If you are not able to log into your user account and you see a message - Your account has been disabled, Please see your system administrator on Windows 10/8/7, follow this solution. You won't be able to access your data unless you have the administrator account access.

Malware can change various settings on your computer. If your computer was under malware attack recently, and it changed the Account is disabled option, you can face this issue. The only solution is to log into your computer using a different administrator account and change the setting. If you do not have a second account, you can enable the in-built hidden administrator account. Enabling this hidden administrator account is very easy when you can log into your account. This article shows how to enable the hidden administrator account using Registry so that you can fix the error immediately.
Your account has been disabled, Please see your system administrator
To resolve the Your account has been disabled, Please see your system administrator issue on Windows 10/8/7 you need to follow these following steps:
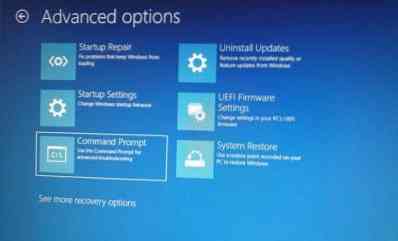
- Open Advanced Boot options
- Open Command Prompt and Registry Editor
- Enable Hidden administrator account
- Remove Account is disabled filter from your user account.
To get started, you need to start your computer and make sure that you are on the error screen. You should find the Power options on your right-hand side. Click this option, press and hold the Shift key, and select Restart. It should open the Advanced Boot Options.
Now, go to Troubleshoot > Command Prompt.
After that, you need to choose your user account. Click on it, and enter the password to open Command Prompt.

After the Command Prompt, open on your screen, type regedit, and hit the Enter button.
Then, select HKEY_LOCAL_MACHINE in the Registry Editor, and go to File > Load Hive.
Next, you need to open your Windows installation drive and go to this location:
Windows\System32\Config
Here you can find a file called SAM. Select it and click the Open button.
Now, you need to enter a Key Name. You can write anything you want. After doing that, navigate to this path:
HKEY_LOCAL_MACHINE\key_name\SAM\Domains\Account\Users
Here you should find a key called 000001F4. Select it, and double-click on the F entry that is visible on your right-hand side.
Now, find out the Value data line named 0038. It should show 11 in the first column. You need to replace it with 10.
After that, click the OK button, and close Registry Editor and Command Prompt to restart your PC.
After doing that, you need to restart your computer and sign in to the Administrator account. Then, open the Computer Management window on your computer. You can search for it in the Taskbar search box. In the Computer Management panel, go to Local Users and Groups > Users. Here you can find all the user accounts. You need to right-click on your defected user account and select Properties.
Remove the tick-mark from the checkbox saying Account is disabled.
That's all!
Now restart your PC, and sign in to the user account as you did earlier.
TIP: This post will help you if you receive a message Your account has been disabled message after exiting Audit mode.


