In this article, I will show you how to use Redis with Node.js. I will be using Node.js 10.x on Debian 9 Stretch in this article. But any modern version of Node.js should work. So, let's get started. To get started you must have the following requirements:
- js and NPM installed on your computer.
- Redis installed on your computer.
You should be able to find articles on installing Node.js and NPM on your desired Linux distribution on LinuxHint.com. I've written a dedicated article on installing Redis on Ubuntu/Debian.
Starting Redis:
You can check whether redis service is running with the following command:
$ sudo systemctl status redisAs you can see, redis service is running.
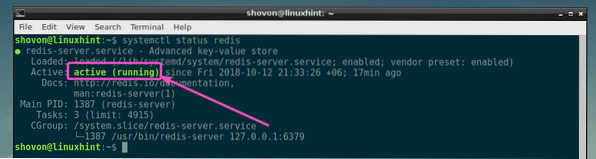
If redis service is not running in your case, start it with the following command:
$ sudo systemctl start redisInitializing the Project Directory:
First, create a project directory (let's call it node-redis) with the following command:
$ mkdir ~/node-redis
Now navigate to the project directory ~/node-redis
$ cd ~/node-redis
Now create a package.json file:
$ npm init -y
Installing Redis Node.js Module:
There are many Redis clients for Node.js. The official website of Redis recommends redis. You can easily install the redis Node.js module using NPM (Node Package Manager).
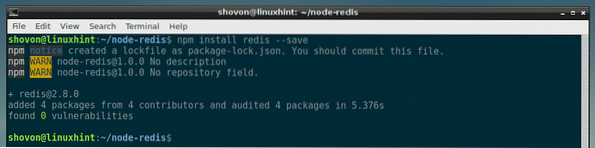
To install redis Node.js module, run the following NPM command:
$ npm install redis --saveredis Node.js module should be installed.
Connecting to Redis using Node.js:
In this section, I am going to show you how to connect to Redis data store using Node.js.
First, create a new file connect.js in your project directory and type in the following commands in it:
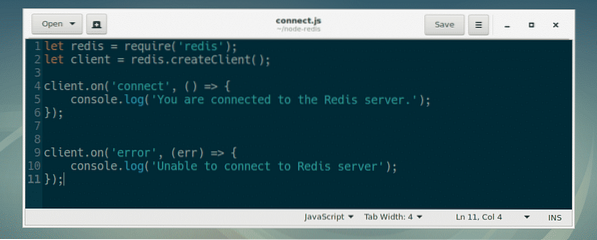
Here, line 1 imports the redis module.
Line 2 creates a Redis client. As I am running Redis on the same computer as the Node.js programs are running, I didn't have to specify the hostname or IP address and port where the Redis server is running. If you're running Redis server on a different computer or server, then you will have to specify it here.
For example, let's say, your Redis server is running on port 6379 on a computer which has the IP address 192.168.10.87, then you would write line 2 as:
let client = redis.createClient(6379, '192.168.10.87');Line 4-6 is used to print a message to the console if we can connect to the Redis server.
Line 9-10 is used to print a message to the console if we are unable to connect to the Redis server.
Now, run the connect.js Node.js script as follows:
$ node connect.jsAs you can see, I am connected to the Redis server.

Storing Data in Redis Using Node.js:
In this section, I will show you how to store data (key-value pairs) in Redis data store with Node.js
First, create set1.js file in your project directory and type in the following lines in it:
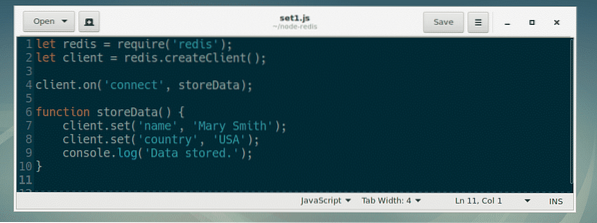
Here, line 1 and 2 are the same as in connect.js.
On line 4, I set the callback function of the connect event to storeData. So, when our Redis client is connected to the Redis server, the function storeData is called.
On line 6-10, the callback function storeData is defined.
On line 7 and 8, I used set(key, value) method of RedisClient object to set the key name and country to value Mary Smith and USA respectively.
Now, run set1.js as follows:
$ node set1.jsAs you can see, the key-value pairs are set.

Retrieving Data from Redis Using Node.js
In this section, I will show you how to retrieve data from Redis data store using Node.js.
First, create a new file get1.js in your project directory and type in the following lines:
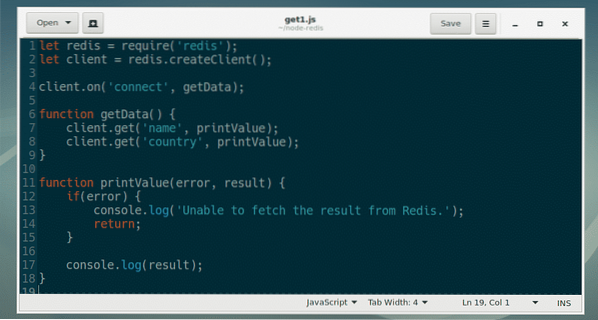
Here, on line 4, getData function is set as a callback function for the connect event of RedisClient.
On line 6-9, the getData function is defined.
On line 7, I called the get(key, callback) method of RedisClient object. name here is the key of the value you want to retrieve. get() method calls the printValue callback function before it finishes running.
On line 11-18, the error first style callback function printValue() is defined. It accepts 2 arguments, error and result. If any error occurs, then it's printed on the console and the function exits. If there's no error, then the value for the certain key is printed on the console.
On line 8, the same thing happens.
Now, run get1.js as follows:
$ node get1.jsAs you can see, the values for the keys name and country is retrieved from the Redis data store.

Storing Objects in Redis with Node.js:
You can store JavaScript objects in Redis data store.
First, create a new file set2.js in your project directory and type in the following lines in it.
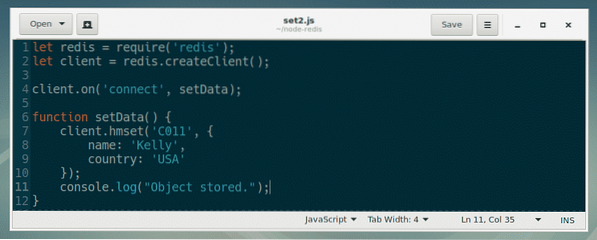
Here, everything is the same as in set1.js file that I already explained earlier. The only difference is, I used client.hmset(key, object) method of RedisClient object in setData() callback function.
In line 7-10, I used client.hmset() method to store a JavaScript object in the Redis data store against the key C011.
Now run set2.js Node.js script as follows:
$ node set2.jsAs you can see, the object is stored.

Retrieving Objects from Redis with Node.js:
In this section, I am going to show you how to retrieve objects from Redis data store.
Fist, create a new file get2.js in your project directory and type in the following lines in it.
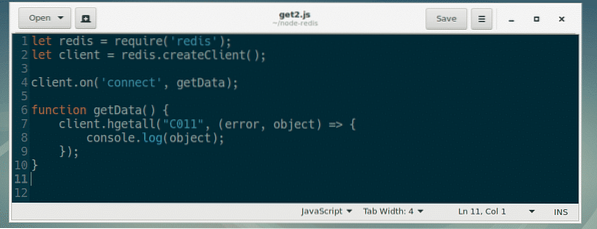
Here, everything is the same as in get1.js script I explained earlier.
You can retrieve a JavaScript object very easily with client.hgetall(key, callback) method of RedisClient as in line 7-9.
Now run get2.js Node.js script as follows:
$ node get2.jsAs you can see, the JavaScript object is retrieved from the Redis data store.

I showed you how to setup Redis with Node.js in this article. Now you should be able to read the redis Node.js module documentation at http://redis.js.org and learn more about it. Thanks for reading this article.


