This feature of the filesystem will save you a lot of disk space and will save you a lot of time that you would have spent compressing your files manually.
In this article, I am going to show you how to enable the Btrfs filesystem-level compression on a Btrfs filesystem. So, let's get started.
Prerequisites:
To try out the examples of this article,
- You must have the Btrfs filesystem installed on your computer.
- You need to have a hard disk or SSD with at least 1 free partition (of any size).
I have a 20 GB hard disk sdb on my Ubuntu machine. I have created 2 partitions sdb1 and sdb2 on this hard disk. I will use the partition sdb1 in this article.
$ sudo lsblk -e7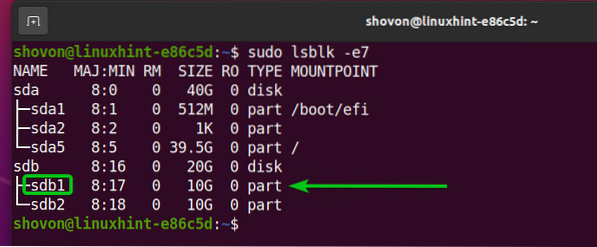
Your hard disk or SSD may have a different name than mine, so will the partitions. So, make sure to replace them with yours from now on.
If you need any assistance installing the Btrfs filesystem on Ubuntu, check my article Install and Use Btrfs on Ubuntu 20.04 LTS.
If you need any assistance installing the Btrfs filesystem on Fedora, check my article Install and Use Btrfs on Fedora 33.
Btrfs Compression Algorithms:
At the time of this writing, the Btrfs filesystem supports the following compression algorithms:
i) LZO: LZO is a lossless real-time block compression algorithm. LZO divides the data into blocks and compresses/decompressed the data by blocks in real-time. It is the default compression algorithm of the Btrfs filesystem.
ii) ZLIB: ZLIB is a library used for data compression. It uses the DEFLATE data compression algorithm. The DEFLATE data compression algorithm is a combination of the LZ77 and Huffman coding algorithms. The Btrfs filesystem supports the ZLIB data compression algorithm.
You can also specify the level of compression you want. The level can be any number from 1 to 9. A higher level indicates a higher compression ratio. So, level 9 will save more disk space than level 1 (level 9 has a higher compression ratio than level 1). Unless you specify a ZLIB level of compression to use, the Btrfs filesystem will use the ZLIB compression level 3 by default.
ZSTD: ZSTD or Zstandard is a high-performance lossless data compression algorithm. It was developed at Facebook by Yann Collect. Its compression ratio is comparable to the DEFLATE algorithm that is used in ZLIB, but it's faster. The Btrfs filesystem supports the ZSTD data compression algorithm.
You can also specify the level of compression you want. The level can be any number from 1 to 15. A higher level indicates a higher compression ratio. So, level 15 will save more disk space than level 1 (level 15 has a higher compression ratio than level 1). Unless you specify a ZSTD level of compression to use, the Btrfs filesystem will use the ZSTD compression level 3 by default.
Creating a Btrfs Filesystem:
To experiment with Btrfs filesystem-level data compression, you need to create a Btrfs filesystem.
To create a Btrfs filesystem with the label data on the sdb1 partition, run the following command:
$ sudo mkfs.btrfs -L data /dev/sdb1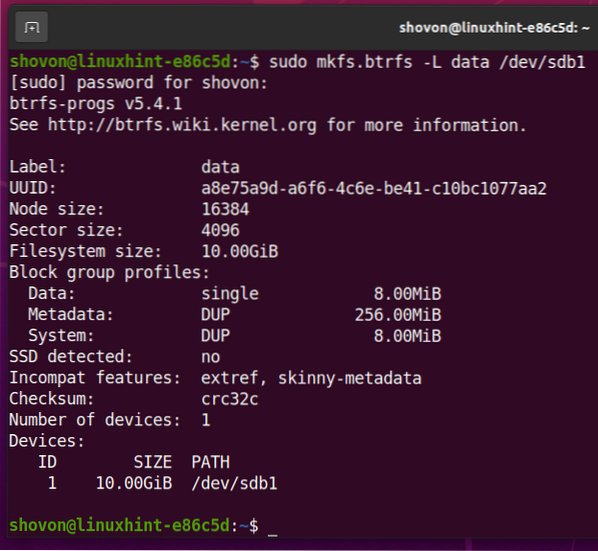
Mount a Btrfs Filesystem with Compression Enabled:
To enable Btrfs filesystem-level compression, you have to mount the Btrfs filesystem you have created on the sdb1 partition with either the compress or compress-force mount option.
i) compress mount option: The compress mount option will simply enable Btrfs filesystem-level compression. The Btrfs filesystem will determine whether compression makes the file that is to be compressed bigger than the original (uncompressed) file size. If compression makes the file size any bigger than the original, then the Btrfs filesystem will not compress that file.
ii) compress-force mount option: Unlike the compress mount option, if the Btrfs filesystem is mounted using the compress-force mount option, then every file on the Btrfs filesystem will be compressed even when compression makes the file bigger.
Create a directory /data with the following command:
$ sudo mkdir -v /data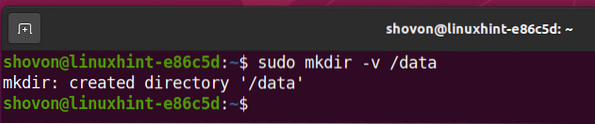
To enable LZO compression, mount the Btrfs filesystem that you've created earlier in the /data directory with the following command:
$ sudo mount -o compress=lzo /dev/sdb1 /data
To enable force LZO compression, mount the Btrfs filesystem that you've created earlier in the /data directory as follows:
$ sudo mount -o compress-force=lzo /dev/sdb1 /data
In the same way, you can mount the Btrfs filesystem in the /data directory as follows to enable ZLIB compression:
$ sudo mount -o compress=zlib /dev/sdb1 /data
To set a ZLIB compression level (let's say, level 7), you can mount the Btrfs filesystem in the /data directory as follows:
$ sudo mount -o compress=zlib:7 /dev/sdb1 /data
To enable ZSTD compression, mount the Btrfs filesystem in the /data directory as follows:
$ sudo mount -o compress=zstd /dev/sdb1 /data
To set a ZSTD compression level (let's say, level 10), you can mount the Btrfs filesystem in the /data directory as follows:
$ sudo mount -o compress=zstd:10 /dev/sdb1 /data
The Btrfs filesystem that you've created on the sdb1 partition should be mounted in the /data directory as you can see in the screenshot below.
$ df -h /data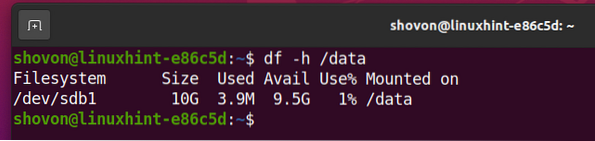
Testing Btrfs Filesystem Compression:
To test whether the Btrfs filesystem compresses the files that are on the Btrfs filesystem, I will mount the Btrfs filesystem on the /data directory with the compress-force option. I will use the highest compression level of the ZSTD compression algorithm for the demonstration.
First, unmount the Btrfs filesystem that you may have mounted on the /data directory as follows:
$ sudo umount /data
Mount the Btrfs filesystem with the highest compression level (level 15) of the ZSTD compression algorithm in the /data directory as follows:
$ sudo mount -o compress-force=zstd:15 /dev/sdb1 /data
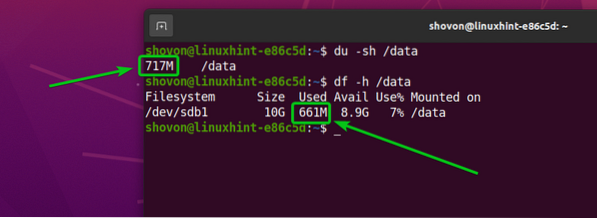
I have copied about 717 MB of data on the Btrfs filesystem mounted on the /data directory. As you can see, only 661 MB is disk space is used on the Btrfs filesystem even though the data stored in the filesystem is 717 MB in size. So, the Btrfs filesystem-level compression is working.
Mounting a Compression Enabled Btrfs Filesystem on Boot:
If you want to mount the Btrfs filesystem automatically at boot time with compression enabled (which you most likely do), then this section is for you.
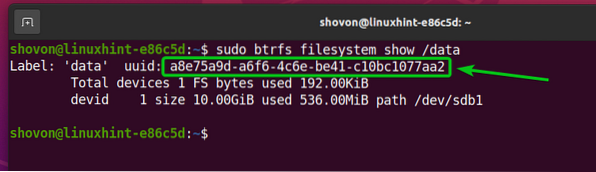
First, find the UUID of the Btrfs filesystem which you want to enable compression and mount automatically at boot time as follows:
$ sudo btrfs filesystem show /data
As you can see, the UUID of the Btrfs filesystem is a8e75a9d-a6f6-4c6e-be41-c10bc1077aa2 in my case. It will be different for you. So, make sure to replace it with yours from now on.
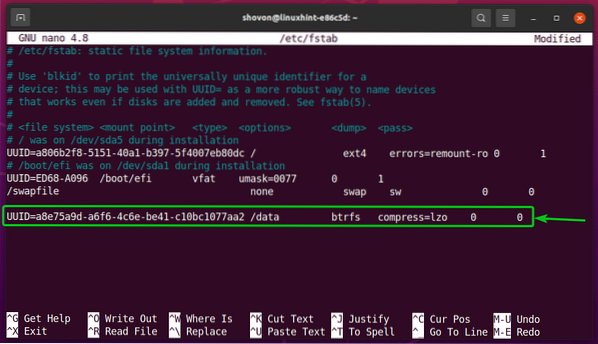
Open the /etc/fstab file with the nano text editor as follows:
$ sudo nano /etc/fstab
Type in the following line at the end of the /etc/fstab file:
UUID=a8e75a9d-a6f6-4c6e-be41-c10bc1077aa2 /data btrfs compress=lzo 0 0NOTE: Replace the UUID of the Btrfs filesystem with yours. Also, change the mount option and compression algorithm as you like.
Once you're done, press
For the changes to take effect, reboot your computer with the following command:
$ sudo reboot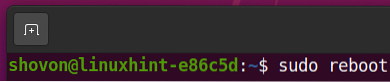
Once your computer boots, the Btrfs filesystem should be mounted in the /data directory as you can see in the screenshot below.
$ df -h /data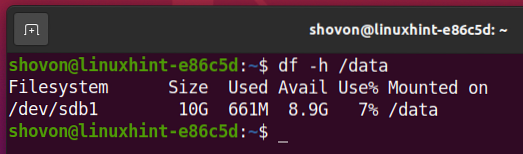
Conclusion:
In this article, I have discussed the compression algorithms supported by the Btrfs filesystem: LZO, ZLIB, and ZSTD. I have also shown you how to enable filesystem-level compression in a Btrfs filesystem.


