ZFS: Concepts and Tutorial
On your quest for data integrity using OpenZFS is unavoidable. In fact, it would be quite unfortunate if you are using anything but ZFS for storing your valuable data. However, a lot of people are reluctant to try it out. Reason being that an enterprise-grade filesystem with a wide range of features built into it, ZFS must be difficult to use and administer. Nothing can be further from truth. Using ZFS is as easy as it gets. With a handful of terminologies, and even fewer commands you are ready to use ZFS anywhere - From the enterprise to your home/office NAS.
In the words of the creators of ZFS: “We want to make adding storage to your system as easy as adding new RAM sticks.”
We will see later on how that is done. I will be using FreeBSD 11.1 to perform the tests below, the commands and underlying architecture are similar for all the Linux distributions that support OpenZFS.
The entire ZFS stack can be laid out in the following layers:
- Storage providers - spinning disks or SSDs
- Vdevs - Grouping of storage providers into various RAID configurations
- Zpools - Aggregation of vdevs into a single storage pools
- Z-Filesystems - Datasets with cool features like compression and reservation.
Zpool create
To begin with lets start with a setup of where we have six 20GB disks ada[1-6]
$ls -al /dev/ada?
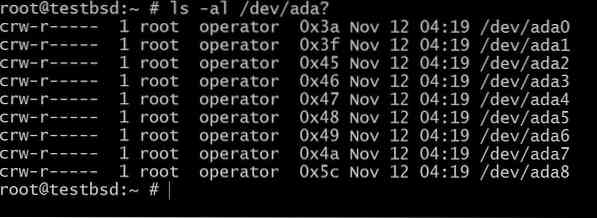
The ada0 is where the operating system is installed. The rest will be used for this demonstration.
The names of your disks may differ depending on the type of interface being used. Typical examples include: da0, ada0, acd0 and cd. Looking inside/devwill give you an idea of what is available.
A zpool is created by zpool create command:
$zpool create OurFirstZpool ada1 ada2 ada3 # And then run the following command: $zpool status
We will see a neat output giving us detailed information about the pool:
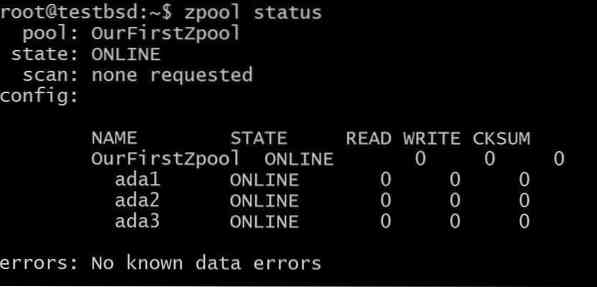
This is the simplest zpool with no redundancy or fault tolerance… Each disk is its own vdev.
However, you will still get all the ZFS goodness like checksums for every data block being stored so you can at least detect if the data you stored is getting corrupted.
Filesystems, a.k.a datasets, can now be created on top of this pool in the following way:
$zfs create OurFirstZpool/dataset1
Now, use your familiar df -h command or run:
$zfs list
To see the properties of your newly created filesystem:

Notice, how the entire space offered by the three disks (vdevs) is available for the filesystem. This will be true for all the filesystems you create on the pool unless we specify otherwise.
If you want to add a new disk (vdev), ada4, you can do so by running:
$zpool add OurFirstZpool ada4
Now, if you see the state of your filesystem

The available size has now grown without any added hassle of growing the partition or backing up and restoring the data on the filesystem.
Virtual Devices - Vdevs
Vdevs are the building blocks of a zpool, most of the redundancy and performance depends on the way in which your disks are grouped into these, so called, vdevs . Lets look at some of the most important types of vdevs:
1. RAID 0 or Stripes
Each disk acts as its own vdev. No data redundancy, and the data spread across all the disks. Also known as striping. A single disk's failure would mean that the entire zpool is rendered unusable. Usable storage is equal to the sum of all available storage devices.
The first zpool that we created in the previous section is a RAID 0 or striped storage array.
2. RAID 1 or Mirror
Data is mirrored between ndisks. The actual capacity of the vdev is limited by the raw capacity of the smallest disk in that n-disk array. Data is mirrored between n disks, this means that you can withstand the failure of n-1 disks.
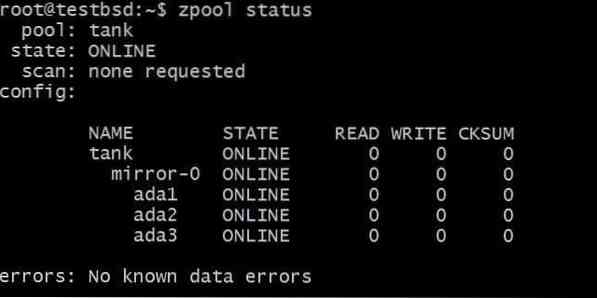
To create a mirrored array use the keyword mirror:
$zpool create tank mirror ada1 ada2 ada3
The data written to tank zpool will be mirrored among these three disks and the actual available storage is equal to the size of the smallest disk, which in this case is about 20 GB.
In the future, you may want to add more disks to this pool, and there are two possible things that you can do. For example, zpool tank has three disks mirroring data as a single vdev mirror-0 :
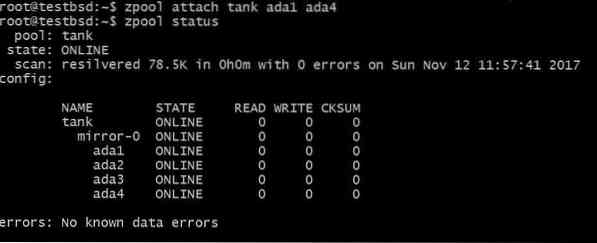
You may want to add extra disk, say ada4, to mirror same the data. This can be done by running the command:
$zpool attach tank ada1 ada4
This would add an extra disk to the vdev which already has the disk ada1 in it, but not increase available storage.
Similarly, you can detach drives from a mirror by running:
$zpool detach tank ada4
On the other hand, you may want to add an extra vdev to increase the capacity of zpool. That can be done using the zpool add command:
$zpool add tank mirror ada4 ada5 ada6
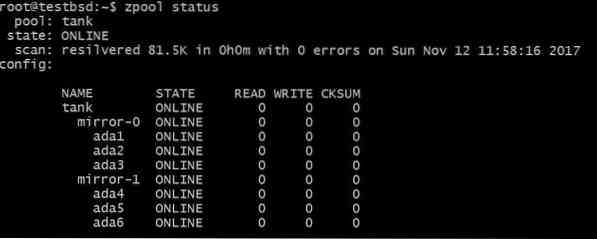
The above configuration would allow data to be striped over vdevs mirror-0 and mirror-1. You can lose 2 disks per vdev, in this case, and your data will still be intact. Total usable space increases to 40GB.
3. RAID-Z1, RAID-Z2 and RAID-Z3
If a vdev is of type RAID-Z1 it must use at least 3 disks and the vdev can tolerate the demise of one only of those disks. RAID-Z configurations don't allow attaching disks directly onto a vdev. But you can add more vdevs, using zpool add, such that the pool's capacity can keep on increasing.
RAID-Z2 would require at least 4 disks per vdev and can tolerate up to 2 disk failure and if the third disk fails before the 2 disks are replaced your valuable data is lost. The same follows for RAID-Z3, which requires at least 5 disks per vdev, with up to 3 disks of failure tolerance before recovery becomes hopeless.
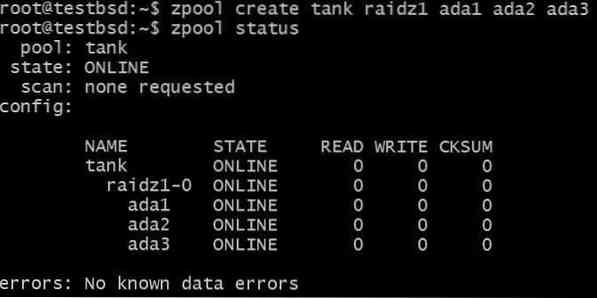
Let's create a RAID-Z1 pool and grow it:
$zpool create tank raidz1 ada1 ada2 ada3
The pool is using three 20GB disks making 40GB of it available to the user.
Adding another vdev would require 3 additional disks:
$zpool add tank raidz1 ada4 ada5 ada6
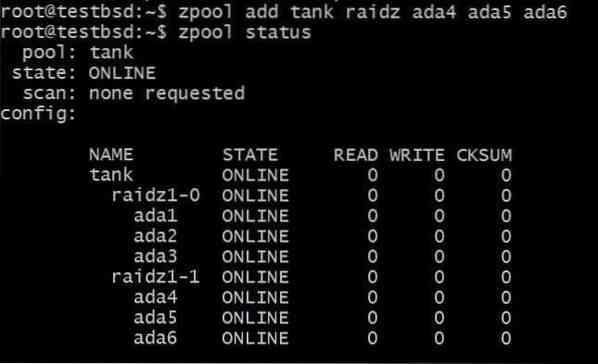
The total usable data is now 80GB and you can lose up to 2 disks (one from each vdev) and still have a hope of recovery.
Conclusion
Now you know enough about ZFS to import all of your data into it with confidence. From here on you can look up various other features that ZFS provides like using high speed NVMes for read and write caches, using built-in compression for your datasets and instead of getting overwhelmed by all the available options just look for what you need for your particular use-case.
Meanwhile there are a few more helpful tips regarding the choice of hardware that you should follow:
- Never ever use hardware RAID-controller with ZFS.
- Error Correcting RAM (ECC) is recommended, but not mandatory
- Data deduplication feature consumes a lot memory, use compression instead.
- Data redundancy is not an alternative for backup. Have multiple backups, store those backups using ZFS!


