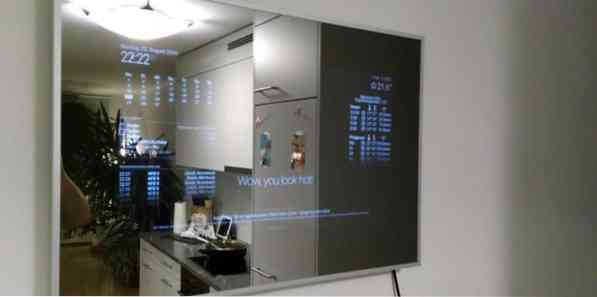
 The Raspberry Pi smart mirror, also known as a magic mirror, is a futuristic digital mirror that displays everything from the current time and date to weather information, scheduled appointments, or the latest news headlines.The chances are that you have seen a Raspberry Pi smart mirror on YouTube or somewhere else on the internet. If so, you probably assumed that putting it together required a lot of time and effort, right? Well, what if we told you that you could create your own Raspberry Pi smart mirror in a day, using the tools you most likely already have at home plus a few parts from eBay or Amazon?
 In this article, we'll walk you through the entire process of building a Raspberry Pi smart mirror step by step and explain how you can customize it to display any information you want.
How to Build a Raspberry Pi Smart Mirror
Building a Raspberry Pi smart mirror wasn't always as easy as it is today. We should all thank Michael Teeuw for creating MagicMirror, an open-source modular smart mirror platform behind most Raspberry Pi smart mirrors you see online.
MagicMirror is an open-source project maintained by a big group of enthusiasts from all around the world, and it contains API that allows third-party developers to build additional modules that extend its functionality.
Besides MagicMirror, there are several other similar software projects, including DAKboard, Makr Mirror, and mirr.OS, but we would not cover them in this article.
What You'll Need for Your Raspberry Pi Smart Mirror
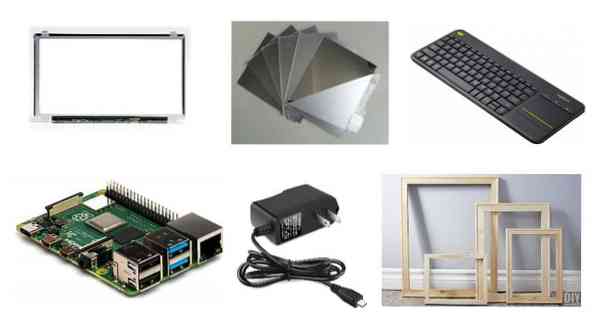
To put together your own Raspberry Pi smart mirror from scratch, you'll need a couple of things:
- Raspberry Pi: Obviously, you'll need a Raspberry Pi. MagicMirror supports the Raspberry Pi 2, 3, and 4, so you have quite a lot of options to choose from. Since MagicMirror has very modest hardware requirements, it doesn't matter which version of the Raspberry Pi you choose. You can also run MagicMirror on Raspberry Pi Zero and Zero W, but their minimal nature somewhat complicates the installation process.
- LCD screen: If you have an old monitor or laptop lying around, you're in luck because you can reuse it for this project. With an old monitor, you simply need to remove the plastic frame (don't touch any of the capacitors inside!), and you're good to go. To use an LCD screen for an old laptop, you also need to get a matching controller board with an HDMI port. Just search the serial number of the screen on eBay, and you should be able to find the right one in no time.
- Two-way mirror: To create the magic mirror illusion, you need to place a two-way mirror in front of the LCD screen so that only bright text and graphics will shine through. Many businesses will happily cut you a two-way mirror of any size, so just look for one online or in your city. Glass two-way mirrors look nicer, but they are considerably more fragile than acrylic two-way mirrors.
- Frame: You wouldn't want to just slap a two-way mirror in front of an LCD screen and call it a day. To make your Raspberry Pi smart mirror display-worthy, you need a pretty frame. If you're handy and have basic woodworking tools, you should be able to create one in under an hour. We recommend you watch this YouTube video by Fix This Build That if you're not sure how to start (just replace all the power tools with hand tools). Alternatively, you can purchase a suitable frame in the store.
- Keyboard and mouse: To set up your Raspberry Pi and install MagicMirror, you'll need a keyboard and mouse. Many Raspberry Pi users swear by the Logitech K400 Plus, which is a wireless keyboard with an integrated touchpad and multimedia keys that let you control your magic mirror remotely.
- HDMI cable and power supply: Last but not least, you won't be able to enjoy your Raspberry Pi smart mirror without a power supply (one for the Raspberry Pi and one for the LCD screen) and HDMI cable.
Step-by-Step Instructions
Do you have everything you need to create your magic mirror? Fantastic! Let's have a look at the process step by step.
Step 1: Set Up Your Raspberry Pi
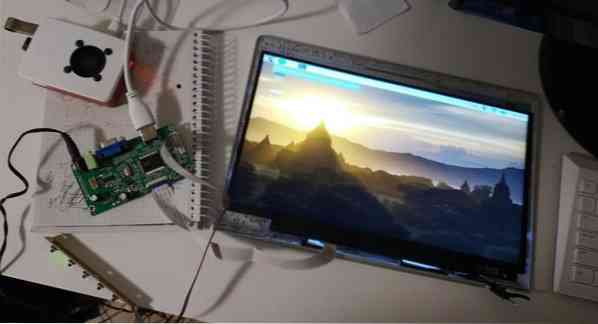
We recommend you start by setting up your Raspberry Pi if you haven't done so already. To avoid difficult-to-troubleshoot bugs and other nasty surprises, make a clean install of the latest version of Raspbian. The official installation guide explains everything you need to know, so we won't go into more detail here.
Boot into Raspbian and connect to the internet. Since you most likely want your Raspberry Pi smart mirror to hang on a wall somewhere, you should connect to your Wi-Fi network by clicking the Wi-Fi symbol in the top right of the screen.
Step 2: Install MagicMirror2
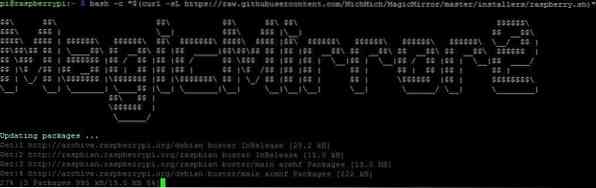
There are two ways to install the latest version of MagicMirror: you can either do it manually or using an automatic installation script. Both of these options are described in great detail on the official website of MagicMirror, but we recommend you make things easier for yourself and go with an automatic installation script.
More specifically, we recommend the automatic installation script created by Sam Detweiler. To execute this script, all you need to do is paste a single command into the terminal window:
# bash -c "$(curl -sL https://raw.githubusercontent.com/sdetweil/MagicMirror_scripts/master/raspberry.sh)"
The script will ask you a few questions during the installation, so make sure to check on its progress once in a while. Don't' forget to restart your Raspberry Pi once MagicMirror has been fully downloaded and installed.
Step 3: Configure MagicMirror2
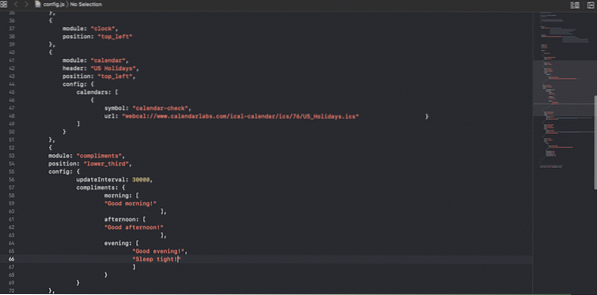
What's so great about MagicMirror is that you completely change its look and behavior. By default, MagicMirror2 ships with the following modules: Clock, Calendar, Current Weather, Weather Forecast, News Feed, Compliments, Hello World, and Alert.
You can customize the default module by editing the following configuration file:
~/MagicMirror/config.jsIf you mess something up, you can simply copy the default configuration file:
$ cd ~/MagicMirror/config$ cp config.js config.js.backup
Keep in mind that you need to restart MagicMirror2 each time you make changes to the configuration file. To do that, either restart your Raspberry Pi or use this command:
$ pm2 restart mmStep 4: Assemble Your Smart Mirror
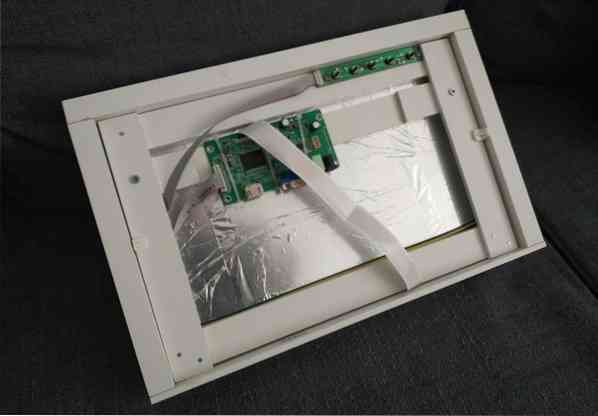
Now that you're Raspberry Pi magic mirror is configured to your liking, you can go ahead and assemble it. Make sure your frame completely covers the bezels of the LCD screen otherwise you would see an unnecessarily large black border, and don't forget to make holes for power cables.
Step 5: Enjoy It!
Congratulations! You've just created your first Raspberry Pi smart mirror. You can now hang it on a wall, connect it to power, and enjoy the fruits of your labor.
A Raspberry Pi smart mirror can become a useful information hub for your home, or it can become a handy dashboard for your next project. Remember that you can always save your current configuration file and start from scratch to give your Raspberry Pi a new life.
Top 10 Best MagicMirror2 Modules
Most MagicMirror users take joy in trying out different third-party modules and tweaking their Raspberry Pi magic mirrors to be even more useful and awe-inspiring than they already are. To help you get the most out of your new smart mirror, we've selected the top 10 best MagicMirror2 modules that you should give a try.
MagicMirror2 modules come with their installation instructions, which typically involve downloading the module from GitHub and then adding it to the modules array in your config.js file.
1. MMM-Admin Interface
Even with a wireless keyboard and mouse, it's not exactly easy to make changes to your Raspberry Pi smart mirror once it's been deployed. This module lets you control and configure your smart mirror remotely from any modern web browser, allowing you to use your wireless keyboard and mouse for something else. The admin interface module is pretty simple to configure as long as you know the IP address of the devices you want to access the mirror's settings from.
2. MMM-PIR-Sensor
As you may know, the Raspberry Pi uses very little power, and you can leave it on around the clock without running up a huge power bill. Still, why waste electricity when you can equip your Raspberry PI smart mirror with a PIR motion sensor and put your mirror to sleep if nobody uses it by turning off HDMI output or by turning off the mirror via a relay? If this sounds interesting to you, make sure to check out this useful module.
3. MMM-SmartTouch
This module can make your Raspberry Pi smart mirror even smarter by transforming it into a touchscreen interactive experience. With a simple tap on the screen, you can hide all magic mirror modules, reveal shutdown and restart buttons and more. To use this module, your Raspberry Pi smart mirror must support touch input or be equipped with an IR frame.
4. MMM-Voice
Wouldn't it be cool if you could control your Raspberry Pi smart mirror with your voice? Well, with this module, you can! What we love about this module is that it works completely offline, which means that your data isn't beamed to servers of some corporations and analyzed for advertising purposes. Since analyzing voice data is a computationally expensive task, it's better to use this module only with the latest version of the Raspberry Pi.
5. MMM-CoinMarketCap
If you're interested in Bitcoin and other cryptocurrencies, you'll probably like the idea of displaying cryptocurrency information on your magic mirror. As its name suggests, the MMM-CoinMarketCap module collects cryptocurrency information from the Coin Market Cap website and displays it in multiple different formats.
6. MMM-GoogleMapsTraffic
Who doesn't hate being stuck in a traffic jam? Using the MMM-GoogleMapsTraffic module, you can display a map of any area with current Google Maps Traffic information and see at a glance just how good or bad the traffic situation is. To use this module, you'll need to obtain an API at Google Developer's page, and you'll also need latitude and longitude coordinates from Google Maps.
7. MMM-AirQuality
In densely populated urban areas, poor air quality has become a major issue, causing terrible respiratory issues in people of all ages. Using this MagicMirror2 module, you can display the current air quality index of a certain location and use this information to decide if it's a good idea to leave your house without a face mask.
8. MMM-AfterShip
Waiting for packages to arrive is no fun, but you can make the wait a bit more tolerable with this MagicMirror2 module and use it to display all parcels from your AfterShip account. To set it up, all you need is your AfterShip API key, which can be found here.
9. MMM-IPCam
It can be surprisingly useful to display a public IP camera on your magic mirror so that you can see the current traffic situation or weather in real-time, and that's exactly where this module comes in. However, there's no reason to limit yourself to public IP cameras because the MMM-IPCam supports password-based authentication.
10. MMM-Reddit
If you're an avid Reddit user, you don't want to miss this module because it lets you show top posts from your favorite subreddit right on your magic mirror. It supports two display types, and you can configure how many posts you want to display.
Is the Raspberry Pi Smart Mirror Worth It?
We think that building a Raspberry Pi smart mirror is worth it! From crafting the frame to configuring the smart mirror itself, the entire process is a wonderful learning experience that lets you use your Raspberry Pi to create a useful conversational piece that you can hang on your wall and enjoy every single day.
If you already have some of the more expensive parts needed for this project, you can have your futuristic mirror for next to nothing. Should you ever get tired of your Raspberry Pi smart mirror, you can easily repurpose it by using it as an external monitor and using your Raspberry Pi for some other project.


