SAR Installation
The SAR command can be installed on your system using the following steps:
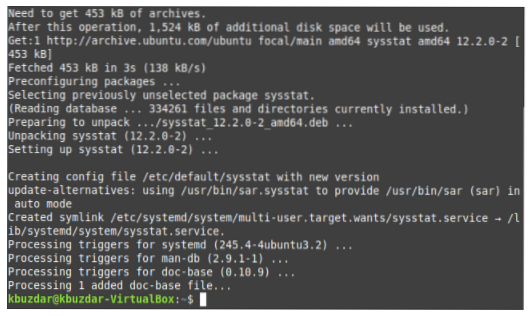
After launching your Linux Mint 20 terminal, execute the command sudo apt install sysstat. The sysstat package in Linux contains the SAR command as well.

It will take a few seconds to install the sysstat package. Then, you will see the messages shown below on your terminal.
Enabling SAR Service
Once the SAR command or the sysstat package has been installed on your Linux Mint 20 system, we need to allow it to collect system activity data by taking the following steps:
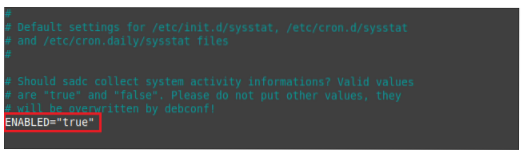
Open the sysstat file in a text editor by running the terminal command sudo nano /etc/default/sysstat. However, we used the nano editor (Linux's default editor) to open this file.

Once the sysstat file is open in the text editor, locate the line (ENABLED=”false”) and replace “false” with “true”, as shown in the image below, to enable the SAR command to collect your system activity data. After enabling this service, save your file and close it by pressing Ctrl+ X.
Restarting the SAR Service
Since we made some changes to the sysstat file, we need to restart our SAR service so that the changes can take effect. To do so, take the following steps:
Run the following command in your terminal to restart the SAR service: service sysstat restart.

When you will run this command, you will be prompted for authentication; enter your account's password and then click the Authenticate button.

Accessing SAR Help
Before using any new command or package, it is useful to read its help manual. For SAR, the help manual can be accessed as follows:
Run the following command in your terminal: sar -help. After executing this command, the syntax of the SAR command, all its variations and all the parameters that can be used with this command will be displayed.
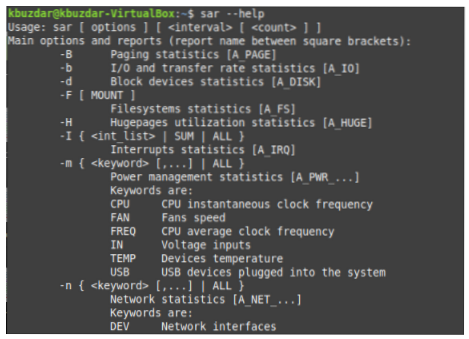
You should carefully read the help manual of the SAR command because it will help you understand its usage.
Next, we will show how the SAR command can be applied in some example scenarios.
Checking Memory Stats
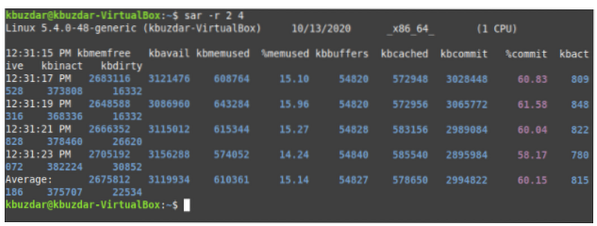
To check memory-related statistics with the SAR command, we must first run the following command in the terminal: sar -r TimeInterval NoOfTimes. The SAR command can be used with the -r flag to check memory-related statistics. Here, TimeInterval specifies the time in seconds after which you want to check your memory statistics, and NoOfTimes specifies how many times you want to check the memory statistics. For this example, we want to check the memory statistics every two seconds until we have checked the statistics four times.

Running this command will show you the memory statistics according to the values of TimeInterval and NoOfTimes, and average values are also provided, as shown in the following image.
Checking CPU Stats
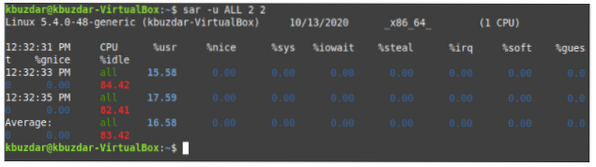
To check the CPU-related statistics with the SAR command, we must first run the following command in our terminal: sar -u ALL TimeInterval NoOfTimes. The SAR command can be used with the -u flag and the ALL keyword to check all CPU-related statistics. Here, TimeInterval specifies the time in seconds after which you want to check your CPU statistics, and NoOfTimes specifies how many times you want to check the CPU statistics. For this example, we want to check the CPU statistics every two seconds until we have checked the statistics twice.

This command will return the CPU statistics according to the values of TimeInterval and NoOfTimes, and average values are also provided.
Checking the CPU Stats of a Specific Core
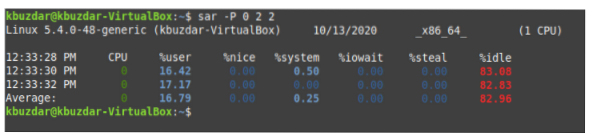
We can check the CPU-related statistics of a specific CPU core with the SAR command by running the following command in our terminal: sar -P CPU_Core TimeInterval NoOfTimes. The SAR command can be used with the -P flag by providing the CPU core (an integer value ranging from 0 to TotalNoOfCores-1) to check the CPU-related statistics of a specific core. Here, TimeInterval specifies the time in seconds after which you want to check your CPU statistics, and NoOfTimes specifies how many times you want to check the CPU statistics of the specified core.
For this example, we want to check the CPU statistics every two seconds until we have checked the first CPU core twice. It is important to note that CPU_Core numbering starts from 0. Therefore, the first core is referred to as 0, the second core is referred as 1, etc.

Running this command will show you the CPU statistics for the first core according to the values of TimeInterval and NoOfTimes, and average values are also provided.
Checking I/O Stats
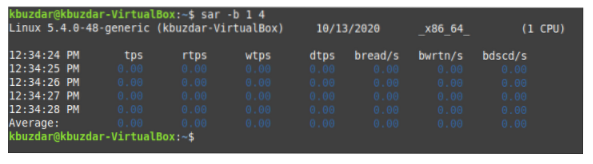
To check I/O-related statistics with the SAR command, we must first run the following command in our terminal: sar -b TimeInterval NoOfTimes. The SAR command can be used with the -b flag to check all the I/O-related statistics. Here, TimeInterval specifies the time in seconds after which you want to check your I/O statistics, and NoOfTimes specifies how many times you want to check the I/O statistics. For this example, we want to check the I/O statistics every second until we have checked the statistics four times.

Running this command will show you the I/O statistics according to the values of TimeInterval and NoOfTimes, and average values are also provided.
Checking Swap Memory Stats
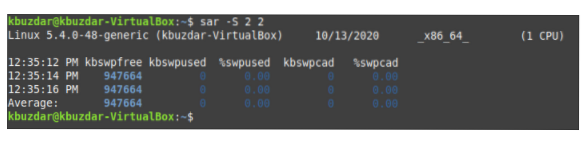
The swap memory is defined as the memory that can be borrowed from the hard disk when your RAM runs out of space. To check the swap memory-related statistics with the SAR command, we must first run the following command in our terminal: sar -S TimeInterval NoOfTimes. The SAR command can be used with the -S flag to check the swap memory-related statistics. Here, TimeInterval specifies the time in seconds after which you want to check your swap memory statistics, and NoOfTimes specifies how many times you want to check the swap memory statistics. For this example, we want to check the swap memory statistics every two seconds until we have checked the statistics twice.

Running this command will show you the swap memory statistics according to the values of TimeInterval and NoOfTimes, and average values are also provided.
Checking Disk Stats
The I/O statistics contain the information related to the input and output devices. However, if you want to check only the disk-related statistics with the SAR command, then you must first run the following command in the terminal: sar -d TimeInterval NoOfTimes. The SAR command can be used with the -d flag to check all the disk-related statistics. Here, TimeInterval specifies the time in seconds after which you want to check your disk statistics, and NoOfTimes specifies how many times you want to check disk statistics. For this example, we want to check disk statistics every two seconds until we have checked the statistics twice.

Running this command will show you the disk statistics according to the values of TimeInterval and NoOfTimes, and average values are also provided.

Checking Disk Names
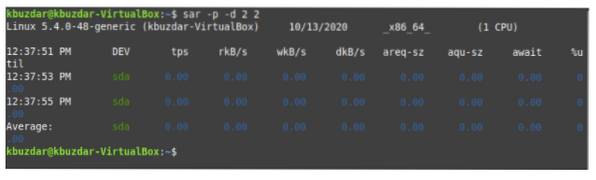
This task is variation of that described above. Here, we check all the disk names by runing the following command in our terminal: sar -p -d TimeInterval NoOfTimes. SAR can be used with the -p and -d flags to check all the disk names. Here, TimeInterval specifies the time in seconds after which you want to check your disk names, and NoOfTimes specifies how many times you want to check the disk names. For this example, we want to check the disk names every two seconds until we have checked the statistics twice.

Running this command will show you all the disk names according to the values of TimeInterval and NoOfTimes, and average values are also provided.
Checking Network Stats
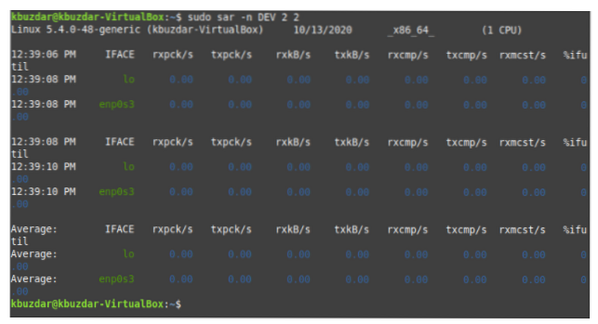
To check all network-related statistics with the SAR command, we must first run the following command in our terminal: sudo sar -n DEV TimeInterval NoOfTimes. The SAR command can be used with sudo privileges and the -n flag, and the DEV keyword is used to check all the network-related statistics. Here, TimeInterval specifies the time in seconds after which you want to check your network statistics, and NoOfTimes specifies how many times you want to check the network statistics. For this example, we want to check the network statistics every two seconds until we have checked the statistics twice.

Running this command will show you the network statistics according to the values of TimeInterval and NoOfTimes, and average values are also provided.
Checking Context Switching Stats
Context switching is important in all operating systems because it enables your CPU to multitask by saving the current state of a process and allowing another process to be executed, and it can prevent conflicts and data loss. Once the execution of one process is complete, the previous process can be resumed based on the saved state.
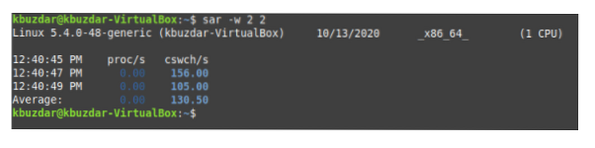
To check all the context switching statistics with the the SAR command, we must first run the following command in our terminal: sar -w TimeInterval NoOfTimes. The SAR command can be used with the -w flag to check all the context switching statistics. Here, TimeInterval specifies the time in seconds after which you want to check your context switching statistics, and NoOfTimes specifies how many times you want to check the context switching statistics. For this example, we want to check the context switching statistics every two seconds until we have checked the statistics twice.

Running this command will show you the context switching statistics according to the values of TimeInterval and NoOfTimes, and average values are also provided.
Checking Paging Stats
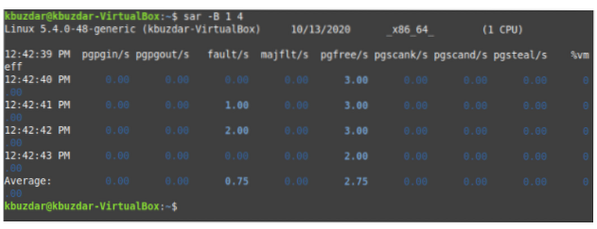
Paging is used in operating systems for memory management. It handles how data are stored and retrieved on the hard disk and how they are brought to and used in the main memory. To check all paging-related statistics, we must run the following command in our terminal: sar -B TimeInterval NoOfTimes. The SAR command can be used with the -B flag to check the paging-related statistics. Here, TimeInterval specifies the time in seconds after which you want to check your paging statistics, and NoOfTimes specifies how many times you want to check the paging statistics. For this example, we want to check the paging statistics every second until we have checked the statistics four times.

Running this command will show you the paging statistics according to the values of TimeInterval and NoOfTimes, and average values are also provided.
Saving SAR Stats in a File
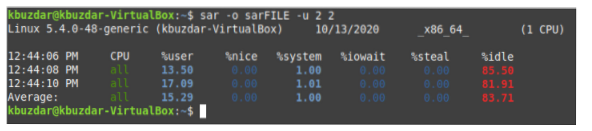
You can save the output of the SAR command for later use by running the following command in your terminal: sar -o FileName -u TimeInterval NoOfTimes. The SAR command can be used with the -o flag and any other flag (according to the statistics you want to generate) along with a file name to save the result of your SAR command to a file. Here, TimeInterval specifies the time in seconds after which you want to save your SAR command output, and NoOfTimes specifies how many times you want to save the SAR command output. For this example, we want to save the CPU statistics (as indicated by the -u flag) every two seconds in a file named sarFILE until we have saved the statistics twice.

Running this command will show you the CPU statistics according to the values of TimeInterval and NoOfTimes, and average values are also provided. Moreover, it will save this output to a file.
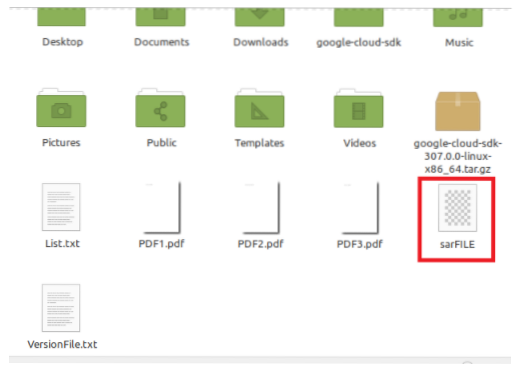
To verify if such a file has been created, you can visit your Home directory by clicking on the File Manager icon. Here, you will find sarFILE, as highlighted in the image shown below.
Retrieving Past SAR Stats from a File
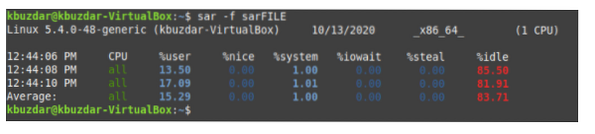
To use the SAR stats you saved to a file, you can run the following command in our terminal: sar -f FileName. Here, we want to retrieve the contents of sarFILE.

Running this command will display the contents of sarFILE on your terminal, as shown in the following image. You can verify that this content is the same as that from above.
Conclusion
This tutorial went over a handful of simple scenarios in which the SAR command can be used. However, there are many other (more complex) scenarios in which this command can be used effectively. We hope you found this article to be a useful introduction to the SAR command in Linux Mint 20.


