If you want to turn off notifications from specific apps using Registry Editor, here is how you can do that. While it is possible to disable Notifications for an App via Settings, you can do the same via Registry Editor in Windows 10.
Apps often show notifications in the Action Center whenever something new happens, like receiving a new email, getting a Skype message, etc. Although it helps us know about the latest happenings, it could distract you while working from home. If that situation arises, you can block a certain app from showing notifications, allowing you to concentrate on your work. The good news is that you can turn off notifications from a specific app using Registry Editor. In other words, you can follow this method whether you are using Windows 10 Home, Professional, or Enterprise Edition.
As you are about to change Registry values, it is recommended to create a System Restore point to be on the safe side.
Turn off App Notifications using Registry Editor in Windows 10
To turn off notifications from specific apps using Registry Editor, follow these steps-
- Search for regedit in the Taskbar search box.
- Click on Registry Editor in the search result.
- Click on the Yes button.
- Navigate to Settings in HKEY_CURRENT_USER.
- Expand the desired app's key.
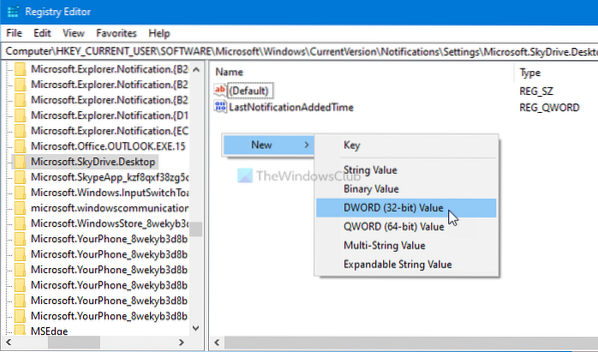
- Right-click on empty space > New > DWORD (32-bit) Value.
- Name it as Enabled.
- Keep the Value data as 0.
To learn more about these steps in detail, continue reading.
At first, you need to open Registry Editor on your computer. For that, you can search for “regedit” in the Taskbar search box and click on the Registry Editor in the search result. After that, it shows the UAC prompt. If so, click on the Yes button to get the Registry Editor on your PC.
Next, navigate to the following path-
HKEY_CURRENT_USER\SOFTWARE\Microsoft\Windows\CurrentVersion\Notifications\Settings
In the Settings key, you can find some sub-keys representing the apps available for you.
For example, Microsoft.WindowsStore_8wekyb3d8bbwe!App represents Microsoft Store whereas Microsoft.SkyDrive.Desktop represents the OneDrive app.
You have to check the name of the key to find out the app and select it.
Following that, right-click on empty space, select New > DWORD (32-bit) Value to create a REG_DWORD value, and name it as Enabled.
By default, it comes with a Value data of 0, and you need to keep it that way to turn off notifications from the selected app.

After that, you need to follow the same steps to create the Enabled REG_DWORD value inside each app's key to disable notifications in Windows 10.
In case you want to start receiving notifications, you can navigate to the same path, right-click on the Enabled REG_DWORD value, select the Delete option, and click on the Yes button.
That's all!
Now read: How to hide number of new Notifications in Action Center in Windows 10.


