Installing Nginx:
Nginx is available in the official package repository of CentOS 8. So, it's very easy to install.
First, update the DNF package repository cache as follows:
$ sudo dnf makecache
Now, install Nginx with the following command:
$ sudo dnf install nginx
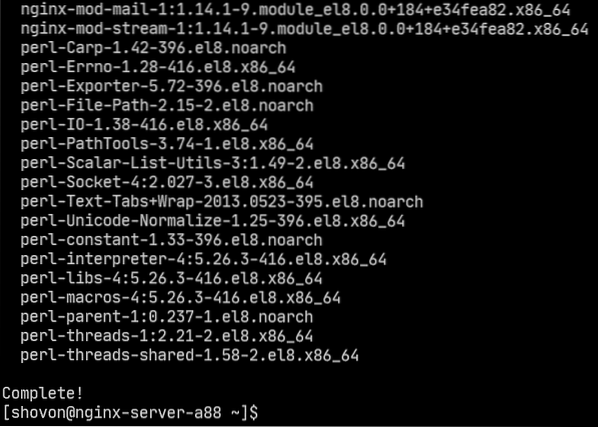
To confirm the installation, press Y and then press

Nginx should be installed.
Managing the nginx Service:
By default, nginx service should be inactive (not running) and disabled (won't automatically start on boot).
$ sudo systemctl status nginx
You can start the nginx service as follows:
$ sudo systemctl start nginx
nginx service should be running.
$ sudo systemctl status nginx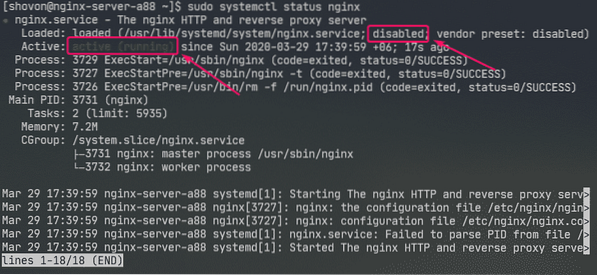
Now, add nginx service to the system startup as follows:
$ sudo systemctl enable nginx
Configuring the Firewall:
You must configure the firewall to allow access to the HTTP port 80 and HTTPS port 443 in order to access the Nginx web server from other computers on the network.
You can allow access to the HTTP and HTTPS port with the following command:
$ sudo firewall-cmd --add-service=http,https --permanent
Now, for the changes to take effect, run the following command:
$ sudo firewall-cmd --reload
Testing the Web Server:
You must know the IP address or domain name of the Nginx web server in order to access it.
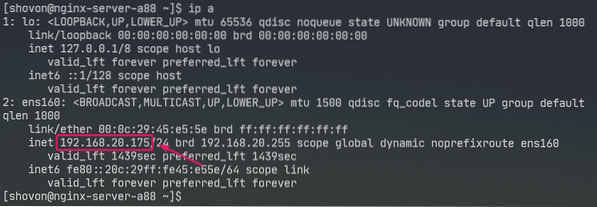
You can find the IP address of your Nginx web server with the following command:
$ ip aIn my case, the IP address is 192.168.20.175. It will be different for you. So, make sure to replace it with yours from now on.
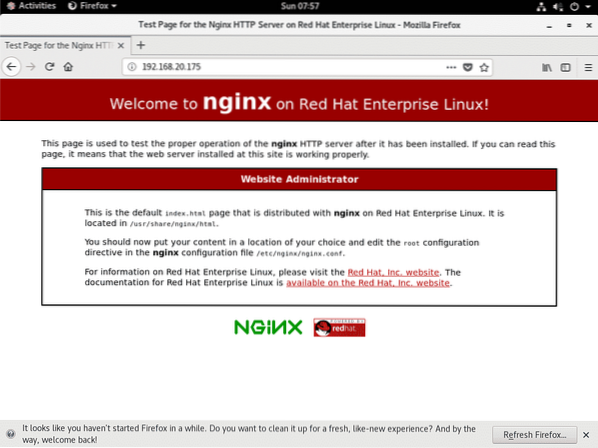
Now, visit http://192.168.20.175 from your web browser. You should see the following page. It means Nginx web server is working.
Configuration Files of nginx:
Nginx web server configuration files are in the /etc/nginx/ directory.
$ tree /etc/nginx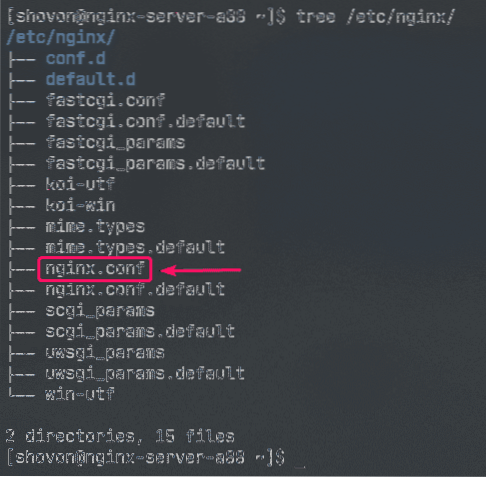
/etc/nginx/nginx.conf is the main Nginx configuration file.
The default web root directory of Nginx web server is /usr/share/nginx/html/. So, this is where you should keep your website files.
Setting up a Basic Web Server:
In this section, I am going to show you how to set up a basic Nginx web server.
First, take a backup of original Nginx configuration file with the following command:
$ sudo mv -v /etc/nginx/nginx.conf /etc/nginx/nginx.conf.original
Now, create a new Nginx configuration file as follows:
$ sudo nano /etc/nginx/nginx.conf
Now, type in the following lines in the /etc/nginx/nginx.conf file and save the file.
user nginx nginx;worker_processes auto;
error_log /var/log/nginx/error.log;
pid /run/nginx.pid;
events
worker_connections 1024;
http
include /etc/nginx/mime.types;
default_type application/octet-stream;
server
listen 80;
server_name example.com www.example.com;
root /usr/share/nginx/html;
index index.html;
access_log /var/log/nginx/access.log;
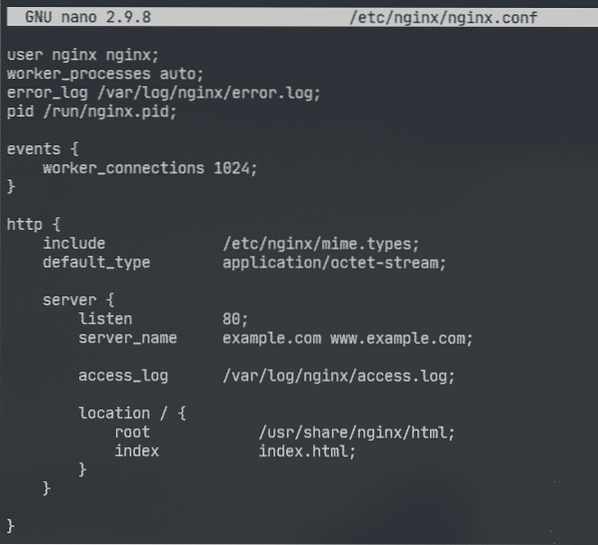
Here, user option is used to set the Nginx run user and group to nginx respectively.
The error_log option is used to set the error log file path to /var/log/nginx/error.log. This is where errors related to the Nginx server will be stored.
The main Nginx server configuration is defined in the server section inside the http section. You can define more than one server section inside the http section if needed.
In the server section,
listen option is used to configure Nginx to listen to port 80 (HTTP port) for web requests.
server_name option is used to set one or more domain names for the Nginx web server. If your DNS settings are correct, you can access Nginx web server using these domain names.
access_log is used to set the access log file path to /var/log/nginx/access.log. When someone tries to access the Nginx web server, the access information (i.e. IP address, URL, HTTP status code) will be logged to this file.
The location option is used to set the root directory of the Nginx web server.
Here, the root directory is /usr/share/nginx/html/.
This is where all the website files should be kept. The index option sets index.html as the default file to serve if no specific file is requested. For example, if you visit http://192.168.20.175/myfile.html , then you Nginx will return myfile.html file. But, if you visit http://192.168.20.175/, then Nginx will send you index.html file as no specific file was requested.
Now, remove all the files from the /usr/share/nginx/html/ directory (web root) as follows:
$ sudo rm -rfv /usr/share/nginx/html/*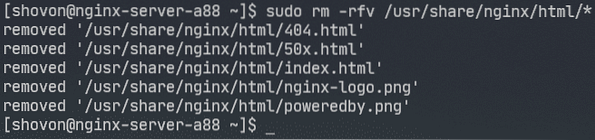
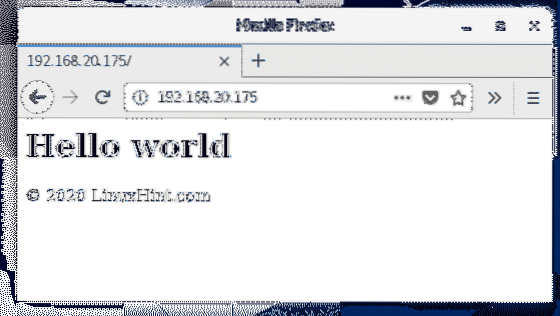
Now, create a new index.html file in the /usr/share/nginx/html/ directory as follows:

Now, type in the following lines in index.html file and save the file.
Hello world
© 2020 LinuxHint.com

Now, restart nginx service as follows:
$ sudo systemctl restart nginx
Now, visit http://192.168.20.175 from your web browser and you should see the following page. Congrats! You've set up your first Nginx web server.
Configuring Error Pages:
You can configure error pages in Nginx. For example, if a page/file/directory is not available, HTTP status code 404 will be returned to the browser. You can set a custom HTML error page for the HTTP status code 404 which will be returned to the browser.
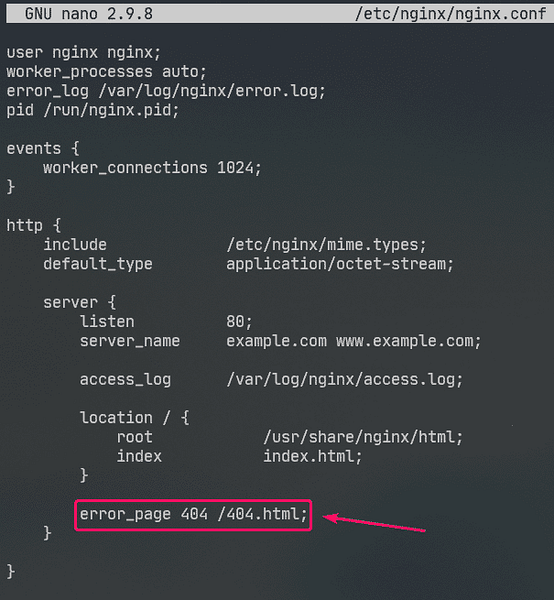
To do that, add the following line in the server section of nginx.conf file.
server…
error_page 404 /404.html;
…
Now, create a file 404.html in the Nginx web root /usr/share/nginx/html/ as follows:
$ sudo nano /usr/share/nginx/html/404.html
Now, type in the following lines in 404.html and save the file.
Error 404
Page not found
© 2020 LinuxHint.com

Now, restart nginx service as follows:
$ sudo systemctl restart nginx
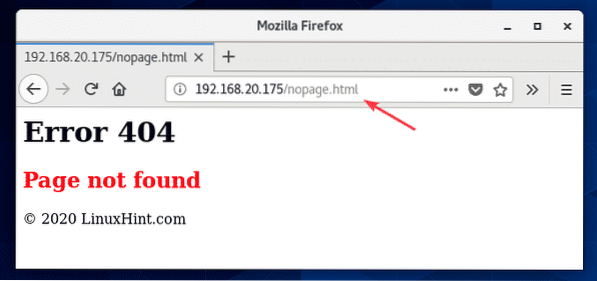
Now, try to access a non-existent path (http://192.168.20.175/nopage.html) and you should see the following error page.
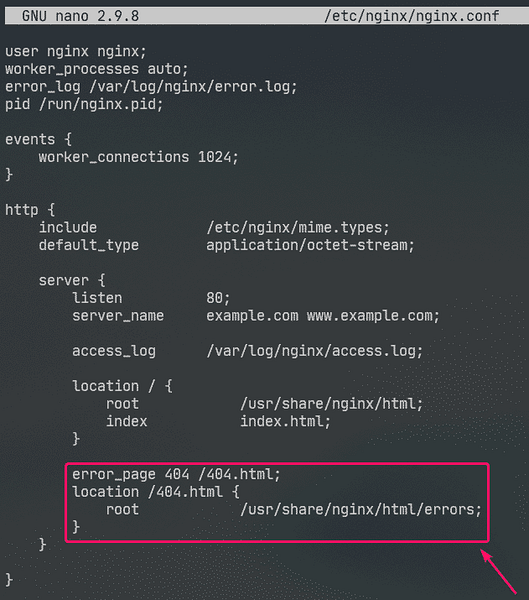
If the 404.html file is in a different filesystem path (let's say /usr/share/nginx/html/errors/ directory), you can map the URL /404.html to it as follows:
server…
error_page 404 /404.html;
location /404.html
root /usr/share/nginx/html/errors;
…
Now, make a new directory /usr/share/nginx/html/errors/ as follows:
$ sudo mkdir /usr/share/nginx/html/errors
Now, create a new file 404.html in the directory /usr/share/nginx/html/errors/ as follows:
$ sudo nano /usr/share/nginx/html/errors/404.html
Now, type in the following lines in the 404.html file and save the file.
PAGE NOT FOUND
GO BACK HOME

Now, restart nginx service as follows:
$ sudo systemctl restart nginx
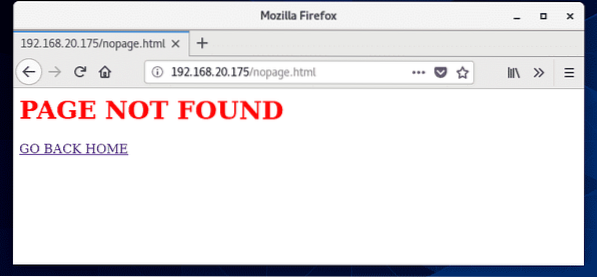
Now, try to access a non-existent path (http://192.168.20.175/nopage.html) and you should see the updated error page.
The same way, you can set error page for other HTTP status codes.
You can also set the same error page for multiple HTTP status codes. For example, to set the same error page /404.html for the HTTP status codes 403 and 404, write the error_page option as follows:
error_page 403 404 /404.html;Configuring Logs:
In Nginx, the error_log and access_log options are used for logging error messages and access information.
The format of the error_log and access_log options are:
error_log /path/to/error/log/file [optional:custom-log-name];access_log /path/to/access/log/file [optional:custom-log-name];
You can define your own error log and access log formats if you want.
To do that, use the log_format option in the http section to define your custom log format as follows.
http…
log_format simple '[$time_iso8601] $request_method $request_uri '
'[$status] ($request_time) -> $bytes_sent bytes';
…
server
…
access_log /var/log/nginx/access.log simple;
…
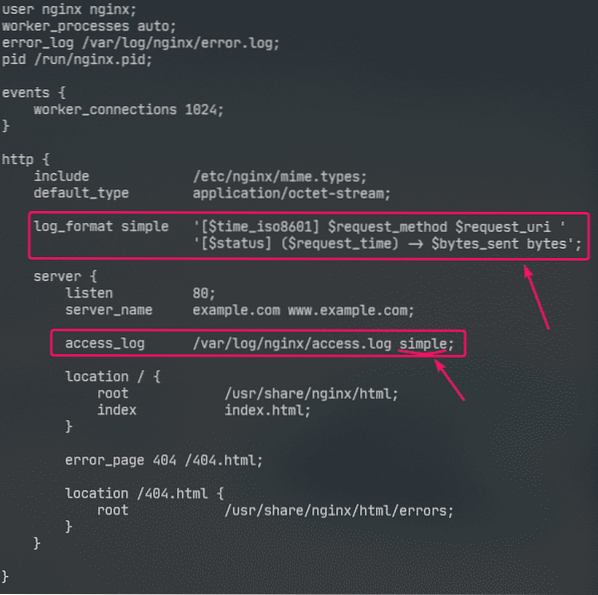
Here, the log format name is simple. Some nginx variables are used to define the custom log format. Visit the Nginx Embedded Variables Manual to learn about all the Nginx variables.
The custom log format should be enclosed in single quotes. The log format can be defined in a single line or in a multiple lines. I've shown how to define the log format in multiple lines in this article. You won't have any trouble with single line log format, trust me!
Once the log format simple is defined, access_log option is used to tell Nginx to use it as access log.
The same way, you can set a custom error log format using the error_log option.
I've only configured custom log format for the access log in this article.
Now, restart nginx service as follows:
$ sudo systemctl restart nginx
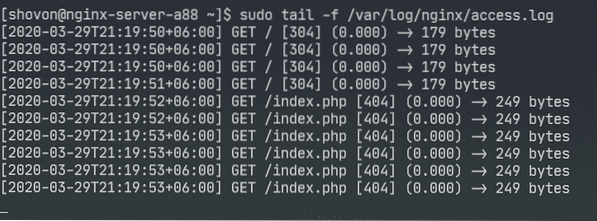
Now, you can monitor the access log file as follows:
$ sudo tail -f /var/log/nginx/access.log
You can also monitor the error log file as follows:
$ sudo tail -f /var/log/nginx/error.log
If you want, you can monitor the access log and error log files at the same time as follows:
$ sudo tail -f /var/log/nginx/error,access.log
As you can see, the new access log format is being used.
Denying Access to Certain Paths:
You can use regular expressions to match certain URI paths and deny access to it in Nginx.
Let's say, your website is managed by Git, and you want to deny access to the .git/ directory on your web root.
To do that, type in the following lines in the server section of /etc/nging/nginx.conf file:
server…
location ~ \.git
deny all;
…
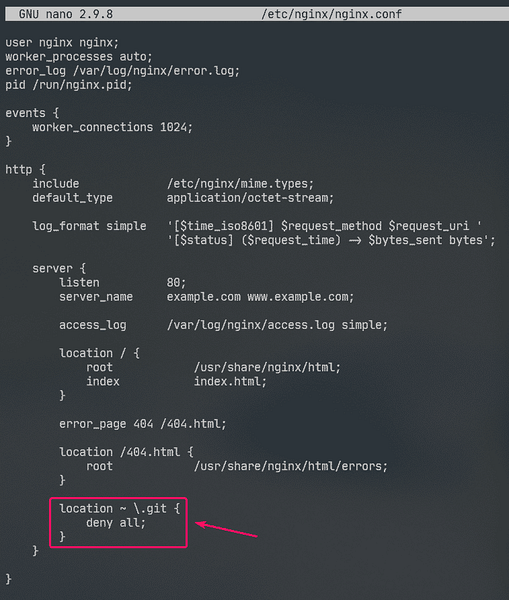
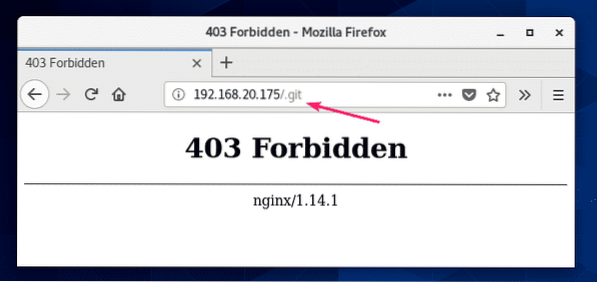
As you can see, access to any path that contains .git is denied.
Configuring Compression:
You can compress web contents before sending them to the browser using gzip to save bandwidth usage of the Nginx web server.
I have some JPEG images in the /usr/share/nginx/html/images/ directory.
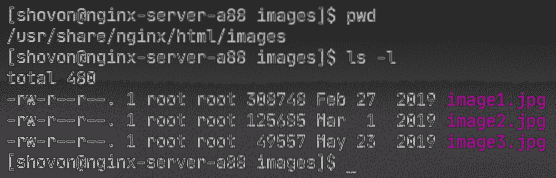
I can access these images using the URI path /images.
To enable gzip compression for only the JPEG images in the URI path /images, type in the following lines in the server section of /etc/nginx/nginx.conf file.
server…
location /images
gzip on;
gzip_comp_level 9;
gzip_min_length 100000;
gzip_types image/jpeg;
…
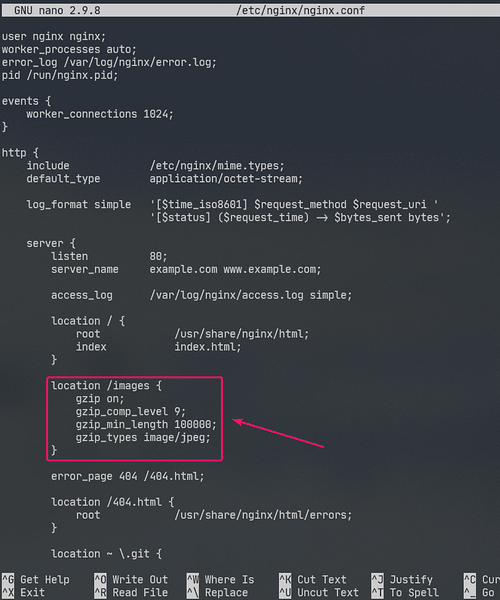
Here, gzip_comp_level is used to set the compression level. It can be any number from 1 to 9. The higher the level, the smaller the compressed file will be.
The file will only be compressed if the size of the file is above gzip_min_length. I've set it to about 100 KB in this example. So, JPEG files smaller than 100 KB won't be gzip compressed.
The gzip_types is used to set the mime type of the files that will be compressed.
You can find mime type from file extensions as follows:
$ grep jpg /etc/nginx/mime.typesAs you can see, for .jpg or .jpeg file extension, the mime type is image/jpeg.

You can set one or more mime types using gzip_types option.
If you want to set multiple mime types, then make sure to separate them with spaces as follows:
"gzip_types image/jpeg image/png image/gif;
Now, restart nginx service as follows:
$ sudo systemctl restart nginx
As you can see, Nginx sends gzip compressed image files to the browser when requested.

As you can see in the screenshot below, the gzip compressed file is smaller than the original file.
$ sudo tail -f /var/log/nginx/access.log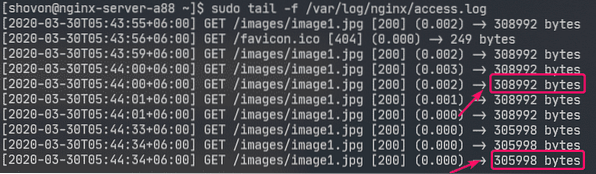
Enabling HTTPS:
You can enable SSL in Nginx very easily. In this section, I am going to show you how to set self-signed SSL certificate in Nginx.
First, navigate to the /etc/ssl/ directory as follows:
$ cd /etc/ssl
Now, generate an SSL key server.key and certificate server.crt with the following command:
$ sudo openssl req -x509 -nodes -days 365 -newkey rsa:2048 -keyoutserver.key -out server.crt

NOTE: You must have openssl installed for this to work. If openssl command is unavailable, install openssl with the following command:
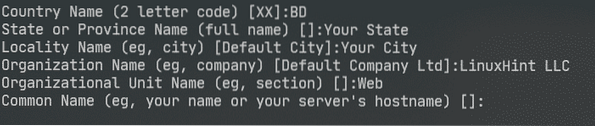
$ sudo dnf install openssl -yNow, type in your 2-letter country code (i.e. US for USA, UK for United Kingdom, RU for Russia, CN for China) and press
Now, type in your State/Province name and press

Now, type in your City name and press

Now, type in your Company name and press

Now, type in the organizational unit name of your company which will use this certificate and press

Now, type in the fully qualified domain name (FQDN) of your Nginx web server and press
Now, type in your email address and press
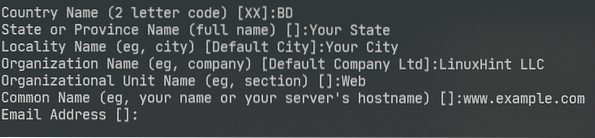
Your SSL certificate should be ready.
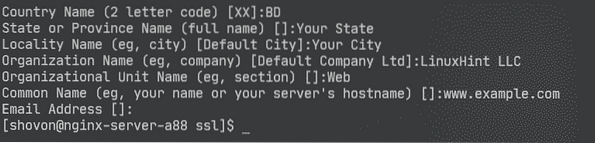
The SSL certificate and key should be generated in the /etc/ssl/ directory.
$ ls -lh
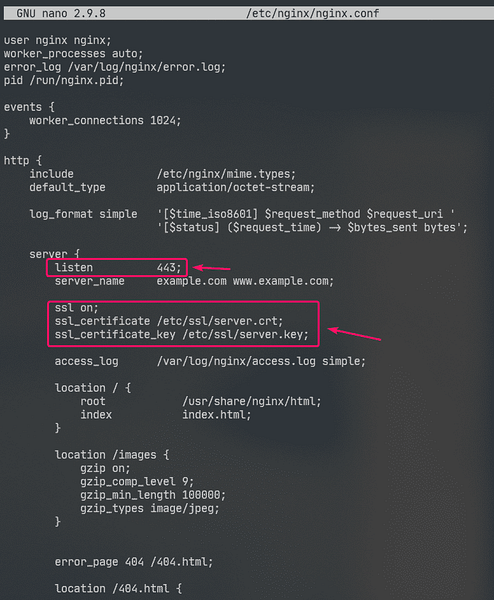
Now, open the Nginx configuration file /etc/nginx/nginx.conf and change listen port to 443 and type in the following lines in the server section.
server…
ssl on;
ssl_certificate /etc/ssl/server.crt;
ssl_certificate_key /etc/ssl/server.key;
…
Now, restart nginx service as follows:
$ sudo systemctl restart nginx
In real life, you will have correct DNS setup. But for testing purpose, I've configured local file-based domain name on the computer I've used to access the Nginx web server from.
If you want to follow along, open the /etc/hosts file as follows:
$ sudo nano /etc/hosts
Then, add the following line to the /etc/hosts file.
192.168.20.175 www.example.com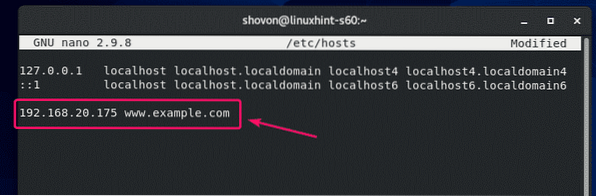
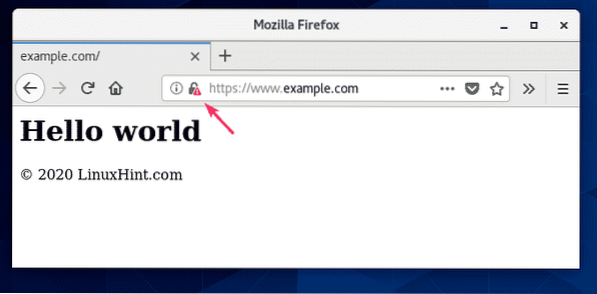
Now, try to visit https://www.example.com and you should see the following page. You will see Your connect is not secure message because it is a self-signed certificate. This is good for testing purpose only.
In real life, you will be buying SSL certificates from Certificate Authorities (CAs) and use them. So, you won't see this type of message.

As you can see, Nginx served the web page over HTTPS. So, SSL is working.
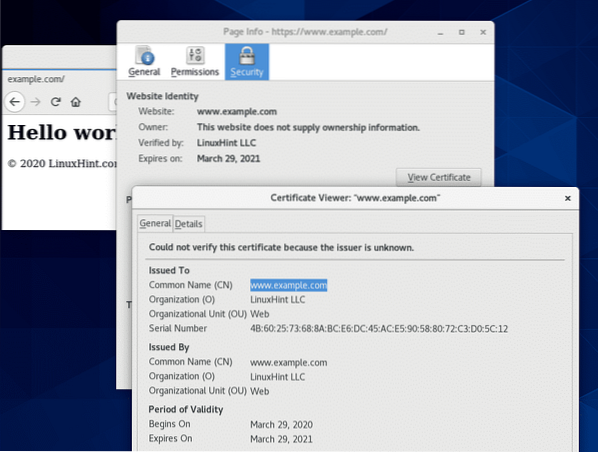
The SSL information of www.example.com.
Redirecting HTTP Requests to HTTPS:
If someone visits your website over HTTP protocol (http://www.example.com or http://192.168.20.175) instead of HTTPS (https://www.example.com), you don't want to reject the HTTP request. If you do that, you will lose a visitor. What you really should do is redirect the user to the SSL enabled site. It is really simple to do.
First, open the Nginx configuration file /etc/nginx/nginx.conf and create a new server section inside the http section as follows:
http…
server
listen 80;
server_name www.example.com;
return 301 https://www.example.com$request_uri;
…
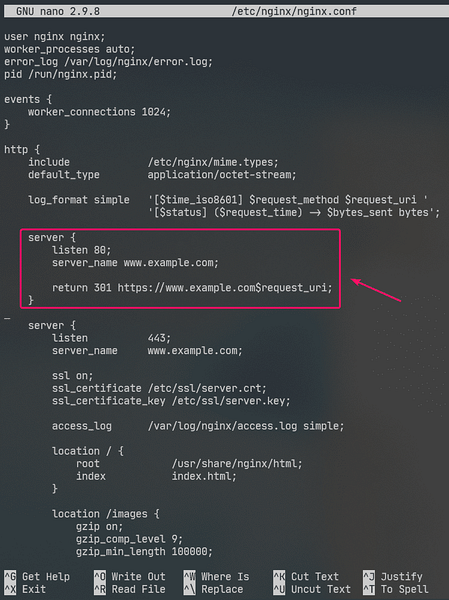
This is the final /etc/nginx/nginx.conf file:
user nginx nginx;worker_processes auto;
error_log /var/log/nginx/error.log;
pid /run/nginx.pid;
events
worker_connections 1024;
http
include /etc/nginx/mime.types;
default_type application/octet-stream;
log_format simple '[$time_iso8601] $request_method $request_uri '
'[$status] ($request_time) -> $bytes_sent bytes';
server
listen 80;
server_name www.example.com;
return 301 https://www.example.com$request_uri;
server
listen 443;
server_name www.example.com;
ssl on;
ssl_certificate /etc/ssl/server.crt;
ssl_certificate_key /etc/ssl/server.key;
access_log /var/log/nginx/access.log simple;
location /
root /usr/share/nginx/html;
index index.html;
location /images
gzip on;
gzip_comp_level 9;
gzip_min_length 100000;
gzip_types image/jpeg;
error_page 404 /404.html;
location /404.html
root /usr/share/nginx/html/errors;
location ~ \.git
deny all;
Now, restart nginx service as follows:
$ sudo systemctl restart nginx
Now, if you try to access http://192.168.20.175 or http://www.example.com, you will be redirected to https://www.example.com.

So, that's how you install and configure Nginx web server on CentOS 8. Thanks for reading this article.


