MySQL is a database system that provides database services for storing and managing data. It is one of the popular open-source databases.
MySQL comes with the following commercial products:
- MySQL Standard Edition
- MySQL Enterprise Edition
- MySQL Cluster Carrier Grade Edition
All these editions come with a price tag and are mostly suitable for commercial use. We will use the MySQL Community Edition, which is available for free usage under the GPL license for our this guide.
What will we cover here
In this guide, we will go through the process of installing MySQL Community Edition on Fedora Linux. We will install MySQL from Yum repository using the YUM utility. Let's get started with the installation process.
Step 1. The first thing is that we need to add the official yum repository for our Fedora Linux provided by MySQL. We will download the yum repository using the wget tool on Linux using the command:
# wget https://dev.mysql.com/get/mysql80-community-release-fc33-1.noarch.rpm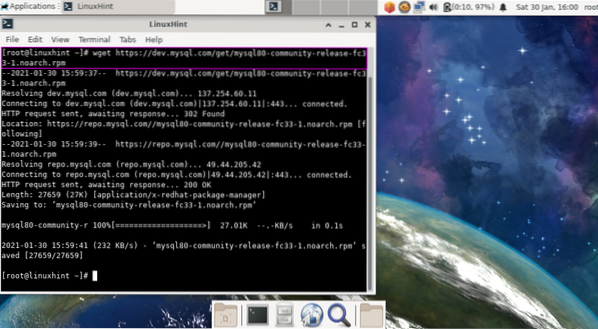
Please remember that download link may change with time, in case the above link does not work, you should manually copy the link from the official website.
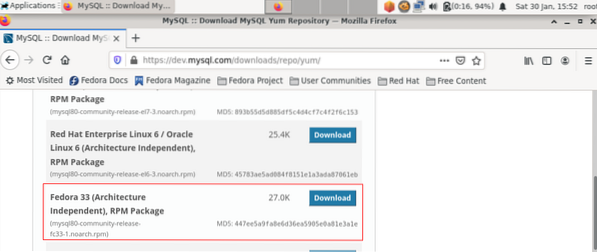
Another way to get the yum repository is to directly download this file to your system from MySQL as here:
Step 2. Once the file download is complete, we can install it with the following command:
# yum localinstall mysql80-community-release-fc33-1.noarch.rpm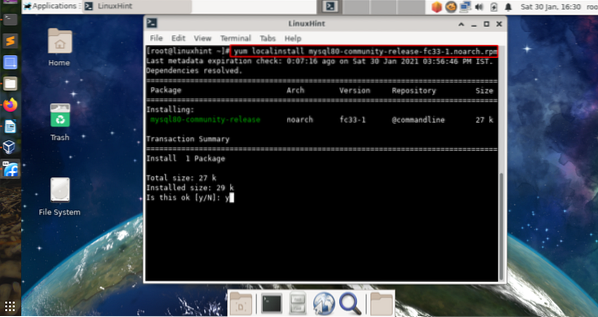
Note: We can also use the dnf command instead of yum.
When you run the above command, it will add the MySQL Yum repository to your system's repositories list. Also, enter 'y' when it asks to verify the packages' integrity with downloaded GnuPG key.
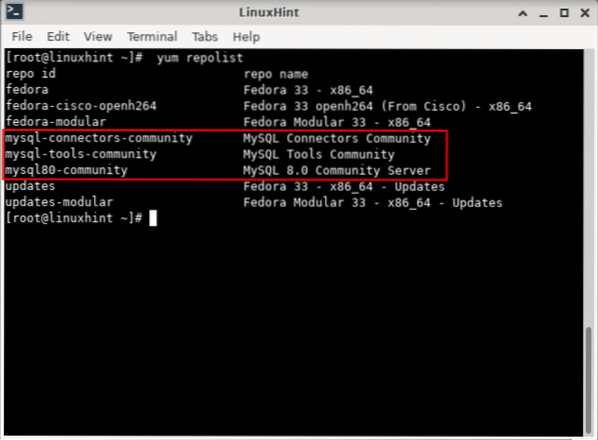
Step 3. Now we will verify if the MySQL repository is added to our system repository list or not:
# yum repolistThe output of the above command will show you all the repositories configured on our system under YUM.
Step 4. Start the installation of MySQL community release with the following command:
# dnf install mysql-community-server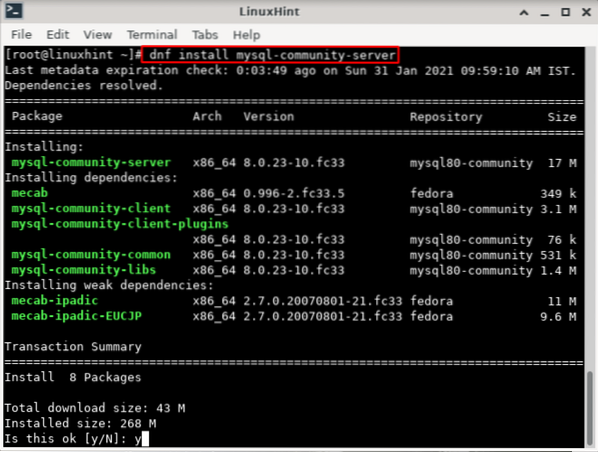
Step 5. Once the MySQL server is installed, we can start it with the command:
# service mysqld startor
# systemctl start mysqld.serviceNote: If you take much time to start the MySQL service, then stop the above command by pressing 'ctrl+c'. Now run the 'dnf update' command and then start the MySQL service again.
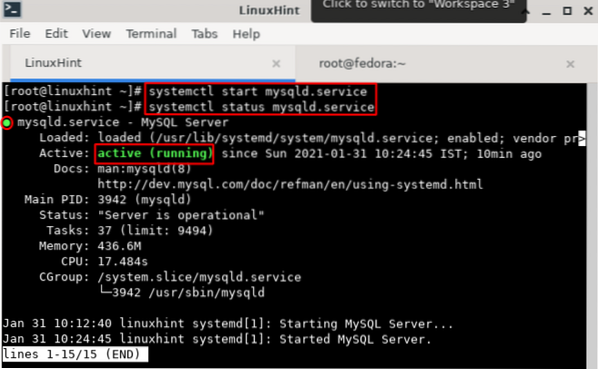
Step 6. Check the status of the MySQL service by running the command:
# service mysqld statusIt should show an active running status for MySQL service.
Beside the status, we can also verify the status of the mysql server with the command:
# mysql --version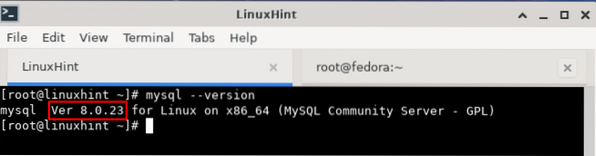
The above command shows that we have installed the latest version of MySQL available in the yum repository.
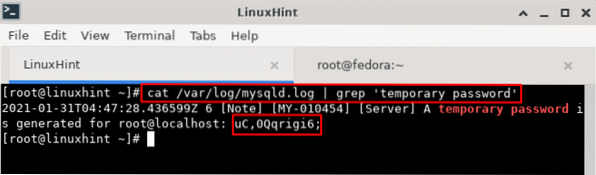
Step 7. Now, as our MySQL is installed and working, we need to secure it. But before that, we need to get a root password created by Mysql during the installation process. This temporary password is required during the configuration of the MySQL server.
To get this password, open a new terminal and run the below command:
# cat /var/log/mysqld.log | grep 'temporary password'The password will be printed on your terminal.
Step 8. Now for securing the MySQL server, we need to change certain settings. Run the below command to enter the MySQL secure installation:
# mysql_secure_installationIt will ask for the temporary password which we created in step 7. Put that here. Now it will prompt for password change for the root user. Make sure that you enter a strong password satisfying all the requirements. Otherwise, you will get an error regarding password policy. This is shown below:
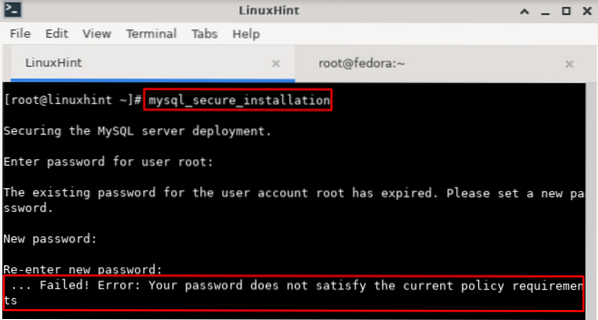
Once you have entered the correct password, you will see some instructions and questions on the screen like:
Securing the MySQL server deployment.
Enter a password for user root: [Enter the Temporary Password here]
The existing password for the user account root has expired. Please set a new password.
New password: [New password here]
Re-enter new password: [Retype the password]
The 'validate_password' component is installed on the server.
The subsequent steps will run with the existing configuration of the component.
Using the existing password for root.
Estimated strength of the password: 100
Change the password for root? ((Press y|Y for Yes, any other key for No) : [You can change MySQL root password here]
… skipping.
By default, a MySQL installation has an anonymous user, allowing anyone to log into MySQL without having to have a user account created for them. This is intended only for testing, and to make the installation go a bit smoother. You should remove them before moving into a production environment.
Remove anonymous users? (Press y|Y for Yes, any other key for No) : [Type 'y' to remove the anonymous user]
Success.
Normally, root should only be allowed to connect from 'localhost'. This ensures that someone cannot guess at the root password from the network.
Disallow root login remotely? (Press y|Y for Yes, any other key for No) : [Deny root login by entering 'y']
Success.
By default, MySQL comes with a database named 'test' that anyone can access. This is also intended only for testing and should be removed before moving into a production environment.
Remove test database and access to it? (Press y|Y for Yes, any other key for No) : [Press 'y' here]
- Dropping test database…
Success.
- Removing privileges on test database…
Success.
Reloading the privilege tables will ensure that all changes made so far will take effect immediately.
Reload privilege tables now? (Press y|Y for Yes, any other key for No) : [Reload the privilege tables to apply changes by pressing 'y' here]
Success.
All done!
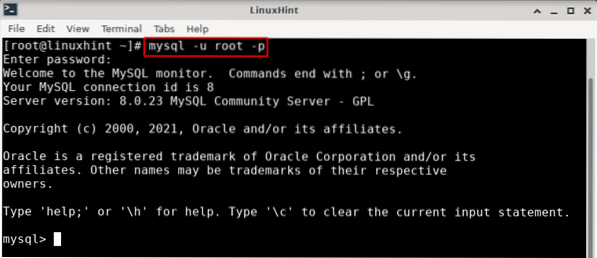
Step 9. Once the above steps are completed, we are all set to login the MySQL database server. Use the password you have created during mysql secure installation in step 8:
# mysql -u root -pYou will see an output similar to this:
Enter password: [Enter MySQL root Password here]
Welcome to the MySQL monitor. Commands end with ; or \g.
Your MySQL connection id is 8 Server version: 8.0.23 MySQL Community Server - GPL.
Copyright (c) 2000, 2021, Oracle and/or its affiliates. Oracle is a registered trademark of Oracle Corporation and/or its affiliates. Other names may be trademarks of their respective owners.
Type 'help;' or '\h' for help. Type '\c' to clear the current input statement.
mysql>
Conclusion
That's all; we have managed to set up a working MySQL database server. What you can do next is to:
- Create new users and grant different privileges to them.
- Create databases and tables and then create a join between tables of different databases.
- Define a trigger that is automatically invoked with a response to operations like insert, update or delete.


