Setting Up Static IP Address:
First, you have to set up a static IP address on your CentOS 7 machine. You can do that via Network Manager Text User Interface nmtui.
Run nmtui with the following command:
$ sudo nmtui
Now, select Edit a connection and press

Now, select Automatic from the IPv4 CONFIGURATION section and press
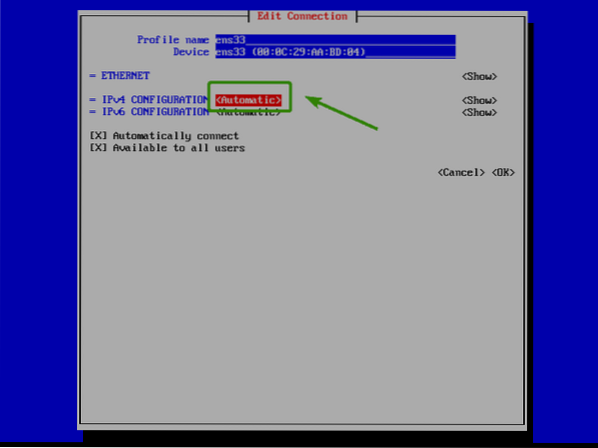
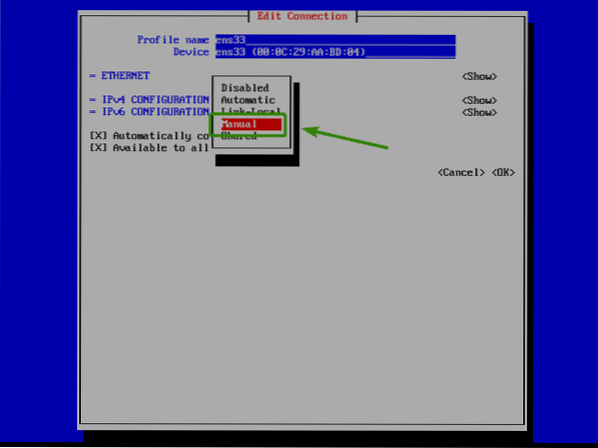
Now, select Manual and press
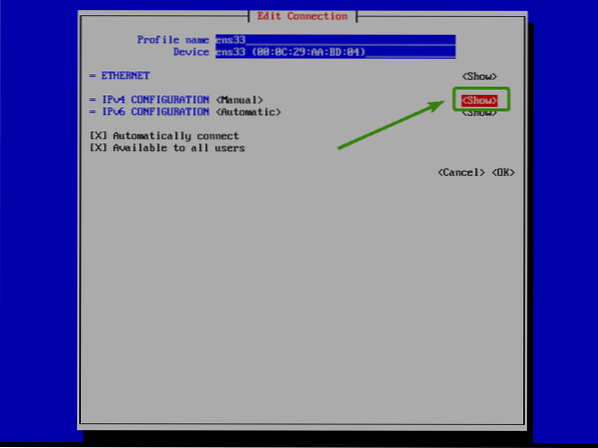
Now, navigate to
Now, you have to add the IP address, Gateway, DNS server address and search domain.
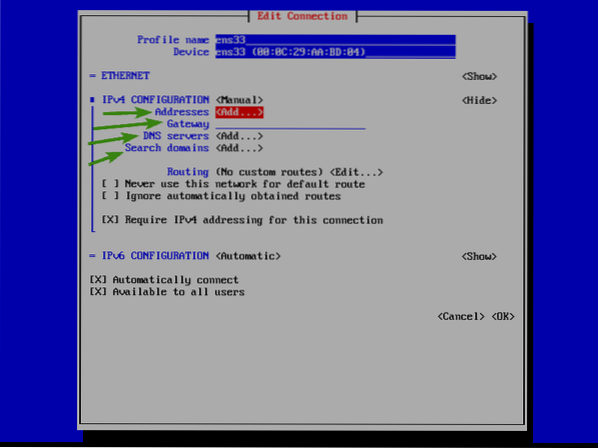
The address should be the IP address of your CentOS 7 machine. This will be the IP address of your DNS server as well once you configure dnsmasq.
The gateway is the IP address of your router.
Use the IP address that you're setting for your CentOS 7 machine as the primary DNS server. Then, I prefer adding 8.8.8.8 (Google's public DNS server) as the secondary DNS server.
The search domain should be your own domain name.
Once you're done, make sure all of the marked options are checked. You can select the options and press
Then, navigate to
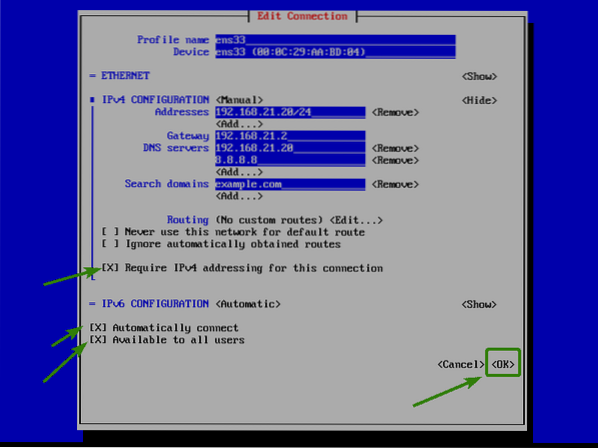
Finally, press

Once your computer boots, the IP address should be set as you can see in the screenshot below.
$ ip a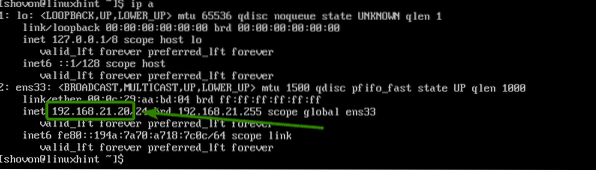
Installing dnsmasq:
Dnsmasq is available in the official package repository of CentOS 7. So, you can easily install it with the YUM package manager.
First, update the YUM package repository cache with the following command:
$ sudo yum makecache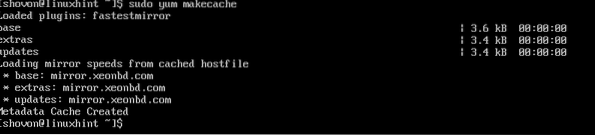
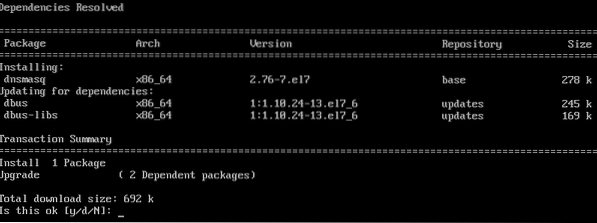
Now, run the following command to install dnsmasq:
$ sudo yum install dnsmasq
Now, press y and then press
Press y and then press

dnsmasq should be installed.

Configuring dnsmasq:
The default dnsmasq configuration file is /etc/dnsmasq.conf. This file contains all the supported options of dnsmasq and well documented. But, it's very long and hard to work with. So, I am going to rename this file to /etc/dnsmasq.conf.bk and create a new configuration file /etc/dnsmasq.conf. That way, whenever I need any help, I can just look at the file /etc/dnsmasq.con.bk and type in the required options in the /etc/dnsmasq.conf file.
To rename the dnsmasq configuration file, run the following command:
$ sudo mv /etc/dnsmasq.conf /etc/dnsmasq.conf.bk
Now, create a new configuration file with the following command:
$ sudo vi /etc/dnsmasq.conf
Now, press i to go to the INSERT mode of vi and type in the following lines. Then press

Here, port is used to set the port (53 in this article) that dnsmasq will listen to.
domain is your own domain name. I've used example.com in this article.
Now, restart the dnsmasq service with the following command:
$ sudo systemctl restart dnsmasq
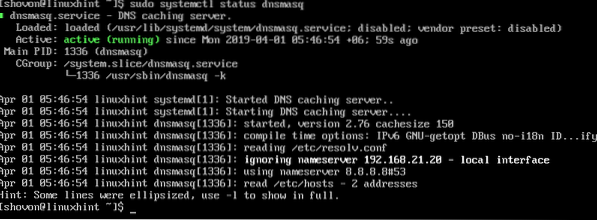
Now, check whether the dnsmasq server is running correctly with the following command:
$ sudo systemctl status dnsmasqIt is working correctly.
Adding New DNS Entries to dnsmasq:
Now, you can add new DNS entries to dnsmasq very easily using the /etc/hosts file.
To do that, open the /etc/hosts file with vi as follows:
$ sudo vi /etc/hosts
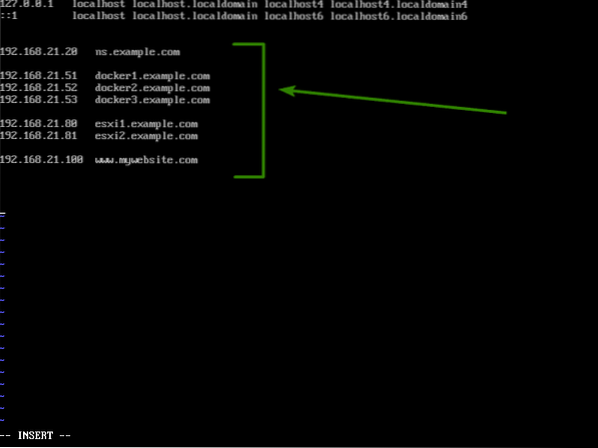
Now, type in the following lines at the end of the file and save the file.
192.168.21.20 ns.example.com192.168.21.51 docker1.example.com
192.168.21.52 docker2.example.com
192.168.21.53 docker3.example.com
192.168.21.80 esxi1.example.com
192.168.21.81 esxi2.example.com
192.168.21.100 www.mywebsite.com
Here, you have a DNS entry in each line. Each line contains an IP address and a hostname separated by tabs or spaces. You type in the IP address first and then the hostname.
Now, restart the dnsmasq service for the changes to take effect.
$ sudo systemctl restart dnsmasq
Testing DNS Server:
Now, you can use dig to test whether the DNS server is working or not.
NOTE: The dig command is not available on CentOS 7 by default. The dig command is included in the bind-utils package. You can install it as follows:
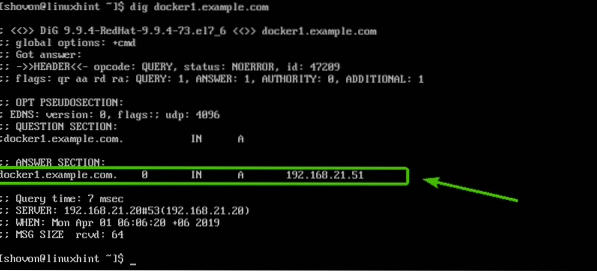
$ sudo yum install bind-utilsNow, run the following command to check whether the DNS name (let's say docker1.example.com) can be resolved:
$ dig docker1.example.com
As you can see, the IP address of the DNS name is printed. So, it's working.
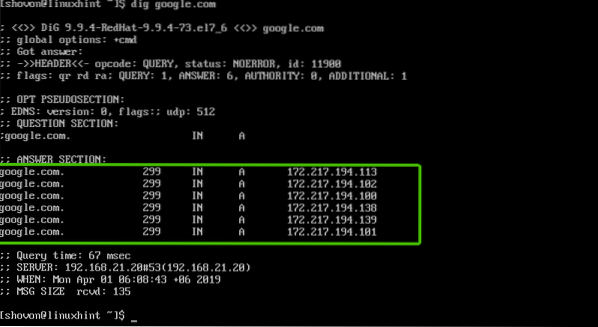
dnsmasq can also act as a Caching DNS server. To test whether DNS caching is working, run the following command:
$ dig google.comAs you can see, the IP addresses of the DNS name google.com is printed on the screen. So, DNS caching is working as well.
Other dnsmasq Options:
I've shown you a very basic dnsmasq configuration above. But there are some other common options that you can use to configure dnsmasq. In this section, we are going to take a look at them.
- user and group - You can use these options to set a run user and group for dnsmasq.
For example,
user=dnsmasqgroup=dnsmasq
- cache-size - If you want to increase the number of DNS records that will be cached by the dnsmasq server, then use this option.
For example, to set the cache-size to 1000, use
cache-size=1000- addn-hosts - Earlier, I used the default /etc/hosts file to add new DNS entries. But, if you want to use different hosts file for different domain names, then this option is useful for you.
For example, you can create a new file /etc/hosts.example.com and add all the example.com DNS entries there. Then add the following line to your /etc/dnsmasq.conf file:
addn-hosts=/etc/hosts.example.com- resolv-file - By default dnsmasq uses the /etc/resolv.conf file to learn about what DNS servers to use for name caching. But if you want dnsmasq to get this information from some other file, just create the file, add DNS servers to that file and finally add resolv-file option to your dnsmasq configuration file /etc/dnsmasq.conf.
For example, to use the file /etc/resolv2.conf as the dnsmasq resolv-file,
create the file as follows:
$ sudo vi /etc/resolv2.confNow, add your DNS servers there in the following format. Remember to put the high priority ones above others.
nameserver 192.168.21.2nameserver 8.8.8.8
Then, add the following line to the /etc/dnsmasq.conf file.
resolv-file=/etc/resolv2.confThere are many more options of dnsmasq. I recommend you check the default configuration of dnsmasq that you renamed to /etc/dnsmasq.conf.bk earlier for more information.
So, that's how you configure dnsmasq DNS server on CentOS 7. Thanks for reading this article.


