Introduction
ZFS is a file system, originally shipped with Solaris but was later adapted in many Unix and Linux operating systems. The main advantage of ZFS file system is supporting zettabytes of data, and being 128bit, and therefore it's often used in large corporate servers, and by data collectors like government agencies. Unlike other file systems, ZFS is resistant to data rot problem in hard drives as it preserves the integrity of data when storing, and no partitioning is necessary when adding more hard drives to the existing RAID. ZFS is basically the future of the Unix file systems due to its tremendous amount of benefits. However, it's unlikely it's much useful for an average home user anytime soon, but server administrators should be aware of ZFS and its benefits. So, this article demonstrates how to use ZFS on Ubuntu servers with ease.
How to Install ZFS
Installing ZFS is as easy as any other package, but it has to be installed with root access. To gain root access use sudo su, which then prompts for the administrative password. Upon typing the password, the user is granted with root access. Once root access is gained, use install command along with the package name - zfs to install zfs in the system. It will take a while to install, but once it's completed it will notify.
sudo su
apt install zfs

How to Configure ZFS
Once ZFS is installed in the system, next a pool (also known as Zpool) has to be created. A pool consists of a group of hard drives which are combined together, and inside of this pool there are datasets where the data actually stores. In this phase, a pool and a dataset is created.
Type either lsblk for listing block devices in the system, or ls -l /dev/sd* for listing out all the /dev blocks. Either way it returns a list of block devices detected by the Ubuntu. This tutorial assumes the system has multiple hard drives, which are actually combined into a pool.
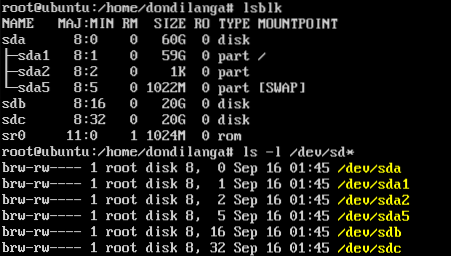
Before creating a pool. A GUID partition table has to be created in each hard drive. Partition table is a kind a scheme that helps in partitioning the hard drives. Zpool requires the hard drives to have it before creating the pool. Use the following commands to create the partition table in spare hard drives attached to the systems. here spare hard drives are /dev/sdb and /dev/sdc
parted /dev/sdb mklabel GPT q parted /dev/sdc mklabel GPT q
Once the partition table is created in each hard drive, now create the zpool. Since here only two hard drives are used use mirror groups, but if there are 3 or more hard drives use raidz, and for 4 or more use raidz2 commands. Mirroring is also known as RAID 1, which seamlessly copies data from one drive to another that is quite useful for increasing the data redundancy.
zpool create vol0 mirror /dev/sdb /dev/sdc

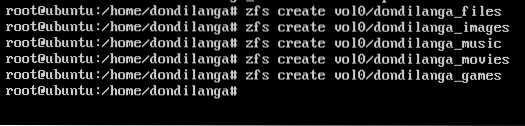
At this point a pool is already created, now create the dataset where actually the data, which includes files, directories, stores.
A dataset creation format goes as this…
zfs create
Use this format and create a couple of directories as seen in the following screenshot.
zfs create vol0/dondilanga_files
zfs create vol0/dondilanga_images
zfs create vol0/dondilanga_music
zfs create vol0/dondilanga_movies
zfs create vol0/dondilanga_games
Creating the dataset is not enough for having a functioning file structure, it also needs the proper permissions (refer Linux file permissions) to be set. The permission setting is quite easy as it follows the standard permission set format.
chown -R username:groupName /poolname/dataset
chown -R dondilanga:users /vol0/dondilanga_files

How to Monitor ZFS
Monitoring usually includes inspect the pool status, IO statistics, list out the available pools, list out particular details of the pool, show the pool status with verbose mode, list out ZFS file systems etc. These information provides valuable insight of the pools, datasets, and are quite useful in making decisions regarding the ZFS file systems.
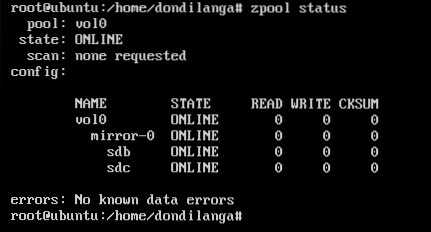
Checking the health state of the pool
zpool status
Checking the Input/Output (IO) statistics for the pools
zpool iostat

List out available pools
zpool list

List out particular details of the pool
zpool list -o name,size,capacity

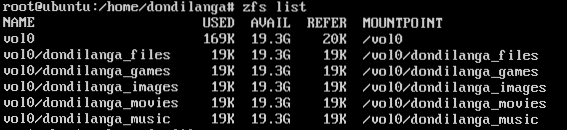
See list of the file systems (dataset) In the pool.
zfs list
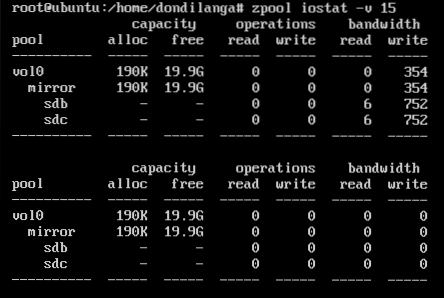
See the statistics of the pool in each 15 seconds.
zpool iostat -v 15
How to Administrate, Tune and Maintain ZFS
This segment covers the different types of the pools, how to create them, making block devices in pool, destroying or removing pools (removing is useful when a pool is created on a USB hard drive or a similar removable storage), set various properties to pools, mounting and unmounting.
Different types of pools
There are 4 main pool types, and each one has its own purpose in creating them. Usually here the RAID type is taken into the account when creating a pool. As described earlier the type has to be stated when creating the pool along with it. This tutorial uses the mirror pool type, and apart from that there are raidz for RAID5, raidz2 for RAID5 with duel parity and when no redundancy is involved no pool type is stated.
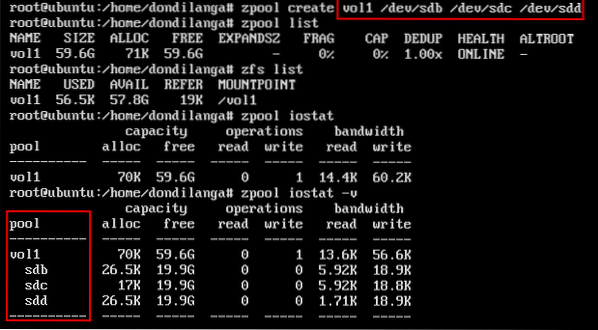
Stripe or non-redundancy groups can have as much as hard drives, for instance… as in the following command. Each sd* represents a new virtual/physical hard drive, and they all can be lumped up together with a single pool with the following command under the vol1 name.
zpool create vol1 /dev/sdb /dev/sdc /dev/sdd
As seen in the following screenshot, now all the aforesaid hard drives are a part of the pool vol1, which can be expanded to see the components with zpool iostat command.
Unlike the above example, in the mirror group hard drives are grouped as pairs.
zpool create vol1 mirror /dev/sda /dev/sdb mirror/dev/sdc /dev/sdd

Making block device in a pool
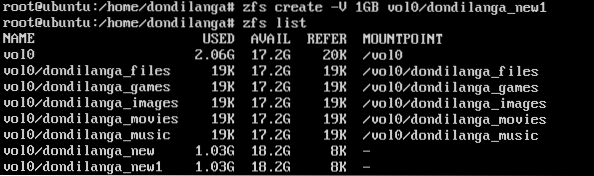
Block devices are datasets created in the pool, and have a predefined size at the outset, for instance if a block device is created with the size of 1GB, then that particular block device weighs 1GB. In the following example, it shows how to create a block device in an existing pool.
zfs create -V
zfs create -V 1GB vol0/dondilanga_new1
Destroying a pool
Undoubtedly knowing about destroying a pool is important as much as creating one, but this has to be done extremely carefully as there is no way to take it back once it's gone, as the deleting is permanent unless the data is backed up elsewhere.
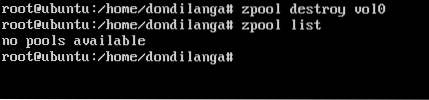
zpool destroy poolname
zpool destroy vol0
After the pool is deleted, it's possible to try to list available pool with list parameter in zpool command, if it returns “no pools available”, it means the delete was successful.
Removing/Restoring a pool
What this means temporary remove the pool out of the system, and mount it back when it's needed. This is quite useful when a pool is created in an USB hard drive/ drive or any other portable device. Web administrators can create a pool on their portable hard drive, copy system data to it, unmount and take it home for usage. The following commands demonstrates how to remove a pool, and mount it back.
zpool export poolname
zpool export vol0
zpool import poolname
zpool import vol0

Adding a new hard drive to the pool
As there are many pool types, the hard drives can be added to the pool in various ways. The usual method of adding a hard drive is as a spare one. What it means when one of the hard drives is failed to function, the spare hard drive is used to replace the broken one. A spare hard drive is added as following.
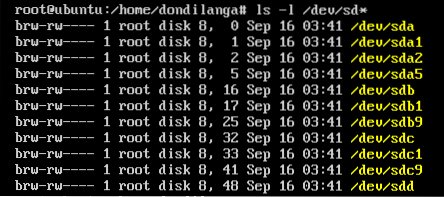
This lists out the available hard drives. As seen in the following screenshot. The hard drive sdd is currently available to the operating system; hence, it's used here.
ls -l /dev/sd*
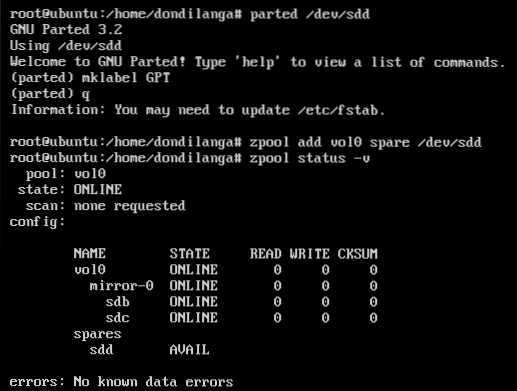
As usual, first it's formatted before adding to the pool. The following commands format the hard drive with GUID partition scheme.
parted /dev/sdd
mklabel GPT
q
Once it's formatted, add to the pool with the following command.
zpool add vol0 spare /dev/sdd
Then type zpool status -v to list out all the available hard drive in zpools. As seen in the following screenshot, the spare drives are labeled as “spares”, and are only used when the main drives are failed.
How to Create Snapshots on ZFS?
Snapshot is an exact replica of a particular zpool, and is created with zfs command as seen in the following screenshot. Snapshot creation process is a walk in the park though some tutorials out there make it complicated than necessary. The format of the snapshot creation command is.
zfs snapshot [email protected]
zfs snapshot [email protected]_snapshot

Restore a snapshot
Restoring a snapshot back to the pool is easy as same as backing it up. All have to do is stating its name along with the pool name. Beware that restoring a snapshot back to the pool will overwrite the currently exist data in the pool; hence it has to be done wisely.
zfs rollback [email protected]
zfs rollback [email protected]_snapshot

Delete a snapshot
Creating, restoring and deleting snapshots, all these are walk in the park with ZFS. The following command simply deletes the snapshot out of the system; and consequently release more space back to it.
zfs destroy [email protected]
zfs destroy [email protected]_snapshot


