Form validation is a very important task for any web application to enter valid data in the database. The users of the application will not be able to insert invalid data if the form data are validated before submitting. Django is called MVT (Model View Template) based framework where the task of the controller is done by this framework itself. The database-related tasks are done by Model and the data are presented to the template using View. The fields of a form are generated based on the particular model that will insert data into the Django database after validation. One type of validation is done by the browser-based on the field type that is defined in the model. Using the is_valid() function is another way to check the form data whether they are valid or not after submitting the form. This tutorial will show you how the data can be inserted into the Django database after validating the form.
Prerequisites
Before practicing the script of this tutorial, you have to complete the following tasks:
- Install the Django version 3+ on Ubuntu 20+ (preferably)
- Create a Django project
- Run the Django server to check the server is working properly or not.
Setup a Django App
1. Run the following command to create a Django app named validationapp.
$ python3 manage.py startapp validationapp2. Run the following command to create the user which is used to access the Django database. If you have created the user before then you don't need to run the command.
$ python3 manage.py createsuperuser3. Add the app name in the INSTALLED_APP part of the py file.
INSTALLED_APPS = […
'validationapp'
]
4. Create a folder named templates inside the validationapp folder and set the template's location of the app in the TEMPLATES part of the py file.
TEMPLATES = [… .
'DIRS': ['/home/fahmida/django_pro/validationapp/templates'],
… .
,
]
Django Form Validation
You must write the code for the following files to check the form validation task in Django.
- models.py
- admin.py
- views.py
- forms.py
- customer.html
Create the Model
Open the models.py file from the app folder and add the following script to create the structure of the customers table. The table will contain four fields. These are the full_name, email, contact_no, and customer_type. Here, the customer_type is created by selection type. That means the user must select any value from the dropdown list.
models.py
# Import modelsfrom django.db import models
# Define class for customer entry
class Customer(models.Model):
# Define values for the customer type
type = (
('paid', 'Paid'),
('free', 'Free')
)
# Define the fields for the customer table
full_name = models.CharField(max_length=50)
email = models.EmailField()
contact_no = models.CharField(max_length=20)
customer_type = models.CharField(max_length=32, choices=type, default='free')
Register the Model
Add the following script in the admin.py file for registering the Customer model in the Django database to access the customers table from the Django administrative dashboard.
admin.py
# Import admin modulefrom django.contrib import admin
# Import customer model
from .models import Customer
# Register customer model
admin.site.register(Customer)
Create forms.py inside the app folder and add the following script to define the class to create the form based on mentioned fields of the Customer model.
forms.py
# Import forms modulefrom django import forms
# Import Customer model
from validationapp.models import Customer
# Define the class for the customer form
class CustomerForm(forms.ModelForm):
class Meta:
model = Customer
fields = ('full_name', 'email', 'contact_no', 'customer_type')
Create Template
Create an HTML file named customer.html with the following script to display the previously designed form with the Save button.
customer.html
Customer Entry Form
Insert Data After Form Validation
Modify the content of the views.py file with the following script. AddCustomer() function is used in the script to insert a new record in the customers table after validating the form. If the form is not submitted, then the form will be loaded using the customer.html file. If the form is submitted with the valid data then a new record will be inserted using the save() function and a success message will be printed in the browser with the option to add another record.
views.py
# Import HttpResponse modulefrom django.http.response import HttpResponse
# Import render module
from django.shortcuts import render
# Import CustomerForm
from validationapp.forms import CustomerForm
# Define function to add customer entry
def AddCustomer(request):
if request.method == "POST":
form = CustomerForm(request.POST)
# If the form data are valid or not
if form.is_valid():
try:
# Save the form data into the database
form.save()
# Define the message for the user
data = ['
The Customer data inserted properly.
Add another']
# Return the response
return HttpResponse(data)
except:
pass
else:
# Define the form object
form = CustomerForm()
# Show the customer entry form
return render(request, 'customer.html', 'form': form)
Modify the urls.py file of the Django project with the following script. Two paths have been defined in the script. 'customer/' path will be used to display the form to add the new customer records. The 'admin/' path will be used to display the Django Administration Dashboard.
urls.py
# Import admin modulefrom django.contrib import admin
# Import path module
from django.urls import path
# Import view
from validationapp import views
# Define path for customer and admin
urlpatterns = [
path('customer/', views.AddCustomer),
path('admin/', admin.site.urls)
]
Run the Django server and execute the following URL from the browser to display the customer entry form. If the Save button is pressed without adding any data into the form, then the following page will appear with errors for keeping required fields empty.
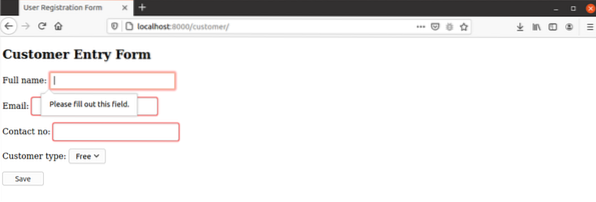
If the invalid data is set for the email field, then the following error will appear.
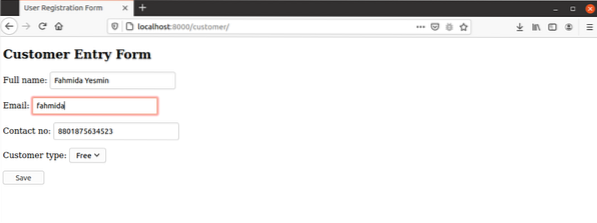
The following information will appear if the form is submitted with valid data. If the user clicks on the 'Add another' link, the form will appear again to insert data for the next record.

Conclusion
The way of validating a Django form was shown in this tutorial by creating a simple Django app. The said app will help Django developers to understand the importance of form validation and they would be able to do it properly.


