If your deleted Printer keeps reappearing on your Windows system, especially whenever you're trying to print something, you're not alone. Several users have complained about the same issue. More often than not, when the printer keeps reappearing, is it has an unfinished printing job, which had been commanded by the system, but was never fully processed. In fact, if you click to check what is printing, you will see that there are documents that it is trying to print. This might be a reason you keep seeing the printer even after you've removed it.
Deleted Printer keeps reappearing & coming back
This problem is a very common one at a workplace, where multiple printers are being used, and different people work on individual printers. If your deleted Printer may keep reappearing & coming back in Windows 10/8/7 try these suggestions and see if they fix the problem for you.
1] The problem might be in the Print Server Properties
- Possibly, the issue might be with the Print Server properties. However, it could be rectified.
- Select 'Win + S' and then go to Printers.
- From the menu, select Devices and Printers.
- Choose any printer by clicking on it once and choose Print Server Properties.
- On it, find the Drivers tab, and choose the printer you want to delete from the system. Right-click and select Remove.
- Choose Apply and OK to save the changes you just made.
You then need to go to the Settings app and right-click on System. Then choose Apps & features, find the printer driver, and choose to remove it from the system.
2] Might be a problem with the Registry
Even after deleting the printer from the Settings app and the Control Panel, the configuration of the registry does not change, and you need to edit it. Here's what you need to do to configure the registry.
Select 'Win + R' on your keyboard and write regedit in Run, when it appears. This will open up the Registry Editor and then click OK.
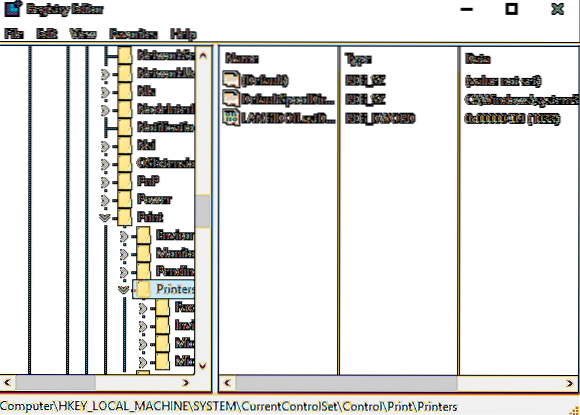
In the Registry Editor, navigate to the following key-
HKEY_LOCAL_MACHINE\SYSTEM\CurrentControlSet\Control\Print\Printers
Next, you need to expand the Printers key and find the printer you need to delete. Right-click on it and click on Delete. Now, restart your PC, and then go to Devices and Printers again to see if the printer has been deleted.
3] Log out as every user
Office computers usually have multiple users, who might be logged in to the printer you want to delete at the same time. You need to log out of each account and delete the printer and the driver package.
4] Use a Deleter tool
The Kyocera Deleter tool, for instance, will remove the printer if you run it as an administrator. This tool is available here. Create a system restore point first before using it.
5] Use Device Manager
Go to the Device Manager and go to View and then choose Show hidden devices. Expand the Software devices group, where you will find all the printer devices. You can delete it from there.
6] Use Print Management
If you are using the Print Management app, this might be a good tool to delete the ghost printer without much hassle.
- Select Windows Key + S from your keyboard and then go to Print Management desktop app.
- Choose Custom Filters and then go to All Printers.
- This will help you to find the printer which you want to delete. Right-click on it and then select Delete.
Hope something here helps you.
Read next: Clear jammed or stuck Print job queue.


