Debian Network setup
The entire configuration for the network interfaces is stored in plain text files in a single directory named /etc/network. This directory contains a number of files and subdirectories to cover both the setup for IPv4 and IPv6.
- interfaces and interfaces.d: general configuration per interface
- if-down.d: scripts that are run in case the interface goes down
- if-post-down.d: scripts that are run after the interface goes down
- if-up.d: scripts that are run if the interface goes up
- if-pre-up.d: scripts that are run before the interface goes up
The specific configuration is done per network interface. You can store all of it in the single file named interfaces, or as separate files in the directory interfaces.d. A typical IPv4 configuration from a portable device is shown below. It consists of one loopback interface (/dev/lo), an ethernet interface (/dev/eth0), and a wireless interface (/dev/wlan0). Line 1 refers to include all the scripts that are stored in the directory /etc/network/interfaces.d/. The lines 3 to 5 configure /dev/lo, lines 7 to 9 /dev/eth0, and line 11 the interface /dev/wlan0. A detailed explanation for the single commands is given below.
2
3 # The loopback network interface
4 auto lo
5 iface lo inet loopback
6
7 # The primary network interface
8 allow-hotplug eth0
9 iface eth0 inet dhcp
10
11 iface wlan0 inet dhcp
For other Debian GNU/Linux releases or distributions based on it the file “interfaces” may look similar but with different names for the network devices. As of Debian 9 “Stretch” the old network names like /dev/eth0, /dev/eth1 and /dev/wlan0 have gone away as the device name can change. The new names are similar to these ones - /dev/enp6s0, /dev/enp8s0, /dev/enp0s31f6, and /dev/enp5s0 [1]. For the network interfaces available have a look at the file “/sys/class/net” - in our case the interfaces are named /dev/lo and /dev/enp0s3.
The list of available network interfaces:

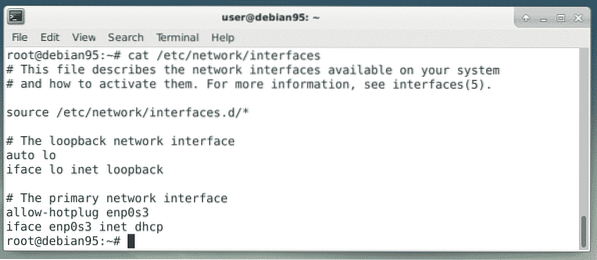
The configuration for these interfaces looks as follows. The image below is taken from a Debian GNU/Linux 9.5.'
The basic network configuration on a Debian GNU/Linux 9.5:
As the next step we will have a look at the single statements to configure a desired interface.
Debian Network Configuration in detail
Automatic enabling of an interface on startup
At startup of your system the setup scripts go through the configuration files for the network interfaces. In order to automatically enable an interface add the keyword “auto” (short for “allow-auto”) followed by the logical name of the interface(s). The setup scripts will call the command “ifup -a” (short for “-all”) that will activate the mentioned interfaces. The following line will bring up the loopback interface /dev/lo, only:
auto loThe network interfaces are brought up in the order they are listed. The following line brings up /dev/lo followed by /dev/wlan0, and /dev/eth0, eventually.
auto lo wlan0 eth0Activate an interface if the network cable is plugged in
The keyword “allow-hotplug” leads to a event based on a physical connection. The named network interface is activated as soon as the network cable is plugged in, and deactivated as soon as the the network cable is unplugged. The next line demonstrates this for the Ethernet interface /dev/eth0 (similar to line 8 of listing 1).
allow-hotplug eth0Static interface configuration
In order to communicate with other computers in a network an interface is assigned an IP address. This address is obtained either dynamically (via DHCP) or set in a fixed way (static configuration). Therefore, the declaration of the interface starts with the keyword “iface” followed by the logical name of the network interface, the connection type, and the method used to obtain the IP address. The next example shows this for the network interface /dev/eth0 with the static IPv4 address 192.168.1.5.
iface eth0 inet staticaddress 192.168.1.5
netmask 255.255.255.0
gateway 192.168.1.1
After the interface declaration you are invited to specify a number of options (option name in brackets). This includes values such as the IP address (address), the netmask (netmask), the broadcast range (broadcast), the routing metric for the default gateway (metric), the default gateway (gateway), the address of the other end point (pointtopoint), the link local address (hwaddress), the packet size (mtu) as well as the address validity scope (scope). The next example shows the configuration for IPv6 for the network interface /dev/enp0s3 [4].
iface enp0s3 inet6 staticaddress fd4e:a32c:3873:9e59:0004::254
netmask 80
gateway fd4e:a32c:3873:9e59:0004::1
Dynamic interface configuration via DHCP
Connecting to different networks requires flexibility. The Dynamic Host Control Protocol (DHCP) [5] makes this flexibility possible and the network scripts assign the IP address to the network interface that is handed over from the DHCP server. The following line demonstrates this for the wlan interface named /dev/wlan0:
iface wlan0 inet dhcp#For IPv6 use this line, instead:
iface wlan0 inet6 dhcp
Similar to the static configuration from above a number of options are possible to be set. These options depend on your DHCP setup. Among others the list includes the hostname to be requested (hostname), the metric for added routes (metric), the preferred lease time in hours or seconds (leasehours, leasetime), the client identifier (client), or the hardware address (hwaddress).
Other options
The configuration file /etc/interfaces also allows setups for the Bootstrap Protocol (BOOTP) [6] (bootp), PPP (ppp) as well as IPX [7].
Showing the interface configuration
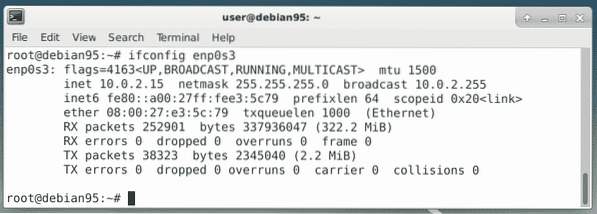
Up to the release 8 of Debian GNU/Linux use the command “/sbin/ifconfig” to display the interface configuration. See the configuration for the first ethernet interface below.
Interface configuration using ifconfig:
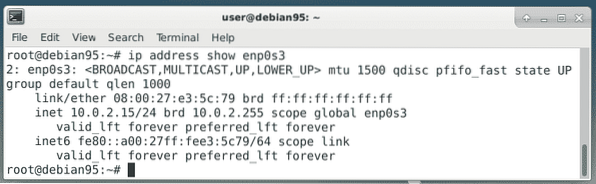
From the release 9 onwards, the command “ifconfig” is no longer preinstalled, and replaced by its predecessor “ip”. Use the command “ip addr show”, instead.
Interface configuration using ip:
Enabling and disabling an interface
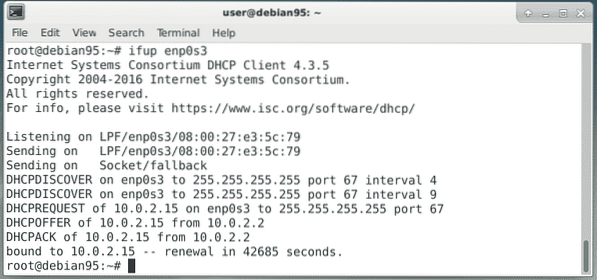
As already described above the option “auto” enables an interface on startup, automatically. There are two commands to enable and disable an interface, manually. Up to Debian 8, use “ifconfig eth0 up” or “ifup eth0” to enable the interface. From Debian 9, use “ifup eth0”, only. The counterparts are “ifconfig eth0 down” and “ifdown eth0”. The image below shows the default output when enabling an interface.
Interface activation using ifup:
Adding further options
It is possible to add further action in case an interface is activated or deactivated. These scripts are called if-pre-up and if-post-down scripts and come into play before enabling and after disabling an interface.
The next example demonstrates this in combination with a firewall that is active in case the interface is active, too. In line 3 the script /usr/local/sbin/firewall-enable.sh is called before the interface is activated (hence the tag “pre-up”, and in line 4 the script “/usr/local/sbin/firewall-disable.sh” is called after the interface is deactivated.
1 allow-hotplug eth02 iface eth0 inet dhcp
3 pre-up /usr/local/sbin/firewall-enable.sh
4 post-down /usr/local/sbin/firewall-disable.sh
Conclusion
The basic configuration of network interfaces in Debian GNU/Linux is comparable easy - a few lines of code, and it is done. For more information regarding additional options you may have a look at the resources given below.
Links and References
[1] Debian Wiki, Network Configuration
[2] IPv4, Wikipedia
[3] IPv6, Wikipedia
[4] Debian Static Ip IPv4 and IPv6
[5] Dynamic Host Control Protocol (DHCP), Wikipedia
[6] Bootstrap Protocol (BOOTP), Wikipedia
[7] Internetwork Packet Exchange (IPX), Wikipedia
Thanks
The author would like to thank Axel Beckert for his help and critical comments while preparing this article.


