This article demonstrates how to upgrade to Ubuntu 17.10. Existing users can upgrade either from Ubuntu 16.04 or 17.04. An Internet connection is required with a relatively good download speed to receive the updated files. It's advisable to regularly backup important files to avoid consequences that occur during the upgrade process.
What's New in Ubuntu 17.10?
Ubuntu 17.10 emerged 6 months after the release of its previous version 17.04 which was a standard version just as the current one. 17.10, as per Canonical, the company behind Ubuntu provides a glimpse of how the upcoming LTS (Long term support) 18.04 LTS will look like. The following list demonstrates the main features included in Ubuntu 17.10.
Custom Version of GNOME Shell
Ubuntu used to have the Unity Interface, but due to the massive amount of requests, Unity was removed it in favor of GNONE.
Horizontal Bar Across the Top of the Screen
The horizontal bar at the top of the screen is a task bar similar to that appearing in Windows and Linux Mint, and which acts as a base for a number of contents to be placed on.
From left to right, the compact action menu for performing quick actions of certain applications, The common area for clock, calendar, music player, and message tray. The calendar can be utilized for creating schedules. The music player is for playing a quick track. The message tray is a kind of notification area, which notifies users of various applications. However, it only works with applications that support GNONE shell, then finally the unified states menu, which consists of various functions that may come handy in using the operating system regardless of what it's used for.
These functions are, Ethernet port indicator, VPN and Bluetooth managers, screen filter, display settings, the user menu which is comprised of switch user, log out, account settings functions. Additionally, it contains the speaker, volume controller, screen locker, shutdown and restart buttons, and quick access to settings window.
Ubuntu Dock
Ubuntu dock is the vertical bar that is located at the left most edge of the screen. This consists of two main parts, the pinned app area, and the full screen app launcher button. This is almost same as the previous design, except the app launcher button is moved to the bottom of the screen in 17.10.
The dock is mainly used for pinning frequently used apps. It also shows apps that are currently being used. The dock is slightly modified to make it transparent when a window is being moved underneath it, this is known as dynamic transparency. The advantage of dynamic transparency is it saves power in laptops, and consumes less hardware resources to render the contents underneath the dock.
Window Controls
Controls were moved to the right side of the window as compared to previous versions of Ubuntu; hence it's the same as windows explorer, which is the default file browser in the Windows platform. As usual, it contains minimize, maximize, and close functions. This is same for all the applications as well.
Client Side Decoration
Client side decoration is the ability to customize the window right within its interface instead of from the settings. This is useful to modify the view of the elements as preferred. As functions, it contains maximize icon sizes, sort, show hide files, reload, create new folder, different views such as details, small icons etc.
Full Screen App Launcher
Full screen app launcher is quite different on GNOME shell, but still somewhat the same on the surface. The prominent feature in the GNOME shell is the ability to filter the frequently used apps with the click on a button. The Gnome interface basically simplifies the interface of Unity, which provides more filters to narrow down the search. For instance in Unity interface the app launcher is categorized into Home, applications, documents, movies, photos, videos, and apart from that there are a bunch of filters in “Filter Results” menu to make the search really narrow down.
Activities Overlay and Dynamic Workplace
Activities overlay is a full screen display on which all currently opened application are arranged. Unlike the regular view, it shows all the apps in the screen. When Activities overlay is opened, it also opens the “Dynamic Workplaces” strip beside it. Initially there are two desktops, but when an application is moved to the second desktop another desktop is emerged right underneath of the second one.
Music Play bar

Music play section is a part of the message bar on which music is playing. By default, only Rythmbox is compatible with this section. If the default music player is used to play music, the currently playing music won't appear here as when playing with Rythmbox.
New Updated Software
Ubuntu 17.10 is equipped with the latest versions of LibreOffice, Firefox, Shotwell, Thunderbird which are for office works, browsing Internet, managing images, and sending emails, respectively.
New Lock Screen
A new Lock screen which resembles the lock screen of Windows 10 now has the ability to display notifications of compatible applications. This is quite similar to Android phones; hence it's safe to conclude that Ubuntu may have a plan to build a universal operating system platform like Windows 10.
Wayland Display Server
A display server is a system in Linux operating systems, which assists in rendering the graphics elements on the screen. Ubuntu used to use Xorg which is now replaced with Wayland as long as the graphics adapter is supported with the latest display server, however if Wayland doesn't work out, there is an option to switch to xorg from the login menu. Basically Wayland is efficient in terms of rendering the contents; hence the performance of Ubuntu is expected to rise a significant amount. However, there might be compatibility issues with certain Nvidia and AMD drivers depending on the model of the video card.
Redesigned Settings
Settings are redesigned from scratch, and now it's quite similar to the settings window of Windows 10. This will probably help Windows users to adapt to the Ubuntu ecosystem with ease, and Linux users can easily navigate, and locate the right option without much effort. However, this still looks a bit primitive in terms of the number of options, but it's expected that this will be changed in the upcoming long term support (LTS) version.
Built in Screen Filter
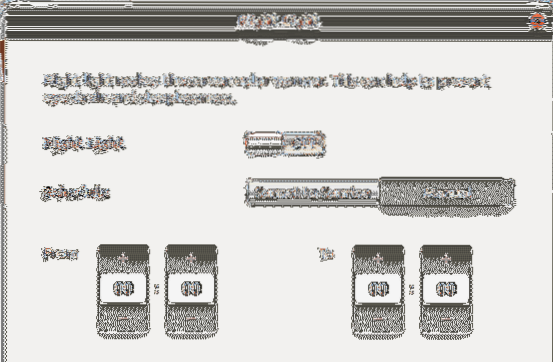
Ubuntu is equipped with a screen filter that helps to reduce the eye strain of users who stay in front of the computer for some time. This is located at Settings -> Devices -> Display -> Night Light.
HIDPI Display Support
HIDPI means high dots per inch, and is a technology that enhances the quality of the display by increasing the number of pixels per inch. This is already a huge battle in the mobile phone market, but in the desktop side there is no big push from vendors, however Ubuntu caters for the minority of users who possess such displays. Obviously, turning this on will increase the hardware resource consumption, so it's not recommended for laptops and low-end computers.
Backup/Restore System Using Duplicity
Duplicity is a perfect backup solution to keep the data secure in a different location. It supports data encryption in order to secure the data while they are being transferred across an unsecured network like the Internet. It also supports backing up the data to a number of destinations such as FTP, RSYNC, IMAP, SSH, PyDrive, WebDev, dpbx, onedrive, azure, as the names themselves imply Duplicity even provides options to back up data to professional cloud platforms like dropbox, onedrive and also google drive. However, this article uses local backup, as it's much easier and convenient. For the sake of the simplicity, it does neither compression nor encryption of the files, and files are backed up to another hard drive of the system. So this guide assumes that the user has access to at least one spare drive in order to back up their data. In platforms like DigitalOcean, Vultr block storages can be used as a spare hard drive.
Type the following command in a terminal window with root access. The first command as stated earlier uses sudo su to change the current user to root; hence the current user gets administrative right to perform various tasks which require administrative privilege. The second command updates the repository information on the local side, which then is helpful in retrieving the latest version of packages when using the apt-get install command. As usually apt-get install performs the installation, since here it states duplicity, it installs duplicity after downloading its package files from the Ubuntu repository. Then parted command is issued to initiate the partition of the spare hard drive. This tutorial assumes that there are only two hard drives; and thus the second one is sdb, otherwise name it appropriately depending on the number of hard drives attached to the system, for instance when there are 3 hard drives, and 2 are spare ones, the second and third hard drives are named as sdb and sdc, respectively. Then it creates the partition table which requires the hard drive to have in order to store information in itself, once it's created the q command is issued which denotes the exit.
After the partition table is created, now the hard drive has to be formatted, so Ubuntu can recognize it. There are various formats with which Ubuntu supports, however this uses ext4 format as it's fairly modern and common option. The new hard drive is labeled as dondilanga_drive, so it can be accessed later on with this name. Any name can be given, but make sure there is no space between each word.
When the hard drive is ready, use the duplicity command to initiate the backup. Here as options, it uses no-encryption to instruct duplicity to ignore encrypting files, progress denotes the progress of the process, no-compression indicates there is no compression involved; hence the backing up is happened at a faster rate. Compression is mostly used when data is backed up to a remote destination in order to save bandwidth, since here no bandwidth is consumed, there is no point of using compression. However, compression is still useful in reducing space on the hard drive if space is constrained.
The parameters that come after no-compression are source and destination respectively. Source directory should always be in standard Linux format, meaning start from '/'. The destination should be in network formation, so even if the local destination is used, the network format has to be used. The later stated duplicity command denotes the restoration of the backed up files. Here the formats have to be reversed, meaning instead of stating the standard linux format in the source place, state the network format, and state the linux standard format in the place for destination.
There is this option called --dry-run which can be used to find out whether the command is working without executing it. Duplicity always includes sub folders and files, by default when both backing up and restoring; thus there is no option for that purpose. If it complains the directory already exists, simply use --force option along with the rest of the options to enforce the command regardless of the nature of the outcome.
sudo su apt-get update apt-get install duplicity parted /dev/sdb mklabel GPT q mkfs.ext4 -L dondilanga_drive /dev/sdb duplicity --no-encryption --progress --no-compression /home file:///dondilanga_drive/home duplicity restore --no-encryption --progress --no-compression file:///dondilanga_drive/home /home
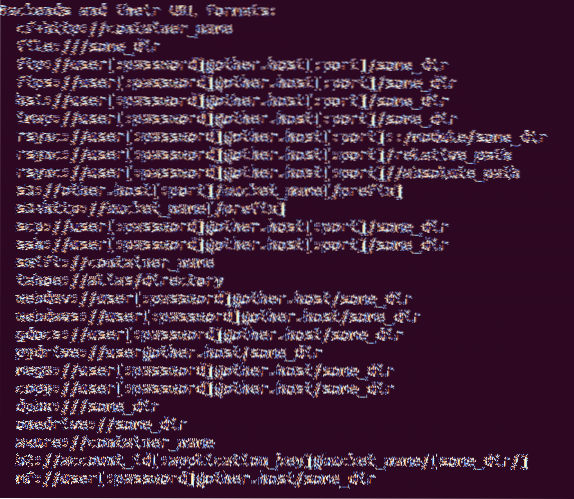
URL formats Duplicity supports on Ubuntu
Steps to Upgrade from 17.04 to 17.10.
Upgrading Ubuntu to its latest version is relatively easy compared to some other distros. Ubuntu needs the user to have administrator privilege prior to continuing the upgrade, hence use sudo su to acquire the admin privilege. It's recommended to upgrade the packages of the operating system before upgrading the operating system as a whole as it eliminates any possibility of malfunction on the way. This is done with apt-get update and dist-upgrade. And finally Ubuntu core is upgraded to 17.10 from 17.04 with the command do-release-upgrade. It will provide on screen instructions, and following them will install Ubuntu 17.10 on the. Make sure the system is connected to the Internet, and the download speed is relatively good, as it takes some time.
sudo su apt-get update apt-get dist-upgrade do-release-upgrade
Steps to Upgrade from 16.04 LTS to 17.10
As upgrading Ubuntu from 17.04 to 17.10, upgrading from 16.04 to 17.10 is as easy as any other regular package, but it involves a couple of extra steps, but it's nothing fearsome like typing assembly codes with just the notepad. As usual make sure the system is up-to-date by using both apt-get update, and apt-get dist-upgrade. The purpose of the dist-upgrade is to make sure there won't be any conflicts among packages, as it intelligently handles them, then Ubuntu update-manager-core package has to be installed, which is used to upgrade the core Ubuntu files, meaning the operating system.
Once the package is installed, configure the release upgrade file to make sure Ubuntu is upgraded to the next successive version. It provides one single parameter name which is Prompt=
apt-get update apt-get dist-upgrade apt-get install update-manager-core nano /etc/update-manager/release-upgrades do-release-upgrade shutdown -r now
Troubleshooting Any Common Issues After Upgrade Reported by Other Users
Even though software updates are meant for improving the performance, and fixing bugs, its not always the outcome. So this segment lists some of the common problems that occur when the operating system is upgraded to the latest version along with possible solutions.
General Solution
As always first upgrade the packages to make sure theoperating system is up-to-date, and it can be done with the following two commands. Here sudo su is used to gain access to the administrator privilege.
sudo su apt-get update apt-get dist-upgrade
Additionally, use the following three commands to make sure the system is free from unwanted packages, cache, obsolete packages respectively. Even though this doesn't guarantee to solve specific problems, it's quite useful to keep the system away from unwanted packages, as they may cause conflicting problems across the operating system, plus removing unwanted packages makes sure the system has enough space for wanted documents.
sudo apt-get clean sudo apt-get autoclean sudo apt-get autoremove
PHP Not Functioning After Upgrade
Another common problem most of the Ubuntu servers encounter is that PHP suddenly stops working right after the operating system is upgraded. Re-enabling the php7.1 module in Apache2 can solve this. Here a2enmod script is used to enable the modules, and in this scenario it turns on php7.1 module only, then the apache2 server is restarted for changes to take effect.
sudo su a2enmod php7.1 systemctl restart apache2
DNS Not Working After Upgrade
DNS, also known as domain name servers are used to resolve domain names to their respective IP addresses. When the DNS server is not working, applications, which rely on Internet, will stop sending requests to the server with which the IP address is linked; hence the Internet may not work as it's intended.
Use the following steps to resolve this problem. Open the resolved.conf file with a text editor, then uncomment the DNS line and use 8.8.8.8, meaning use the Google's public DNS server address to resolve the domain names. Since Google has a large amount of data centers across the world, this not only improves the Internet speed, but also saves time, then also uncomment FallbackDNS to make sure the computer utilizes the given DNS when the primary DNS is not functioning. IPv6 addresses may not work if the ISP doesn't support IPv6, so they can be dropped from the line to keep the file tidy. Once configuration is completed, restart systemd-resolved service to save changes to take effect.
nano /etc/systemd/resolved.conf DNS=8.8.8.8 FallbackDNS=8.8.4.4 2001:4860:4860::8888 2001:4860:4860::8844 systemctl restart systemd-resolved
As stated earlier, Ubuntu 17.10 uses the Wayland display server, by default instead of its usual Xorg to render the graphical contents on the screen. As reported by some users, this causes many issues with some display adapters, especially with Nvidia video cards. So if that's the case, simply disable Wayland and force Ubuntu to revert to its usual Xorg. Go through the file [/etc/gdm3/custom.conf], and locate this line #WaylandEnable=false, and uncomment it to disable Wayland, then restart the computer to changes to take effect.
How to Revert to Previous Version If You Don't Like the Upgrade
Ubuntu 17.10 is very stable, and therefore there is no big reason to roll back to previous versions, but for the sake of the completeness of the tutorial this segment demonstrates how to perform roll back. First of all, Ubuntu doesn't provide any native function to roll back; hence the entire operating system has to be reinstalled to take the operating system to its previous version.
The following steps demonstrate how to restore the settings, applications, and user files after reinstallation is completed. This not only guarantees the operating system will function properly, but also keep it free from any abrupt problems. Please note that this is related to the previously demonstrated duplicity tutorial, so refer it for more information.
The first command saves names of all the currently installed packages into a text file, and keeps it in the home directory. If the current directory isn't home, use cd /home to change it to home prior to following this, then use duplicity to back up both home and etc directories, ignoring proc/sys/tmp folders, then after the roll back is completed, use restoration and the final command to reinstall the existed packages, then use dist-upgrade to remove any conflicting packages, and upgrade older packages.
sudo dpkg --get-selections | grep '[[:space:]]install$' | \awk 'print $1' > install_software
Backing up
duplicity --no-encryption --progress --no-compression /home file:///dondilanga_drive/home duplicity --no-encryption --progress --no-compression /etc file:///dondilanga_drive/etc
Restoration
duplicity restore --no-encryption --progress --no-compression --force file:///dondilanga_drive/home /home duplicity restore --no-encryption --progress --no-compression --force file:///dondilanga_drive/etc /etc cat install_software | xargs sudo apt-get install apt-get update apt-get dist-upgrade
Forums to Reach Out for Help If Its Gone Wrong or You Have Questions
https://askubuntu.com/questions
https://ubuntuforums.org/
https://www.linuxquestions.org/questions/ubuntu-63/
http://manpages.ubuntu.com/
https://forum.ubuntu-nl.org/
http://ubuntugeek.com/forum/index.php

