SSL (stands for secure socket layer) is a web protocol that makes the traffic between server and client secure by encrypting it. Server and clients safely transmit the traffic without the risk of communication being interpreted by third parties. It also helps the client to verify the identity of the website they are communicating with.
In this post, we will describe how to setup SSL for Nginx. We will be demonstrating the procedure using the self-signed certificate. A self-signed certificate only encrypts the connection but does not validate the identity of your server. Therefore, it should be used only for testing environments or for internal LAN services. For the production environment, it is better to use the certificates signed by CA (certificate authority).
Pre-requisites
For this post, you should have the following pre-requisites:
- Nginx already installed on your machine
- Server block configured for your domain
- User with sudo privileges
The procedure explained here has been performed on Debian 10 (Buster) machine.
Step 1: Generating a Self-Signed Certificate
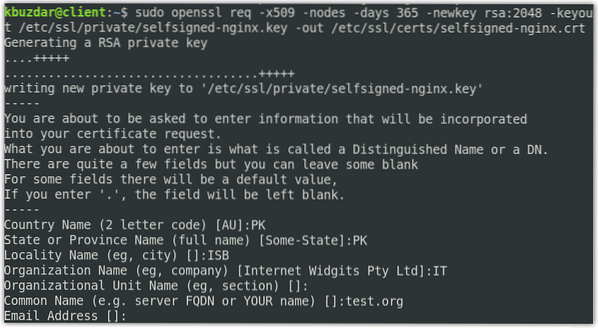
Our first step will be to generate a self-signed certificate. Issue the below command in Terminal to generate CSR (Certificate Signing Request) and a key:
$ sudo openssl req -x509 -nodes -days 365 -newkey rsa:2048 -keyout /etc/ssl/private/selfsigned-nginx.key -out /etc/ssl/certs/selfsigned-nginx.crtYou will be prompted to provide some information like your country name, state, locality, common name (your domain name or IP address), and email address.
In the above command, OpenSSL will create the following two files:
- CSR: selfsigned-nginx.crt in the in the /etc/ssl/cert/ directory
- Key: selfsigned-nginx.key in the /etc/ssl/private directory
Now create the dhparam.pem file using the below command:
$ sudo openssl dhparam -out /etc/ssl/certs/dhparam.pem 2048Step 2: Configuring Nginx to Use SSL
In the previous step, we have created the CSR and the key. Now in this step, we will configure the Nginx to use SSL. For this, we will create a configuration snippet and add information about our SSL certificate files and key locations.
Issue the below command in Terminal to create a new configuration snippet self-signed.conf file in the /etc/nginx/snippets.
$ sudo nano /etc/nginx/snippets/self-signed.confIn the file, add the following lines:
ssl_certificate /etc/ssl/certs/selfsigned-nginx.crt;ssl_certificate_key /etc/ssl/private/selfsigned-nginx.key;
The ssl_certificate is set to selfsigned-nginx.crt (certificate file) while the ssl_certificate_key is set to selfsigned-nginx.key (key file).

Save and close the self-signed.conf file.
Now we will create another snippet file ssl-params.conf and configure some basic SSL settings. Issue the below command in Terminal to edit the ssl-params.conf file:
$ sudo nano /etc/nginx/snippets/ssl-params.confAdd following content to the file:
ssl_protocols TLSv1.2;ssl_prefer_server_ciphers on;
ssl_dhparam /etc/ssl/certs/dhparam.pem;
ssl_ciphers ECDHE-RSA-AES256-GCM-SHA512:DHE-RSA-AES256-GCM-SHA512:ECDHE-RSA-AES256-GCM-SHA384:DHE-RSA-AES256-GCM-SHA384:ECDHE-RSA-AES256-SHA384;
ssl_ecdh_curve secp384r1;
ssl_session_timeout 10m;
ssl_session_cache shared:SSL:10m;
ssl_session_tickets off;
# ssl_stapling on;
# ssl_stapling_verify on;
resolver 8.8.8.8 8.8.4.4 valid=300s;
resolver_timeout 5s;
add_header X-Frame-Options DENY;
add_header X-Content-Type-Options nosniff;
add_header X-XSS-Protection "1; mode=block";
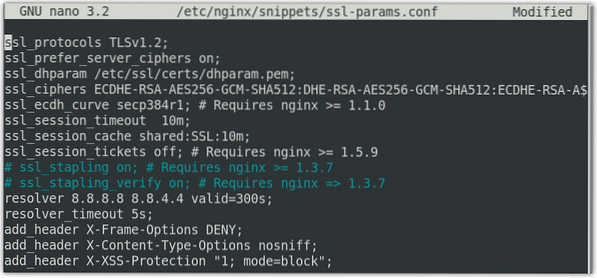
As we are not using a CA-signed certificate, therefore we have disabled the SSL stapling. If you are using a CA-signed certificate, uncomment the ssl_stapling entry.
Step 3: Configuring the Nginx to Use SSL
Now we will open the Nginx server block configuration file to make some configurations. In this step, we will assume you have already set up the server block, which will be similar to this:
serverlisten 80;
listen [::]:80;
root /var/www/test.org/html;
index index.html index.htm index.nginx-debian.html;
server_name test.org www.test.org;
location /
try_files $uri $uri/ =404;
To open the Nginx server block configuration file, use the below command:
$ sudo nano /etc/nginx/sites-available/test.orgNow modify the existing server block to make it look like this:
serverlisten 443 ssl;
listen [::]:443 ssl;
include snippets/self-signed.conf;
include snippets/ssl-params.conf;
root /var/www/test.org/html;
index index.html index.htm index.nginx-debian.html;
server_name test.org www.test.org;
In the above configurations, we have also added the SSL snippets self-signed.conf and ssl-params.conf that we have configured earlier.
Next, add a second server block.
serverlisten 80;
listen [::]:80;
server_name test.org www.test.org;
return 302 https://$server_name$request_uri;
In the above configuration, return 302 redirects the HTTP to HTTPS.
Note: Make sure to replace test.org with your own domain name. Now save and close the file.

Step 4: Allow SSL Traffic through Firewall
If a firewall is enabled on your system, you will have to allow SSL traffic through it. Nginx provides you with three different profiles with ufw. You can view them using the below command in Terminal:
$ sudo ufw app listYou will see the following output with three profiles for the Nginx traffic.
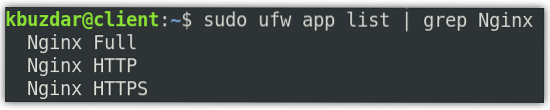
You will need to allow the “Nginx Full” profile in the firewall. To do so, use the below command:
$ sudo ufw allow 'Nginx Full'To verify if the profile has been allowed in the firewall, use the below command:
$ sudo ufw statusStep 5: Test NGINX configuration file
Now test the Nginx configuration file using the below command in Terminal:
$ sudo nginx -tYou should see the below output.

Now create the symbolic link between sites-available and sites-enabled:
Then restart the Nginx service to apply the configuration changes. Use the below command to do so:
$ sudo systemctl restart nginxStep 6: Test SSL
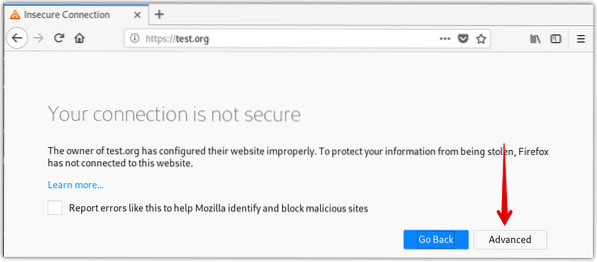
Now to test the SSL, navigate to the following address:
https://domain-or-IP address
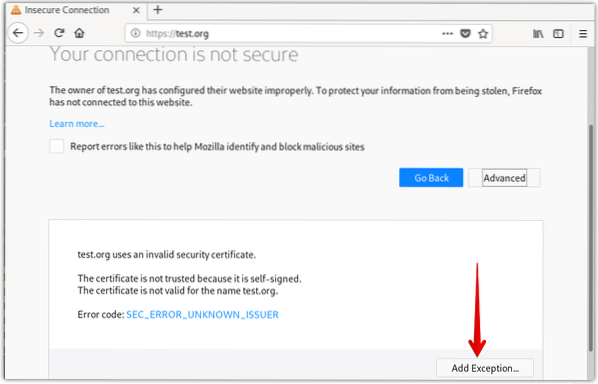
As we have set up the self-signed certificate, therefore we will see a warning that the connection is not secure. The following page appears when using the Mozilla Firefox browser.
Click the Advanced button.
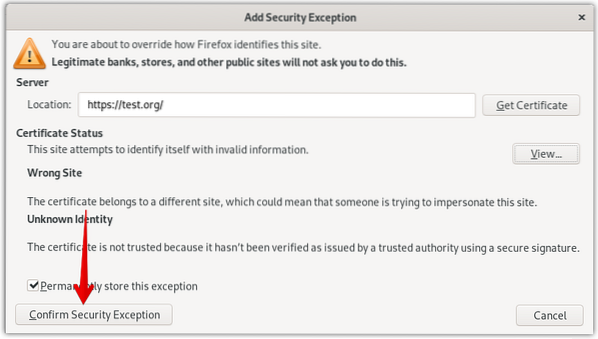
Click Add Exception.
Then click Confirm Security Exception.
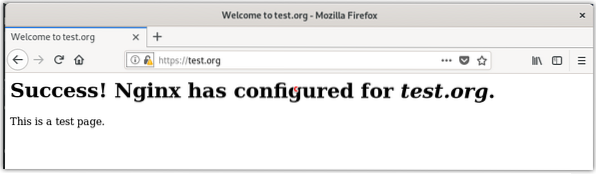
Now you will see your HTTPS site but with a warning sign (lock with a yellow warning sign) about the security of your website.
Also, check if the redirect works correctly by accessing your domain or IP address using http.
http://domain-or-IP address
Now, if your site automatically redirects to HTTPS, this means redirection worked correctly. To configure the redirection permanently, edit the server block configuration file using the below command in Terminal:
$ sudo nano /etc/nginx/sites-available/test.orgNow change the return 302 to return 301 in the file and then save and close it.

That is how you can set up SSL for Nginx in Debian 10 system. We have set up the self-signed certificate for demonstration. If you are in a production environment, always go for a CA certificate.

