
Logging is a crucial step to be performed by a programmer during software development. It helps developers to track events happening during the execution of a program, which can be helpful for the future debugging process. If you are a new learner or working on a new project, it is a good practice to use logging for tracking the code flow and for solving errors.
While writing short programs, most of us typically ignore logging, but when the program becomes complex, then it is an essential and useful step of using logging to fix the errors that prevent the software from running smoothly. Logging is nothing more than writing the events in the software into a log file or outputting in the terminal.
Logging is not only used for debugging. It is also a helpful process for gathering information, gathering usage data, and many other useful tasks. It is also one of the most usual functions for web developers not only to detect errors but also to gather user's data like IP addresses, which can be used for further business analytics.
In Python, most of the logging facilities are provided by the logging module presented in the python's standard library, so we don't have to do any extra configuration. Let's see how to use it for logging in python. Before following this tutorial, it is necessary to have the latest version of python installed in your system. If you don't have the newest python installed in your system, you can follow our step by step guide on installing and updating python on Linux.
The Python Logging Module
The python's logging module is one of the most used logging libraries in python. The best part is that it comes preinstalled with python's standard library, so we don't have to do any configuration or installation. The logging module is robust and straightforward, which means that it is useful for both beginners and enterprises. To use the logging module in python, we need to import it into our program as I do in the following line of code.
import logging
Now let us see a demo of how we can log some messages into the terminal. Just copy the following code into your favorite python IDE and run.
import logging logging.warning("This is a Warning") On running the above code, we will get the output as shown in the below image.

As seen in the output, the program prints a warning message. The logging module also has some other levels of logging like info, error, etc., which make our task easy. Let us discuss them in brief with examples.
Python logging levels
Many levels of logging can be used to log different messages at the level of severity. The levels that are provided by the python logging module are
- CRITICAL
- ERROR
- WARNING
- INFO
- DEBUG
These levels are shown in the decreasing order of their severity. Let us see how to use these levels in our program. Just copy the following code and run in the Python IDE.
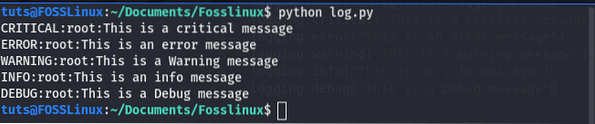
import logging logging.critical("This is a critical message") logging.error("This is an error message") logging.warning("This is a Warning message") logging.info("This is an info message") logging.debug("This is a Debug message") On running the above code in the IDE, the output that the terminal shows is shown in the below image.

As you can see in the output, the DEBUG and INFO messages are not printed in the terminal because the logging module, by default, logged only the messages of security level higher than or equal to the warning. To display INFO and DEBUG in the terminal, we need to change the Basic configuration of the logger manually. To do so, we can use the basicConfig(**kwargs) method provided by the logging module. To see a simple demo of configuration, just run the following code into your Python IDE.
import logging logging.basicConfig(level=logging.DEBUG) logging.critical("This is a critical message") logging.error("This is an error message") logging.warning("This is a Warning message") logging.info("This is an info message") logging.debug("This is a Debug message") In the above code, we have set the level of logging.DEBUG, which means that all the levels which are above the debug level will be logged. Thus in the above code, all the messages will be logged as shown in the below image.
Let us discuss more the basicConfig() method of the logging module.
Basic Configurations
The logging module provides a very useful method basicConfig(**Kwargs), which is used for setting configurations for logging data. Some of the commonly used parameters of the basicConfig() function are:
- level: This is used to set the severity level, which must be logged.
- filename: This is used to specify the file where we want to log the messages. If we don't define the file, then it will be logged to the terminal, as we have seen till now.
- filemode: This is used when we write the logs into a file. These parameters accept the mode in which the log file to be opened. By default, it is set to the 'a' mode, which means the file will open in the append mode.
- format: This is used to format the log message as we need it to display.
Let us see how we can use these configurations in the python's logging module by exploring the example of one after one.
The level parameter is used to set the level of severity, to see a practical demo of how to use it, copy the below code in the python IDE and run.
import logging logging.basicConfig(level=logging.INFO) logging.critical("This is a critical message") logging.error("This is an error message") logging.warning("This is a Warning message") logging.info("This is an info message") logging.debug("This is a Debug message") On running the code, you may see the output, as shown in the below image. As you can see that the messages which are above the info levels are printed, but the message at the debug level does not print.

The level parameter is a useful configuration that should be done so that the log files were not too large by containing unnecessary data and have only the required information.
Logging into a file
We have only seen how to log on to the terminal, but logging to the terminal is not always helpful as we can't save it for later use. For a better solution, we can print the logs in a text file that we save and analyze later. The logs are text and can be kept in a text file of any format, but universally it is adopted to save the logs in a file with the .log extension. These files are known as log files and are used universally for storing logs of programs, web applications, and other software.
We can save logs to a file by setting up the configuration of the logging module with the help of basicConfig() function. We need to give the name of the file where we want to save the logs in the filename parameter of the basicConfig() function, after which the records will be automatically printed in the log file that we specify. Let us see a practical example to know how it works.
import logging logging.basicConfig(level=logging.INFO, filename="mylog.log") logging.critical("This is a critical message") logging.error("This is an error message") logging.warning("This is a Warning message") logging.info("This is an info message") logging.debug("This is a Debug message") On running the code, you can see that a new file has been created in the current working directory name mylog.log. On opening the file with a text editor, you may notice that the logs were saved into the file.
If we rerun the code, we will see that log will be appended in the file. We can change this by specifying the filemode parameter in the basiconfig() function. By default, the filemode parameter has the value “a,” which stands for append. But sometimes we also want to delete the previously logged data and write the new logs only in the file. For doing this, we can give the filemode parameter the value “w,” which stands for write, and it deletes any previous data in the file and writes the new ones. For a demo, see the following example.
import logging logging.basicConfig(level=logging.INFO, filename="mylog.log", filemode="w") logging.critical("This is a critical message") logging.error("This is an error message") logging.warning("This is a Warning message") logging.info("This is an info message") logging.debug("This is a Debug message") On running the above code, you may notice that the earlier logs present in the file have been removed from the file, and the new logs have been added. Every time we run the code, the new logs will be added, and the previous will be deleted, which is useful when we don't need the records for further use.
Formatting the Logs
We have seen the output logs have the default layout, but we can change the format by setting the format parameter of the basicConfig() function. Let us see a practical demo to know how we can use the format parameter in the basicConfig() function to change the format of the log.
import logging logging.basicConfig(level=logging.INFO, format="%(filename)s: %(levelname)s: %(message)s") logging.critical("This is a critical message") logging.error("This is a error message") logging.warning("This is a Warning message") logging.info("This is a info message") logging.debug("This is a Debug message") The output of the above code is as shown in the below image.

As you can see in the output, the filename has also been displayed. We can use the format parameter for indicating many other formats lets discuss some of them.
%(asctime)s: This is used to display the human-readable time in the logs. To see how it shows time, run the following code in the Python IDE.
import logging logging.basicConfig(level=logging.INFO, format="%(asctime)s : %(message)s") logging.warning("This is a Warning message") On running the code, you may see the output, as shown in the below image.

%(created)f: This will display the time in which the log is created.
%(filename)s: This is used to display the name of the file in the log message. To see how it works, just run the following example code in your Python IDE.
import logging logging.basicConfig(level=logging.INFO, format="%(asctime)s : %(filename)s : %(message)s") logging.warning("This is a Warning message") The output that the code provides is shown in the following image. In the output, the name of the file has been displayed. This is useful while working on a project which involves multiple files so we can get the file that has the error quickly.

%(levelname)s: This is used to display the name of the level used like WARNING, DEBUG, etc.
%(levelno)s: This is used to print the numeric value of the level that the message is a part of.
%(lineno)d: This is used to print the line number of the current line, which displays the message. This is very useful as it gives us the line number where we must-see for an error, so it helps the debugging process. Let us see an example code to see how to use this to form the output of logs.
import logging Format = '%(asctime)s : %(filename)s:%(lineno)d: %(message)s' logging.basicConfig(level=logging.INFO, format= Format) logging.warning("This is a Warning message") This code will also print the line no, as shown in the below image.

%(message)s: It is used to display the message that we have logged.
%(pathname)s: This is used to display the full pathname of the source code file.
%(process)d: This will display the process id if available.
%(processname)s: This will display the process Name if available.
%(thread)d: This will display the Thread id if available.
%(threadName)s: This will display the Thread Name if available.
Logging Variable Data
We have given the messages in the logs by ourselves, which are static data. Still, in real-world applications, the data we logged will be mostly dynamic information from our application. To do this, we need to output the variables with the message log. We can do this in many ways. For example, we can include the variables and format the string with placeholders and then pass them to the message log so that the values of the variables will be output in the records.
For example, see the below code; you can copy the code an run in your python IDE.
import logging var_message = "internal Error" logging.warning("The server has been stopped due to %s", var_message) On running the code, you will see the output, as shown in the below image. As you can see in the picture that the value stored in the variable is also printed on the screen.

We can also display variables in logs using the f-strings, which are introduced in python 3.6. But to use the f-strings, you will need python 3.6 or greater installed in your system. You can check which python version is installed in your system by running the following command in the terminal.
python --version # for python 2 on Linux python3 --version # for python 3 in Linux
This will print the version of python you are using in your system. It is a good practice to use the latest version of python to get better performance; you can see our guide to updating your python version in Linux.
To format strings using the f-strings in python, we need to use the following code syntax. You can copy and run the code in your favorite python IDE.
import logging var_message = "internal Error" logging.warning(f"The server has been stopped due to var_message")
On running the code, you will get the output similar to the one we get on running the above code. But when we see the code, we can notice the f at the beginning of the string, which represents that it is an f-string, and we can directly use variables in f-strings by putting them in curly braces.
Logging Stack Traces
The logging module can also be used for capturing stack traces. Stack traces are the exception messages that are thrown when an error has occurred in the program. We can capture the exception by setting up the exc_info parameter to True while calling the logging function. This parameter is useful as we can log the complete exception message with our error message in a file or terminal screen.
To get a practical demo to know how we can lof the stack traces, copy the following code into your python IDE and run.
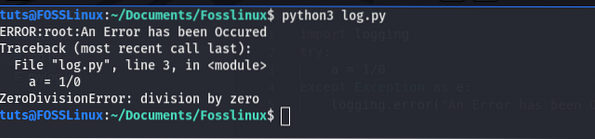
import logging try: a = 1/0 except Exception as e: logging.error("An Error has been Occured", exc_info=True)On running the code, the exception will be logged in the terminal. You will see the output of the code, as shown in the below image. You can also log the exception into a file using the filename parameter in the basicConfig() method, as we discussed above.
This method is also critical in building the extensive application as we can have exception handling with logging, which is excellent for the debugging process.
Logger Objects
The logging module also provides some useful classes which can be used for better logging, mainly for a broader application. Let us see some of the most used classes of the logging module and what and how they function.
- Loggers: The Logger class is the class whose objects are used to call the functions directly.
- Handlers: Handlers are used to send the log messages to the desired output location i.e., file or console.
- Filters: This is used to filter the display of log records.
- Formatters: These were used to format the output of the logs messages.
If you want complete detail on how to use these classes, you can refer to the official documentation of the python logging module.
Conclusion
In this article, we have learned the basics of doing logging in python. The logging module is a straightforward and powerful way to do logging in python. Suppose you are not doing logging till now, today is the day to get started with logging as you read the article and learned how easy it is to use logging in python. You can now use logging in both small and significant applications.
If you do logging correctly, it will indeed be helpful in one way or another. I advise you to start using it from small programs as it will help you to get a good knowledge of the thing or two and will be priceless for big projects. You may also want to see how to work with SQLite databases in python.


