If you are a 3D computer graphics or animation enthusiast and are in search of some 3D modeling software, then you have come to the right place. There are many 3D modeling software programs available, many are good and are doing their jobs quite well, but they all come with a hefty price tag and high subscription fees. There is no need to pay heavy subscription fees when you have a free and powerful 3D creation tool at your fingertips, known as a Blender. Blender is a popular and open-source 3D creation software that can be used in 3D printer designs. It is a robust program that supports the entire pipeline of 3D creation, which includes modeling, shading, rigging, animation, and rendering. There is no need to get any supplementary programs because Blender lets you make games and edit videos.
Blender is quite easy to learn and has a great community to support you. This article introduces the basics of the Blender software to beginners. We will discuss the Blender user interface and some essential shortcut keys. If you are a beginner and want to start 3D modeling in Blender, then this article is for you.
Installation
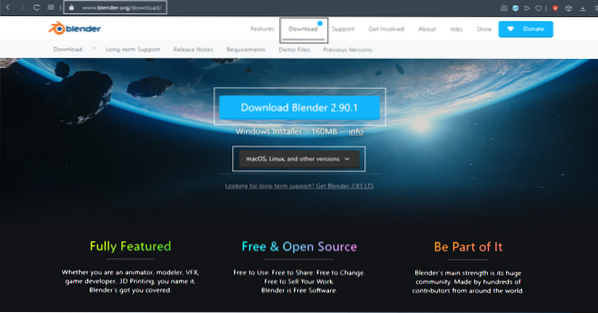
The first step is to get the latest version of Blender from the website. Blender can be downloaded for Windows, Linux, and macOS systems. You can also download a portable version of Blender, called “Blender portable.”
www.blender.org/downlaod
Click Download to download the Blender program.
After downloading the software, the installation process is straightforward. For Windows operating system, you will get a “.msi” file; simply double-click the file and complete the installation process.
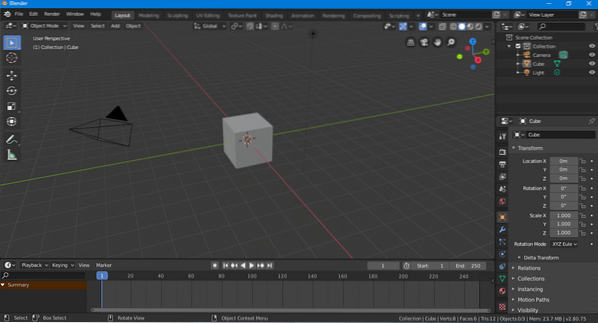
Launch the program after completing the installation procedure. You will see the window shown below. There will be a default cube, a camera, and a light present in the window.
User Interface
At first glance, the user interface may seem intimidating, but it is actually quite easy to understand, and it will not take much time for you to learn how to use it. Like other software, Blender has a navigation bar, toolbar, etc. Let us take a comprehensive look at the user interface.
The key parts of the user interface have been highlighted in the following image:
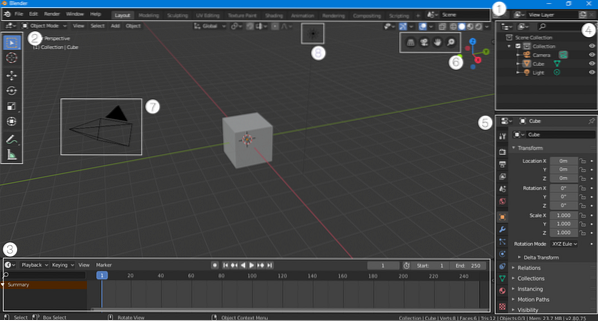
Navigation Bar
The navigation bar, located at the top of the interface, consists of buttons that provide quick access to various features. This bar is conveniently included in the newest versions of Blender. Apart from basic navigation buttons, there are also windows that quickly change the mode of the user interface. For example, if you are in Layout mode and want to add some shaders to your work, just click the “Shading” button, and the interface will be set according to the shading workspace.
Toolbar
The toolbar was redesigned and reintroduced in version 2.80. This toolbar is quite advantageous for beginners who are not aware of the shortcut keys. The toolbar is easy to access and use because you can get short details about each tool by hovering the mouse over the tool's icon.
Timeline
Before moving towards the left side of the user interface, check out the timeline at the bottom. The timeline is a collapse-able window, and you can collapse it if you are not using it. But if you are animating something, then a timeline can help you, because you can key-frame items in layout mode.
Scene Collection Window
This window is essential, as it shows the objects used in the scene. Each group of objects is called a “collection.” For example, this scene contains a collection of a camera, a cube, and a light. This window can be very convenient if your scene contains many objects. You can search for, hide, or reveal the object in this window. Multiple collections can be added to a given scene.
Scene/Object Settings
This part of the user interface is quite significant, as this window is used to modify scene settings and contains various scene setting options (e.g., renderer setting, output setting, etc.). This window also presents the object and material settings of the selected item. For example, if you select a camera, cube, or light in the layout mode, the setting of that selected item will appear in this window. You can also add “Modifiers” and “Constraints” to the object in this window.
View Navigation Bar
The navigation bar is a useful addition in version 2.80 for beginners. These buttons are used to navigate the scene. It contains 4 buttons: an orthographic/perspective view button, zoom and pan buttons, and a camera view button.
Camera
The camera is an essential part of every scene because the renderer only renders out a scene that is visible in the camera. Any object outside of the camera will not render.
Light
Lighting is very important in 3D creation. Without light, the scene looks dark and lacks details. You can add multiple lights in your scene to make it more detailed and clear.
Shortcut Keys
Undoubtedly, Blender has a great user interface and is now quite user-friendly, as compared to older versions. Still, some essential items cannot be placed on the main screen. Secondly, the 3D modeling process takes a large amount of time, but you can speed up the process if you remember some simple shortcut keys. Blender has shortcut keys for almost all functions. It is always a better practice to remember the shortcut keys.
Let us now look at some of the most commonly used shortcut keys in Blender.
Hiding/Revealing Properties and Tool Bar
The first two shortcut keys to keep in mind are “T” and “N.” If you need more space for your work, then you can hide the toolbar by pressing “T.” Use the same key to reveal the toolbar. Another important shortcut key is “N.” Pressing “N” will reveal the Properties tab on the left.
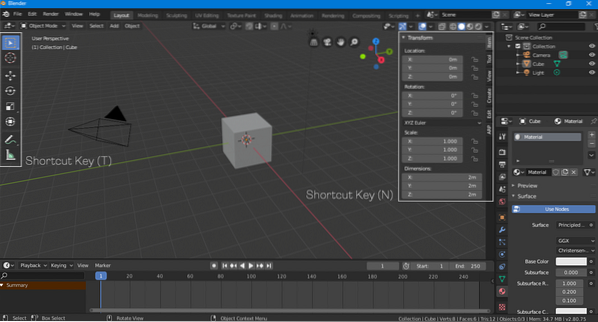
Transforming, Scaling, Rotating
You can transform, scale, and rotate objects using the “Properties” panel (Press “N” to reveal it). However, using the shortcut keys for transformation is a better approach.
Use the “G” hotkey to move an object freely. To clip an object with one axis, select the object by pressing “G” and then define an axis by hitting “X, Y or Z.” To rotate an object, use the “R” key. To rotate an object along an axis, then use the same process; press “R” and then “X, Y or Z.” For scaling, use the “S” key.
Modifying Objects
It is hard to make a complete 3D model using simple shape models only, and you always need to modify an object to get the desired output. All objects can be modified in Blender.
Select the object you want to modify and then go to object interaction mode at the top right corner and select “Edit Mode,” as shown in the following image:
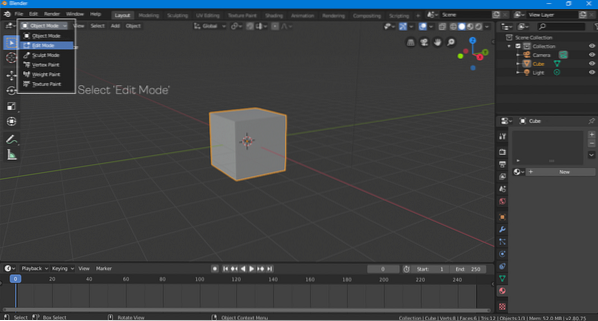
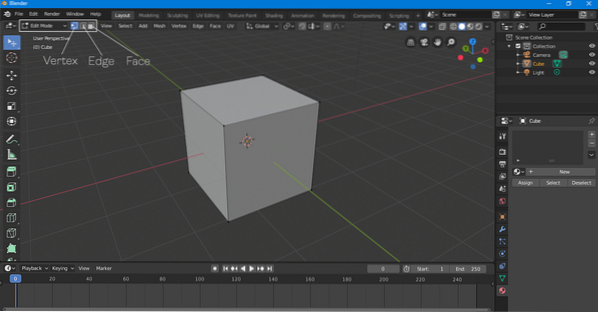
In the “Edit Mode,” the vertices, edges, and faces of a shape can be modified any way you want. Modifications of objects are mostly made in “Edit Mode.” The shortcut key used to toggle between “Edit Mode” and “Object Mode” is the “Tab” key.
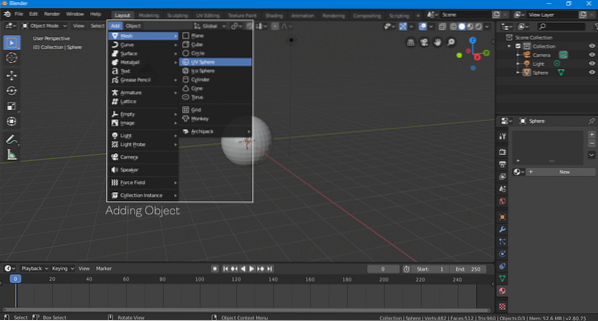
Adding Objects
A 3D model can be a combination of many objects. To add an object, click “Add>Mesh>Object.” You will be presented with several options, including a cone, a cylinder, a sphere, a plane, a torus, and many other objects that can be added to the scene.
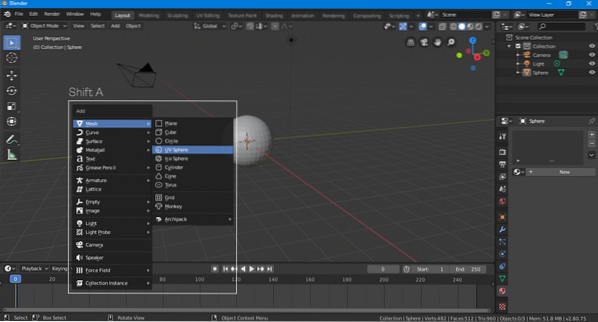
The shortcut key combination for adding an object is “Shift-A.”
Adding Materials
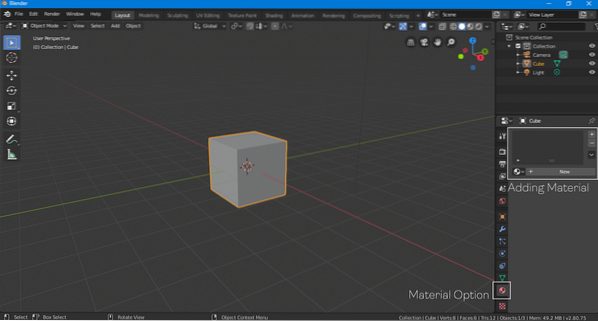
The last thing you should know how to do as a beginner in Blender is adding materials. A material in something that you layer on the top of a model, and could be a texture or color.
Select the object, go to the material option, and add a new material by clicking “New.”
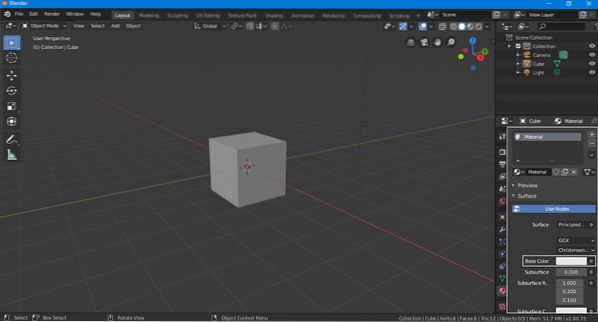
A default material has now been added. You can select a different color for the material by clicking the “Base Color” option.
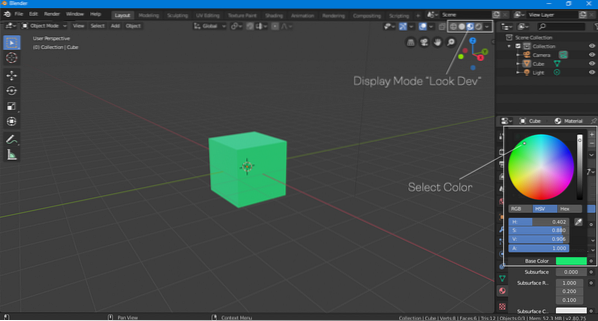
To see the object color, change the display mode to “Look Dev” or “Rendered,” as shown in the above image.
Conclusion
This article discussed some basic features of Blender that can be quite helpful for beginners. However, Blender is still a very complex software that has a lot of features to explore. It also comes with plenty of add-ons developed by community members to make the workflow easier. Most add-ons are free. If you are a beginner and want to learn 3D modeling, then Blender is the best choice. Blender is a fully-featured 3D modeling software with a large community to support it, and even better, it is completely free.


