- Installing the ZFS file system
- Creating the ZFS storage pool
- Removing the ZFS storage pool
ZFS features
Let's take a look at some of the features of ZFS file system:
- High storage capacity
- Data integrity
- Protection against data corruption
- Efficient data protection
- Date compression
Note: We have explained the procedure and commands on Ubuntu 20.04 LTS (Focal Fossa).
Installing ZFS Filesystem on Ubuntu
We will be using the command line Terminal application for the installation of the ZFS filesystem. To launch the command line Terminal, use the Ctrl+Alt+T keyboard shortcut.
Now to install the ZFS filesystem on Ubuntu, issue the following command in Terminal:
$ sudo apt install zfsutils-linuxWhen prompted for the password, provide the sudo password.
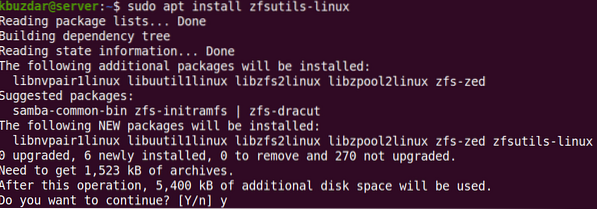
After running the above command, the system might ask for confirmation that if you want to continue the installation or not. Press y to continue; after that, the package will be installed on your system.
To verify ZFS file system installation, issue the following command in Terminal:
$ which zfsYou will see the output similar to the following:

Creating the ZFS storage pool
After the installation is completed, we will now create a storage pool for our drives. Here are the steps to do so:
1. First, find out the names of the drives for the pool. Use the following command in Terminal to do so:
$ sudo fdisk -l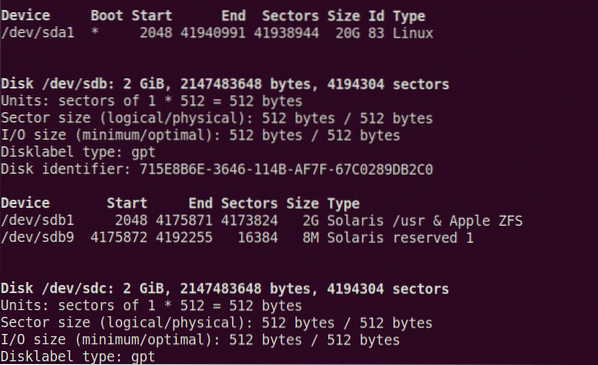
You will see the drives listed in the output. Note down the drive names that you want to pool. From the above output, we can see that there are two drives /dev/sdb and /dev/sdc are listed. We will create the storage pool using these two drives.
There are two types of storage pools: Striped and mirror. In the striped pool, data is stored in the striped across all devices. While in a mirrored pool, the copy of the data is stored across devices that make them fault-tolerant.
To create the striped pool, use the following syntax:
$ sudo zpool createTo create the mirror pool, use the following syntax:
$ sudo zpool createIf any error occurs, try forcing the command using the -f option after the zpool create command.
In the following example, we will create the striped pool named “test” using the /dev/sdb and /dev/sdc.
$ sudo zpool create test /dev/sdb /dev/sdc
To find out where the pool has been mounted, use the following command in Terminal:
$ df -h
From the above command, we can see that the pool has been mounted at the /test. You can also change the mount point for the pool using the following syntax:
$ sudo zfs set mountpoint=For example, to set export/zfs as the new mount point, the command would be:
$ sudo zfs set mountpoint=/export/zfs test
Then use the following command to verify if the mount point has changed:
$ df -h | grep test
You can also create the directories under the storage pool. For example, to create a directory named files under the storage pool, the command would be:
$ sudo zfs create test/files
To view all the ZFS storage pools on the system, you can use the following command in Terminal:
$ zpool listIt lists all the pools along with their size, space usage, health, and some other information.

To view all the configurations and status of each device in the ZFS storage pool, use the following command in Terminal:
$ zfs status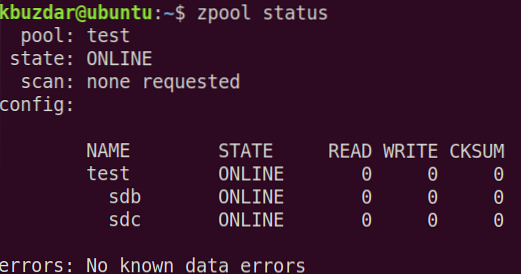
If you experience some issues related to drives in the pool, you can use the events option. Issue the following command in Terminal to view events associated with a specific pool:
$ sudo zpool events pool_name -vRemoving the ZFS storage pool
If you no longer need the pool, you can remove it. However, note that removing the pool will also remove the files contained within it.
Use the following command syntax to remove the storage pool:
$ sudo zpool destroy pool_nameIn this article, you have learned how to install the ZFS file system on Ubuntu 20.04 LTS (Focal Fossa). You have also learned how to create a storage pool in the ZFS file system and remove it when you no longer need it.