HaProxy is used by popular sites such as Tumblr, GitHub, and StackOverflow. In this guide, we will take you through the installation of HAProxy in a setup of webservers that are powered using Nginx.
Lab Setup
3 instances of CentOS 7 servers as shown
Hostname IP addressesload_balancer 3.17.12.132
server_01 3.19.229.234
server_02 3.17.9.217
Step 1: Edit the /etc/hosts file for the load balancer
To start off, log into the load balancer system and modify the /etc/hosts file to include the hostnames and IP addresses of the two web servers as shown
$ vim /etc/hosts3.19.229.234 server_01
3.17.9.217 server-02

Once done, save the changes and exit the configuration file.
Now head out to each of the web servers and update the /etc/hosts file with the IP address and hostname of the load balancer
3.17.12.132 load-balancerThereafter, confirm that you can ping the load balancer from server_01
And likewise from server_02
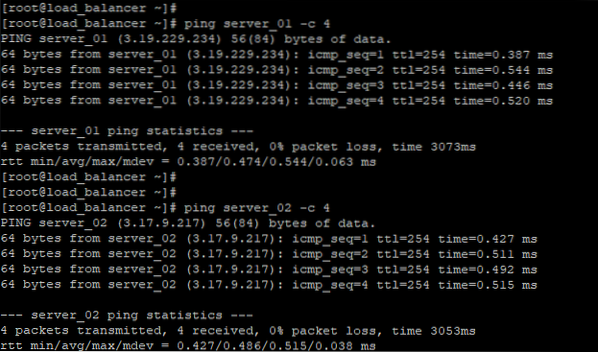
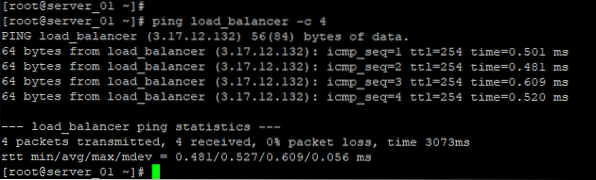
Also, make sure, you can ping the servers from the load balancer.

Perfect ! all servers can communicate with the load balancer!
Step 2: Install and configure HA Proxy on the load balancer
Because HA Proxy is readily available from CentOS official repository, we are going to install it using the yum or dnf package manager.
But as always, update the system first
# yum updateNext, install HA Proxy as shown
# yum install haproxy 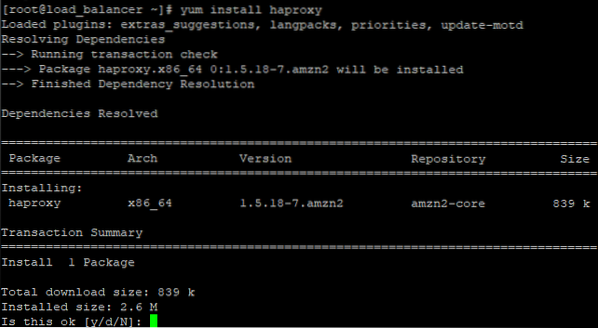
Upon successful installation, navigate to the haproxy directory.
# cd /etc/haproxyBest practice requires us to back up any configuration file before making any modifications. So Backup the haproxy.cfg file by renaming it.
# mv haproxy.cfg haproxy.cfg.bakNext, proceed and open the configuration file
vim haproxy.cfgEnsure you make the modification as shown
#---------------------------------------------------------------------# Global settings
#---------------------------------------------------------------------
global
log 127.0.0.1 local2 #Log configuration
chroot /var/lib/haproxy
pidfile /var/run/haproxy.pid
maxconn 4000
user haproxy #Haproxy running under user and group "haproxy"
group haproxy
daemon
# turn on stats unix socket
stats socket /var/lib/haproxy/stats
#---------------------------------------------------------------------
# common defaults that all the 'listen' and 'backend' sections will
# use if not designated in their block
#---------------------------------------------------------------------
defaults
mode http
log global
option httplog
option dontlognull
option http-server-close
option forwardfor except 127.0.0.0/8
option redispatch
retries 3
timeout http-request 10s
timeout queue 1m
timeout connect 10s
timeout client 1m
timeout server 1m
timeout http-keep-alive 10s
timeout check 10s
maxconn 3000
#---------------------------------------------------------------------
#HAProxy Monitoring Config
#---------------------------------------------------------------------
listen haproxy3-monitoring *:8080 #Haproxy Monitoring run on port 8080
mode http
option forwardfor
option httpclose
stats enable
stats show-legends
stats refresh 5s
stats uri /stats #URL for HAProxy monitoring
stats realm Haproxy\ Statistics
stats auth Password123: Password123#User and Password for login to the monitoring dashboard
stats admin if TRUE
default_backend app-main #This is optionally for monitoring backend
#---------------------------------------------------------------------
# FrontEnd Configuration
#---------------------------------------------------------------------
frontend main
bind *:80
option http-server-close
option forwardfor
default_backend app-main
#---------------------------------------------------------------------
# BackEnd round robin as balance algorithm
#---------------------------------------------------------------------
backend app-main
balance roundrobin #Balance algorithm
option httpchk HEAD / HTTP/1.1\r\nHost:\ localhost
#Check the server application is up and healty - 200 status code
server server_01 3.19.229.234:80 check #Nginx1
server server_02 3.17.9.217:80 check #Nginx2
Be sure to modify the web servers hostname and IP addresses as indicated in the last two lines. Save the changes and exit.
The next step will be to configure Rsyslog to be able to log HAProxy statistics.
# vim /etc/rsyslog.confMake sure you uncomment the lines below to allows UDP connections
$ModLoad imudp$UDPServerRun 514
Next, proceed and create a new configuration file haproxy.conf
# vim /etc/rsyslog.d/haproxy.confPaste the following lines, save and exit
local2.=info /var/log/haproxy-access.log #For Access Loglocal2.notice /var/log/haproxy-info.log #For Service Info - Backend, loadbalancer
For the changes to take effect restart the rsyslog daemon as shown:
# systemctl restart rsyslogThen start and enable HAProxy
# systemctl start rsyslog# systemctl enable rsyslog

Verify that HAProxy is running
# systemctl status rsyslog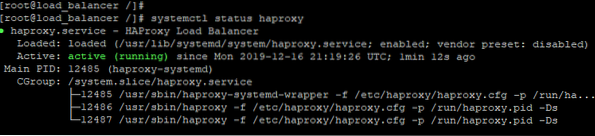
Step 3: Install and configure Nginx
Now, the only part remaining is the installation of Nginx. Log into each of the servers and first update the system packages:
# yum updateNext install EPEL (Extra Packages for Enterprise Linux)
# yum install epel-releaseTo install Nginx, run the command:
# yum install nginxNext, start and enable Nginx
# systemctl start nginx# systemctl enable nginx
We are then going to modify the index.html file in both cases in order to demonstrate or simulate how the load balancer is able to distribute web traffic across both servers.
For server_01
# echo "server_01. Hey ! Welcome to the first web server" > index.htmlFor server_02
# echo "server_02. Hey ! Welcome to the second web server" > index.htmlFor the changes to be effected, restart Nginx
# systemctl restart nginxStep 4: Testing if the load balancer is working
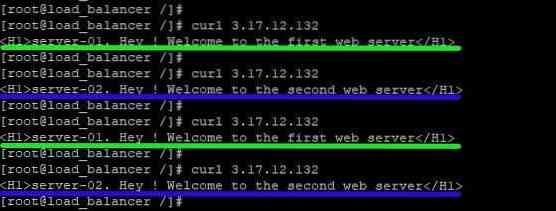
We are finally at the point where we want to see if the configuration is working. So log into the load balancer and execute the curl command repeatedly
# curl 3.17.12.132You should get alternating output on the terminal showing the value of index.html from server_01 and server_02
Now let's test using a web browser. Browse your load balancer's IP address
http://load-balancer-IP-addressThe first page will display content from any of the web servers

Now refresh the webpage and check to see if it displays content from the other web server
Perfect ! The load balance is distributing IP traffic equally between the two web servers !
This wraps up this tutorial on how you can install as well as configure HAProxy on CentOS 8. Your feedback will be much appreciated.


