In this guide, we will discuss two essential networking concepts that are bridging and bonding. We will see how to set up, modify, and delete the bridges and bonds in the Linux system. We will demonstrate the procedure on Linux Mint 20 Ulyana system. However, you can also implement the same procedure on Ubuntu or Debian.
Pre-requisites:
- Linux system with at least two network interfaces
- Sudo user
Bridges
Bridging is to create a bridge between two or more network interfaces to pass traffic between them. It allows you to share your system's internet connection with other systems. Consider a scenario where system A (with no internet connection) wants to connect to another system's B internet connection. All you need is to plug both systems with an Ethernet cable and create a bridge between them. However, to do so, you will need two interfaces on your system B. One interface will be connected to the internet, and the other one will be connected to system A.
Set up Bridge
In our example, we will set up a bridge br0 between two interfaces, ens33 and ens39. The enss33 interface connects to the internet while the ens39 connects to the second system (that needs an internet connection). We will set up the bridge via DHCP.
First, you will have to install the required program bridge-utils to create a bridge. Issue the below command in Terminal to install bridge-utils:
$ sudo apt install bridge-utilsCreate a bridge network interface using the below command in Terminal:
$ brctl addbr br0This command will create a bridge named br0. You can name it anything you want.
Now add both interfaces you want to bridge (one that connects to the internet and the other that connects to the second system) using the below syntax:
$ sudo brctl addifFor instance, in our case, it would be:
$ sudo brctl addif br0 ens33 ens39The above command will add enss33 and ens39 to the bridge br0.
Now, bring up the bridge interface:
$ ip link set devIn our case, it would be:
$ ip link set dev br0 upYou can also run the below command to get the interface up and running (In the case of DHCP).
$ sudo dhclient br0Now, edit the /etc/network/interfaces file and append the following lines:
auto br0iface br0 inet dhcp
bridge_ports ens33 ens39
Now restart the networking services using the below command:
$ sudo systemctl restart networking. serviceNow the bridge has been set up, and hopefully, you will be able to access the internet from your second system.
View Bridge
You can use the below command to view all the configured bridges on your system and the interfaces attached to them.
$ brctl show
Modify Bridge
Add an interface to bridge
You can add an interface to an already existing bridge as follows:
$ sudo brctl addif bridge_name interface_nameFor instance, to add an interface named ens38 to the already existing bridge named br0, the command would be:
$ sudo brctl addif br0 ens38Delete Interface from bridge
You can also delete an interface from a bridge as follows:
$ sudo brctl delif bridge_name interface_nameFor instance, to delete an interface named ens38 from the bridge named br0, the command would be:
$ sudo brctl delif br0 ens38Delete a bridge
To delete a bridge from your system, you will first need to bring it down. Use the following command to do so:
$ sudo ip link set dev bridge_name downFor instance, to delete a bridge named br0, first bring it down:
$ sudo ip link set dev br0 downThen, to delete the bridge, use the following command:
$ sudo brctl delbr bridge_nameIn our example, the command would be:
$ sudo brctl delbr br0Network Bonding
Network bonding combines several network interfaces to present them as a single interface, in effect combining their bandwidth into a single connection. Bonding network interfaces increase throughput, provides high availability and failover in situations where one of the interfaces fails.
There are various modes of network bonding which are as follows:
- mode=0 (Balance Round Robin)
- mode=1 (Active backup)
- mode=2 (Balance XOR)
- mode=3 (Broadcast)
- mode=4 (802.3ad)
- mode=5 (Balance TLB)
- mode=6 (Balance ALB)
Setup Network Bonding
In this guide, we will setup mode 1 (Active backup mode). We will bond two interfaces, ens33 and ens38. The ens33 will be our active interface, while ens38 will be the backup interface.
First, you will have to install the ifenslave tool on your system. To do so, issue the below command in Terminal:
$ apt install ifenslave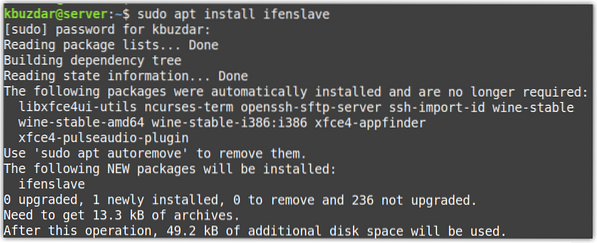
Then load the kernel module using the below command:
$ sudo modprobe bondingThe above command will add additional capabilities to the Linux kernel.
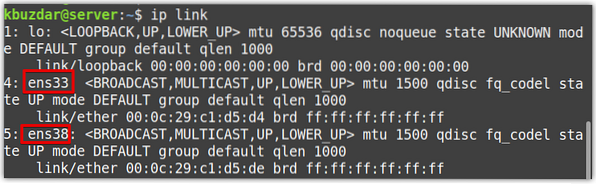
Now, find out your network interfaces. You can use the below command to do so:
$ ip linkThe following output shows there are two network interfaces ens33 and ens38 other than the loopback interface. We will bond the two interfaces, ens33 and ens38, in a bond named bond0.
Now edit the network interfaces files using the below command in Terminal:
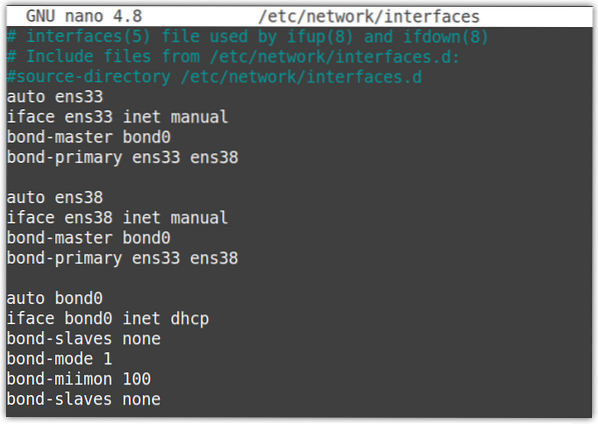
$ sudo nano /etc/network/interfacesModify the file as follows:
Make sure to replace the interface's name with yours.
auto ens33iface ens33 inet manual
bond-master bond0
bond-primary ens33 ens38
auto ens38
iface ens38 inet manual
bond-master bond0
bond-primary ens33 ens38
auto bond0
iface bond0 inet dhcp
bond-slaves none
bond-mode 1
bond-miimon 100
Now save and close the interface configuration file.
Now restart networking service using the below command:
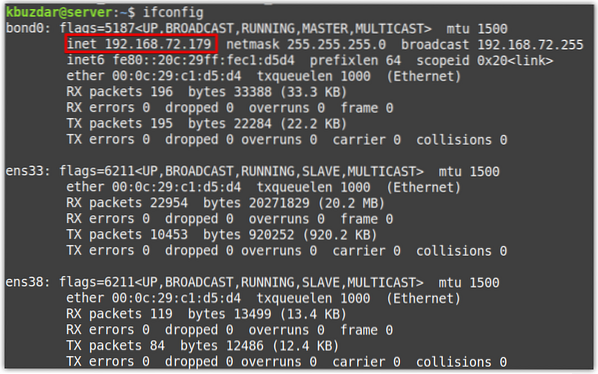
$ sudo systemctl restart networking.serviceRun the “ifconfig” or “ip a” command, and this time you will see the bond0 as a separate interface with an IP address assigned to it. You can also see there is no IP address assigned to the ens33 and ens38 interfaces.
Test Bonding
To verify if bonding is working, issue the below command:
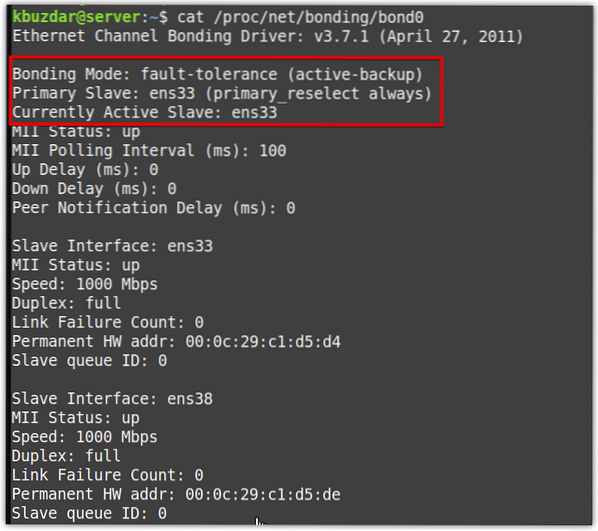
$ cat /proc/net/bonding/bond0The following output shows that the binding mode is active-backup, and both the primary and currently active slave is ens33.
Now to test the active-backup mode, run a continuous ping from another system on the network to the bonding server IP address (which in our case is 192.168.72.179). Your ping should work successfully. Then try shutting down the active interface and see if the ping continues or stops. If the ping continues, this means the bonding has been configured successfully.
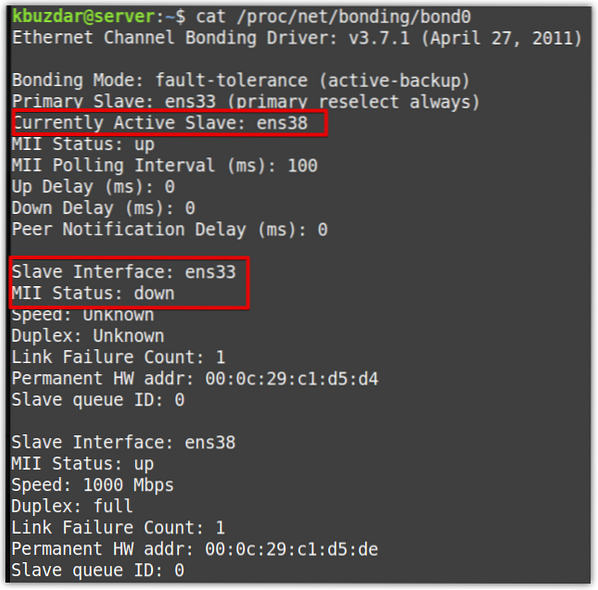
If you run the below command, you can also see that the primary slave ens33 is down while the currently active slave is now ens38.
Modify Bonding
Change Active Slave Interface
You can also change the active slave interface in bonding using the -c option as follows:
$ sudo ifenslave -c bond active_interfaceFor instance, in our scenario, we have ens33 as an active interface while ens38 as a backup interface. To set ens38 as an active slave interface, the command would be:
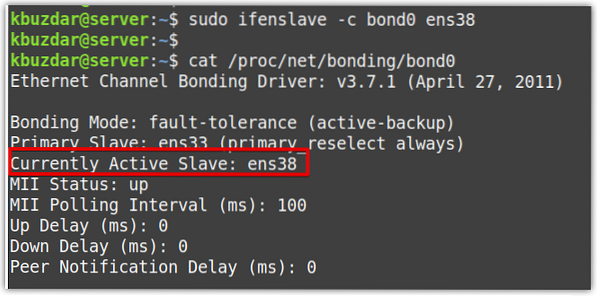
$ sudo ifenslave -c bond0 ens38Now to confirm whether the active interface has successfully changed, issue the below command in Terminal:
$ cat /proc/net/bonding/bond0In the below output, you can see that the active slave interface has changed to ens38.
Change bonding mode
To change the bonding mode, edit the /etc/network/interfaces file and change the bond-mode value. For instance, to change the bond mode to round-robin, modify the value of the bond-mode to 0.
bond-mode 0Now to confirm whether the bonding mode has successfully changed, issue the below command in Terminal:
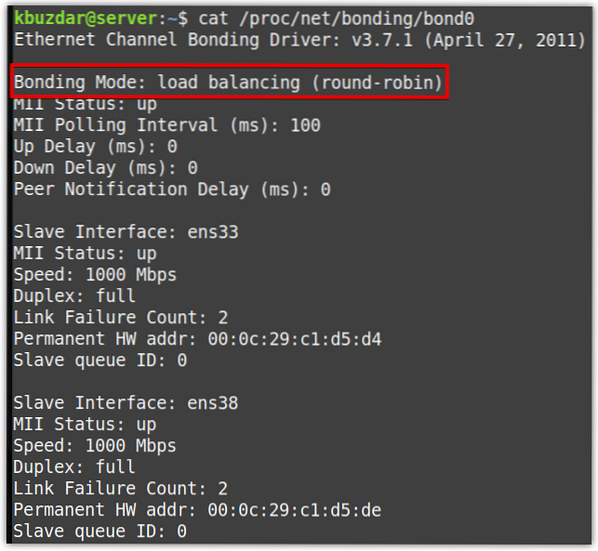
$ cat /proc/net/bonding/bond0In the below output, it is clear that the bond mode has changed to round-robin.
Attaching slave
To attach a new slave interface to an already existing bond, use the following syntax:
$ sudo ifenslave -v bond interface_nameThe -v is used here for verbose output.
For instance, to add a new slave interface ens33 to an already existing bond0, the command would be:
$ sudo ifenslave -v bond0 ens33
Detaching slave
To detach a slave interface from a bond, use the -d option as follows:
$ sudo ifenslave -v bond interface_nameThe -v is used here for verbose output.
For instance, to detach a slave interface ens33 from bond0, the command would be:
$ sudo ifenslave -d -v bond0 ens33
Delete Bonding
To delete bonding, edit the /etc/network.interfaces file, and remove the configurations related to bonding. Leave only the interfaces configuration like this:
auto ens33iface ens33 inet dhcp
auto ens38
iface ens38 inet dhcp
Then save and close the interfaces configurations file.
Now remove the bonding with the below command:
$ sudo rmmod bondingThen restart networking service:
$ sudo systemctl restart networking.serviceThat is all there is to it! In this article, first, we have shown how to set up a network bridge to share the internet connection with other systems. Then we have shown how to modify the bridges by adding or removing an interface from the bridge. Next, we have shown how to setup network bonds to have increased throughput, high availability, and failover. Then we have shown how to modify a bond by changing its active slaves, attaching/detaching slaves, and changing bonding modes. We have also shown how to delete the bridges and bonds in case you no longer need them.

