Squid proxy is a web proxy application that can be installed and set up on Linux and other Unix-like operating systems. It is used to increase web browsing speed by caching the website's data, controlling web traffic, security, and DNS lookups. The squid proxy server acts as an intermediate between the client (web browsers, etc.) and the internet. It is compatible with web protocols HTTP and HTTPS, as well as other protocols like FTP, WAIS, etc.
How to Install Squid Proxy?
To install squid proxy on Linux, first, update the system packages by executing the following command:
[email protected]:~$ sudo apt updateOnce you have updated your system, you can install squid proxy by typing this command:
[email protected]:~$ sudo apt -y install squidSquid proxy will be installed. To start and see the status of Squid proxy, execute these commands:
[email protected]:~$ sudo service squid start[email protected]:~$ sudo service squid status
Configuration for Your Web Browser
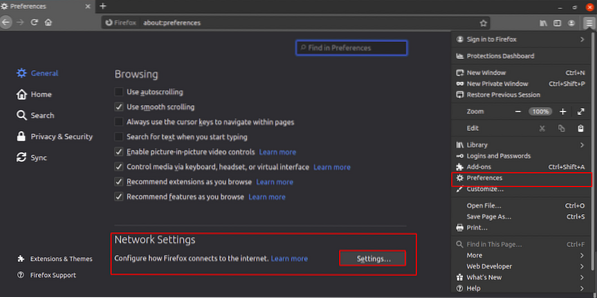
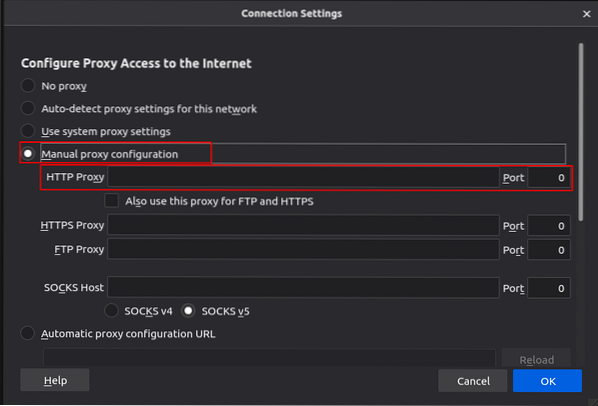
Before you make any changes to the squid configuration file, you have to change some settings in your web browser. So, open your web browser and open “network settings”, then proceed to “proxy settings”. Click on the “manual proxy” configuration, then write the IP_Address of your squid proxy server in the HTTP proxy bar and port no (by default, squid proxy port is 3128). Now, the squid proxy will go through your IP_Address. You can check it by typing any URL in your web browser; it will give you an error saying access denied, and to allow the access, we have to make changes in the squid configuration file.
Squid Proxy Configuration
You can access the squid configuration file in the directory “etc/squid/squid.conf”.
[email protected]:~$ cd etc/squid/squid.confMake a copy of the “squid.conf” file as a backup file if we want to make changes to the “squid.conf” file.
[email protected]:~$ cp etc/squid/squid.conf etc/squid/backup.confNow that a copy has been made as a backup file, we can make changes in the “squid.conf” file.
To open “squid.conf” file in vim, type this command:
[email protected]:~$ sudo vim /etc/squid/squid.confGo to the line http_access deny all.
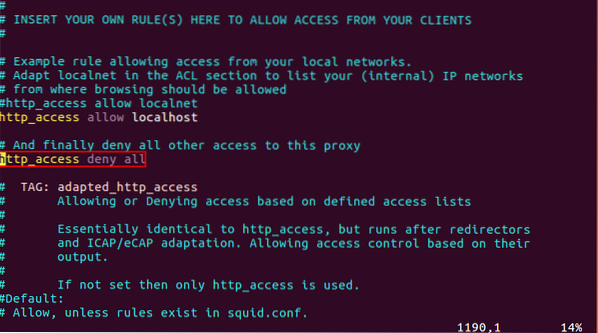
Change it to:
http_access allow all
Now, check your web browser again, type any URL, and it should be working.
ACL (Access Control List)
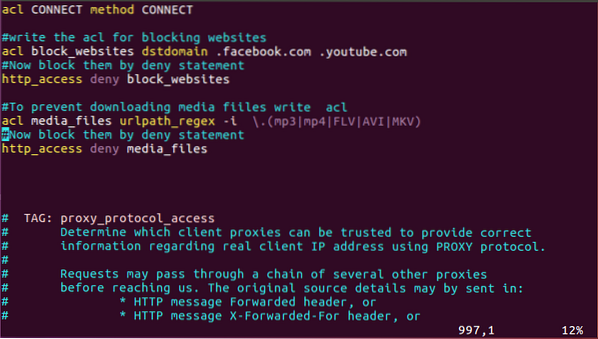
There is another case used in squid proxy that allows you to also control the access to different websites (web traffic) by either allowing or blocking them. To do so, go to the line “acl CONNECT method CONNECT”.

And below this line, write the ACL (access control list) to block the websites you want.
acl block_websites dstdomain .facebook.com .youtube.com .etc.com
Then deny the statement.
http_access deny block_websites

Save the changes, and to check whether your blocked websites are blocked or not, restart your squid service and verify the URL in your web browser.
[email protected]:~$ sudo service squid restartYou can also block a user from downloading specific files like audio and video files using ACL.
acl media_files urlpath_regex -i \.(mp3|mp4|FLV|AVI|MKV)
It will prevent the user from downloading audio or video files with extensions like mp3, mp4, FLV, etc. Add any file extension you want to prevent from downloading. Now, below this line, write the deny statement.
http_access deny media_files
The media files will then be blocked from downloading.
Caching Web Pages
Proxy servers are also used for boosting the network performance by loading the web page faster by caching the website's data. You can also change the directory location where cached data should be stored. Moreover, you can also change the cache file size and no. of directories in which data would be saved.
To make changes, open “squid.conf” file and go to the following line:
#chache_dir ufs /opt/squid/var/cache/squid 100 16 256
This line will be commented by default, so uncomment this line by removing the # sign.
In the above line, there is a phrase “100 16 256”. The 100 shows the size of the cache file, and you may change it to any size like 300. 16 shows the number of directories in which the cache file is saved. 256 shows the no. of subdirectories.
chache_dir ufs /opt/squid/var/cache/squid 300 20 260
You can also change the size of the cache file by adding the following line in the “squid.conf” file:
cache_mem 300 MB
If you want to change the path of the cache file directory, type the following command:
[email protected]:~$ sudo mkdir -p /path/where/you/want/to/place/fileTo change the ownership of the cache directory to squid proxy, you have to execute this command:
[email protected]:~$ sudo chown -R proxy:proxy /path/where/you/want /to/place/fileNow, stop the squid service using this command:
[email protected]:~$ sudo service squid stopAnd then run the command with this command:
[email protected]:~$ sudo squid -zIt will make the missing cache directories in the new cache directory.
Now, start the squid service again using the command below:
[email protected]:~$ sudo service squid startConclusion
We have discussed how to install and configure Squid proxy. It is very simple and easy to use and has vast applications. Squid proxy is a very good tool that can be used in organizations or by small internet service providers to control web traffic and internet access. It boosts web browsing speed and provides security mechanisms for web traffic.


