
Kubernetes is an open-source system used for automating deployment, scaling, and management of containerized applications. It's also called K8s which is a short abbreviation comes by replacing the remaining eight letters “ubernete” with 8.
Installing Kubernetes on Ubuntu
In this tutorial, we are going to show you how to install Kubernetes and configure it on the Ubuntu system. For this tutorial you will need two Ubuntu nodes (machines) with the following minimum configurations:
- Node 1: Will be a master node (CPU of 2 Cores, 2 GB RAM).
- Node 2: Will be a slave node (CPU of 1 Core, 1GB RAM).
Before starting the installation process, you will need to ensure that your machine is updated. You can use the following commands:
sudo apt-get updatesudo apt-get upgradesudo apt-get dist-upgradeSet hostname for your Nodes
Step 1. On your master node, use the following command:
sudo hostnamectl set-hostname kubernetes-masterStep 2. On your slave node, use the following command:
sudo hostnamectl set-hostname kubernetes-slaveIt's highly recommended for both the nodes to have an accurate time and date to get valid TLS certificates.
Docker Installation
Perform the following steps on Master as well as slave.
Step 1. Install Docker using the following command.
sudo apt install docker.ioStep 2. Verify your installation you can use:
docker --version
Step 3. By default, the docker service is not enabled. So, once the installation completes successfully, execute the following command on both nodes to enable the docker service.
sudo systemctl enable docker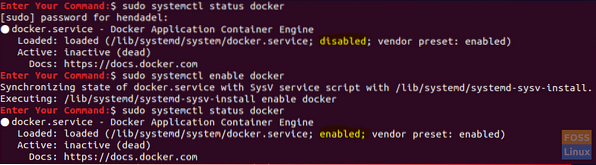
Kubernetes Installation
Perform the following steps on Master as well as slave.
Step 1. Install curl package using the next command.
sudo apt install curlStep 2. Add the Kubernetes signing key.
curl -s https://packages.cloud.google.com/apt/doc/apt-key.gpg | sudo apt-key add
Step 3. Add the Kubernetes repository.
sudo apt-add-repository "deb http://apt.kubernetes.io/ kubernetes-xenial main"Note that at the time of writing this tutorial only the Xenial Kubernetes repository is available so it will be the one we will use for our installation.
Step 4. Verify your installation, use the command:
kubeadm version
Step 5. Before installing Kubernetes, make sure that your system is not using the swap memory because Kubernetes will refuse to operate if your Ubuntu is using the swap memory.
Disable the swap memory:
sudo swapoff -aStep 6. Install Kubernetes.
sudo apt install kubeadmKubernetes Master Server Initialization
Step 1. On your master node, use the next command to initialize the Kubernetes master node.
sudo kubeadm init --pod-network-cidr=10.244.0.0/16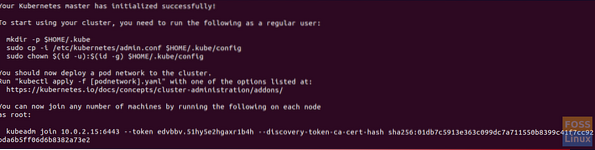
Take a copy from the last line “kubeadm join 10.0.2.15:6443 -token edvbbv.51hy5e2hgaxr1b4h -discovery-token-ca-cert-hash sha256:01db7c5913e363c099dc7a711550b8399c41f7cc92bda6b5ff06d6b8382a73e2” in the previous screenshot as we will be using it in the slave node to make it join the cluster.
Step 2. Also, as per the previous output its recommended to use the following commands to start using the Kubernetes cluster.
mkdir -p $HOME/.kubesudo cp -i /etc/kubernetes/admin.conf $HOME/.kube/configsudo chown $(id -u):$(id -g) $HOME/.kube/configPod Network Deployment
To enable communication between cluster nodes, we have to deploy a pod network.
Step 1. On master node, use the following command to deploy a pod network.
kubectl apply -f https://raw.githubusercontent.com/coreos/flannel/master/Documentation/kube-flannel.yml

Step 2. On the master node, ensure that everything is up and running.
kubectl get pods --all-namespaces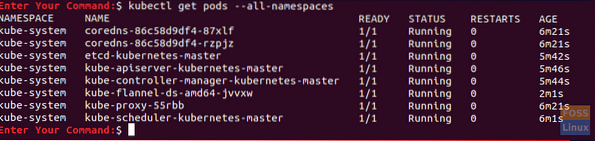
Join the Kubernetes Cluster
For now, everything should be ready for the master and slave nodes to join the Kubernetes Cluster.
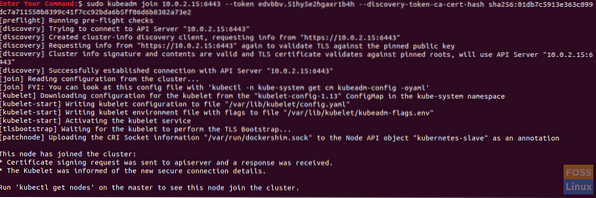
Step 1. On the slave node and to let the slave node join the cluster, use the command copied earlier from the output of Kubernetes initialization step, which should look something like this:
sudo kubeadm join 10.0.2.15:6443 --token edvbbv.51hy5e2hgaxr1b4h --discovery-token-ca-cert-hash sha256:01db7c5913e363c099dc7a711550b8399c41f7cc92bda6b5ff06d6b8382a73e2
Step 2. On the master node, check if the slave node has joined the cluster:
kubectl get nodesCongratulations, you just have created the Kubernetes cluster and everything should be ready to move on and deploy any service you need (like Apache container or Nginx server) to start using your cluster.
I hope you have enjoyed this tutorial and in case you have faced any difficulties during the installation leave a comment, and we will be glad to help you.


