How HTML form can be used to take data from the user, read the input values, and print the values in the browser using Django is shown in this tutorial.
Prerequisites:
You have to create a Django project before creating the Django form. To create a new Django project and go to the project folder, run the following commands:
$ django-admin startproject django_pro$ cd django_pro
To create necessary files and apply migrations for the project, run the following command:
$ python3 manage.py migrateTo check if the Django server is working properly or not, run the following command:
$ python3 manage.py runserverTo create the formapp under django_pro project, run the following command:
$ python3 manage.py startapp formappCreate HTML Form Using Django:
Open the views.py file that is inside formapp folder and modify its content with the following content. The following script will check whether the form is submitted or not. If the form is submitted then the value of the request.method will be POST and request.POST.get() method is used to read its submitted values. The is_valid() function will check whether the data of the form is valid or not. If this function returns true, then a success message with the valid user's data will be printed in the browser, otherwise, the error message that appears on the particular field of the form will be displayed. Other than that, the render() method is used to load the form in the browser and HttpResponse() method is used to send the response from the server to the browser after submitting the form.
# Import necessary modulesfrom django.shortcuts import render
from formapp.forms import StudentForm
from django.http import HttpResponse
def form_request(request):
# Check the form is submitted or not
if request.method == 'POST':
student = StudentForm(request.POST)
# Check the form data are valid or not
if student.is_valid():
# Read the submitted values
name = request.POST.get("name")
email = request.POST.get("email")
username = request.POST.get("username")
# Merge the values
data = ['Your registration is completed successfully.
', 'Name:', name, '
', 'Email:', email, '
', 'Username:', username]
# Return the form values as response
return HttpResponse(data)
else:
# Display the html form
student = StudentForm()
return render(request, "form.html", 'form': student)
Create forms.py inside the formapp folder and add the following content. The following script will create a form of four fields. The name field is defined to take the character data and it can be 40 characters long. The email field is defined to take any valid email address using the character data and it can be 50 characters long. The username field is defined to take the character data, and it can be 20 characters long. The password field is defined to take the character data and it can be a minimum of 10 characters and a maximum of 20 characters long. The forms.PasswordInput widget is used for the password field to hide the content of the password field.
# Import form modulesfrom django import forms
# Create class to define the form fields
class StudentForm(forms.Form):
name = forms.CharField(label="Full name", max_length=40)
email = forms.EmailField(label="Email", max_length=50)
username = forms.CharField(label="Username", max_length=20)
password = forms.CharField(label="Password", min_length=10, max_length=20, widget=forms.PasswordInput)
Create a folder named templates inside the formapp folder. Go to the TEMPLATES section of the settings.py file and set the location of the template folder for the DIRS property.
settings.py
TEMPLATES = ['DIRS': ['/home/fahmida/django_pro/formapp/templates']
,
]
Create form.html inside the template folder with the following content.
% csrf_token % is used in the HTML script to prevent CSRF(Cross-Site Request Forgeries) attacks. form.as_p will load the Django form that is designed by the forms.py file. When the Submit button is pressed, the form data will be submitted to the server.
Open the urls.py from the django_pro folder and modify the content with the following content.
Here, the 'register/' path is used to load the form in the browser.
# Import necessary modulesfrom django.urls import path
from formapp import views
# Call method to display the form
urlpatterns = [
path('register/', views.form_request)
]
Open any browser and type the following URL to load the user registration form in the browser.
http://localhost:8000/register
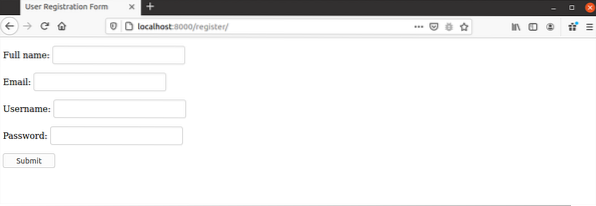
The following output will appear after running the URL. The validation for the empty field, the maximum length value of name, email, and password fields, and the minimum and maximum length values of the password field will be checked after submitting the form.

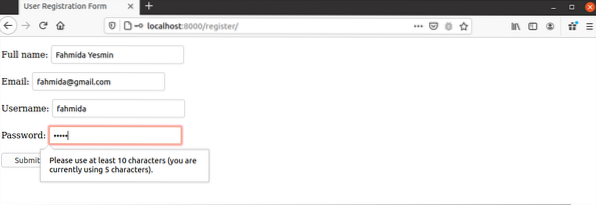
The following output shows that the password field is invalid. According to the form, the length of the password value must be within 10 to 20 characters. 5 characters have been given as input in the following form. For this, the form is showing the error message.

After entering the valid output in every field of the form, the following output will appear.

Conclusion:
The way of creating a very simple user registration form in the Django application has been shown in this tutorial. Django has many methods for creating different types of fields of the form, such as CharField(), EmailField(), TextFiled, etc. The form validation task becomes very easier when the form is designed by Django form.
 Phenquestions


