Create a Simple PyQt Application for Addition:
The steps of implementing a simple PyQt application to calculate the sum of two numbers are shown in this section of the tutorial. Here, the number values will be taken from the user using textboxes, after executing the script, then the sum of the values will be displayed after clicking a button. A window with the necessary fields has been created here to build the design of the application; next, the Python script is used to calculate the sum.
Steps:
Step 1. Create PyQt application object
You have to import the required modules of Python to design the PyQt application of this tutorial. To design this application, it will require two labels, two text boxes, and a push-button.
QApplication, QMainWindow, QLabel, QTextEdit, and QPushButton modules will be required to design the application.
Add the following lines at the beginning of the script to use these modules.
# Import necessary modulesfrom PyQt5.QtWidgets import QApplication, QMainWindow, QLabel, QTextEdit, QPushButton
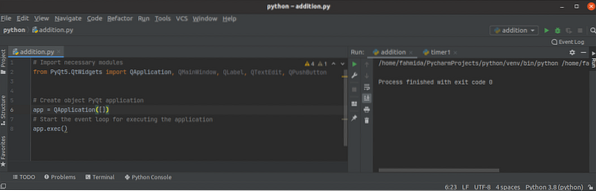
Add the following lines to create the application object and start the event loop. Nothing will appear after executing the script now.
# Create object PyQt applicationapp = QApplication([])
# Start the event loop for executing the application
app.exec()
Step 2: Create class and window object
Create the class to add the necessary objects in this step to design the application window.
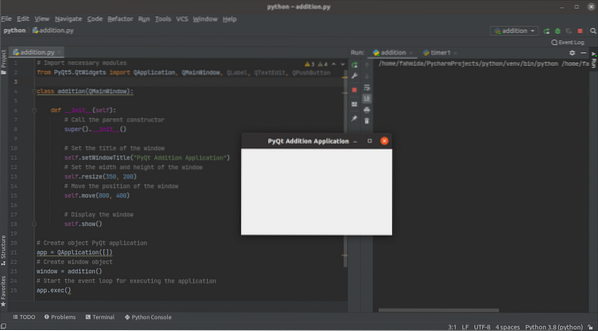
Add the following lines to create a class with a window object. Here, the title, size, and position of the window are set. Next, the show() method is called to display the window as output.
class addition(QMainWindow):def __init__(self):
# Call the parent constructor
super().__init__()
# Set the title of the window
self.setWindowTitle("PyQt Addition Application")
# Set the width and height of the window
self.resize(350, 200)
# Move the position of the window
self.move(800, 400)
# Display the window
self.show()
You have to create the object of the class before running the event loop.
# Create window objectwindow = addition()
The following blank window will appear after executing the script.
Step 3: Add necessary widgets in the window for addition
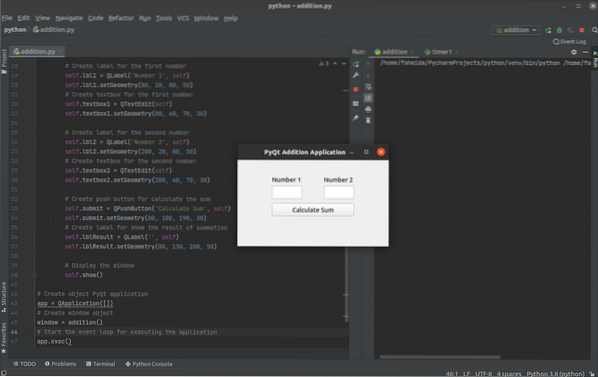
Now, add the necessary objects required to implement the application. The three objects of the QLabel widget, two objects of the QTextEdit widget, and a button object of the QPushButton widget are created in this step. The first two label objects will be used to provide the helping text before the textboxes. QTextEdit objects will be used to take two number values from the user. QPushButton object will be created to calculate the sum of the input numbers using an event handler function that will be created in the next step. The last label object will be used to display the summation of the two numbers. Here, the setGeometry() function is called for every object to set the position of the object in the window.
# Create label for the first numberself.lbl1 = QLabel('Number 1', self)
self.lbl1.setGeometry(80, 20, 80, 50)
# Create textbox for the first number
self.textbox1 = QTextEdit(self)
self.textbox1.setGeometry(80, 60, 70, 30)
# Create label for the second number
self.lbl2 = QLabel('Number 2', self)
self.lbl2.setGeometry(200, 20, 80, 50)
# Create textbox for the second number
self.textbox2 = QTextEdit(self)
self.textbox2.setGeometry(200, 60, 70, 30)
# Create push button for calculate the sum
self.submit = QPushButton('Calculate Sum', self)
self.submit.setGeometry(80, 100, 190, 30)
# Create label for show the result of summation
self.lblResult = QLabel(", self)
self.lblResult.setGeometry(80, 130, 200, 50)
The following output will appear after executing the script. No event handler function is created in this step, which is used to calculate the sum of the numbers. So, if the user clicks the button, nothing will happen.
Step 4: Create and call the function to handle the click event of the button
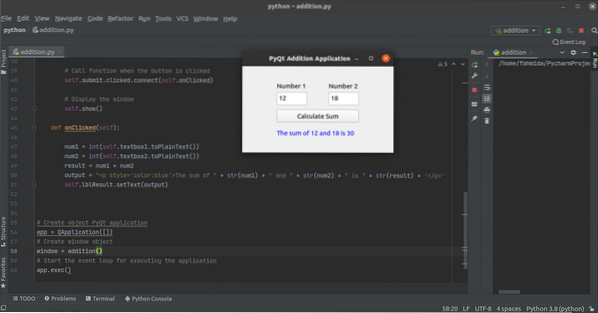
Create a method named onClicked() with the following lines inside the addition class to handle the click event of the button. The values of the textboxes are converted into integer numbers using the int() function and stored into the num1 and num2 variables. Next, the sum of num1 and num2 are stored in the result variable. The values of num1, num2, and result variables are converted into string values using the str() function, before storing the values in the output variable. The third label object is used to display the content of the output variable.
def onClicked(self):num1 = int(self.textbox1.toPlainText())
num2 = int(self.textbox2.toPlainText())
result = num1 + num2
output = "
The sum of " + str(num1) + " and " + str(num2) + " is " + str(result) + '
'self.lblResult.setText(output)
Add the following lines in the class after the button object to call onClicked() method when the button will be clicked.
# Call function when the button is clickedself.submit.clicked.connect(self.onClicked)
After executing the script, if the user entered 12 and 18 in the textboxes and clicked on the Calculate Sum button, and the following formatted output will appear below the button.
Conclusion:
The implementation of a very simple PyQt application has been explained in this tutorial starting from the basic to help the new Python users. Hopefully, the user will be able to design and create a simple PyQt application after completing and understanding the steps of this tutorial properly.


